When automating Google Sheets with Apps Script, two triggers are often confused: onEdit and onChange. They behave differently, and this short guide summarizes what actually triggers each one.
What triggers each event
Action in the spreadsheet
onEdit
onChange
Edit a cell value
✔️
✔️
Insert a row or column
❌
✔️
Delete a row or column
❌
✔️
Change background color or font
❌
✔️
Create or delete a sheet
❌
✔️
Move a column or row with data
✔️
✔️
Move a column or row without data
❌
✔️
Key idea
onEdit reacts to data edits inside cells.
onChange reacts to structural changes in the spreadsheet.
This means that formatting changes, sheet structure modifications, or column insertions will not trigger onEdit, but will trigger onChange.
Comparing the event objects
Another major difference is the object passed to the function.
Example: onEdit(e)
onEdit provides detailed information about the edited range.
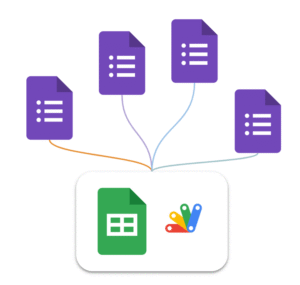
When working with Google Forms + Google Sheets, a common setup is to connect several forms to the same spreadsheet. Each form creates its own response sheet automatically.
This works well at first. But as soon as you want to automate workflows with Google Apps Script, things become messy.
Typical situations:
You have multiple forms for different processes (client onboarding, support requests, event registrations, etc.)
Each form writes responses into a different sheet of the same spreadsheet
You want to trigger different automation logic depending on the form
The issue is that the Form Submit trigger in Google Sheets does not allow you to specify a different function depending on which form submitted the response.
The approach I use is to create one global trigger function that runs whenever a form submission occurs. This function then routes the event to the appropriate handler, based on the sheet that received the response.
A Single Dispatcher Trigger
The e object returned by the trigger provides the context of the event. From it, we can retrieve the range that triggered the execution, then access the sheet, and finally obtain the sheet name using function chaining.
const sheetName = e.range.getSheet().getName();
From there, we can decide which process should handle the submission.
Here is an example which can be easily
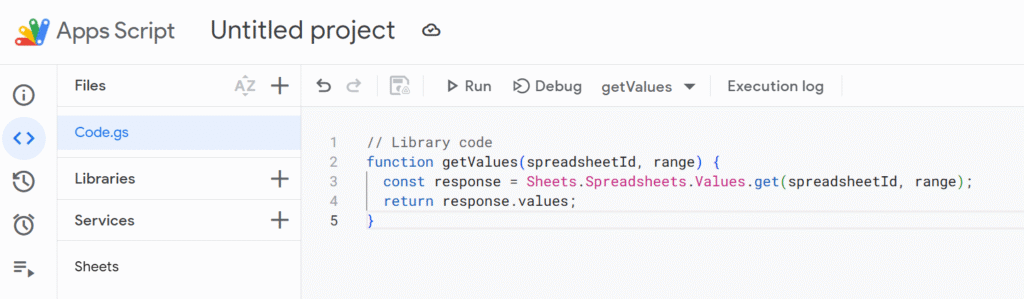
function Main_FormDispatcher(e) {

  // Get sheet name to retrieve what form was submitted
  const sheetName = e.range.getSheet().getName();

  Logger.log(`Form response received from sheet: ${sheetName}`);

  // Dispatch event
  if (sheetName === "Client Intake Responses") {
    processClientIntake(e);
  } else if (sheetName === "Bug Report Responses") {
    processBugReport(e);
  } else if (sheetName === "Newsletter Signup Responses") {
    processNewsletterSignup(e);
  } else {
    Logger.log(`Unknown form sheet detected: ${sheetName}`);
  }
}
If you regularly build Google Workspace automations, structuring your scripts around dispatcher functions like this one will save you a lot of time and complexity later.
One of the biggest strengths of Google Apps Script is how easily it interacts with other Google products. Reading a Google Sheet, creating a Drive file, or updating a document requires almost no setup. You don’t have to think about authentication, token management, or security flows. Google automatically prompts the required scopes and takes care of the authorization for you.
This convenience can make OAuth feel invisible, even unnecessary. Until the day your script needs to talk to something outside Google.
This article takes a step back to explain what OAuth and OAuth 2.0 actually are, why Apps Script usually hides them from you, and what changes when you integrate external services. We’ll also look at how the OAuth2 library fits into the picture when built-in authorization is no longer enough.
OAuth in simple terms
OAuth 2.0 allows an application to access a user’s data without ever handling their password. Instead of sharing credentials, the user approves a limited set of permissions, and the service issues a token representing what the application is allowed to do and for how long.
In an OAuth flow, the user authenticates directly with the service that owns the data. Once consent is given, the service provides a token to the application. From that point on, the application uses this token to make requests, and the service validates it before allowing access. The application never sees the user’s credentials.
OAuth 2.0 is an evolution of the original OAuth concept. It formalizes this permission model using short-lived access tokens and refresh tokens, making integrations more secure, easier to revoke, and better suited to modern applications. Today, when we talk about OAuth, we almost always mean OAuth 2.0.
OAuth in Apps Script
When an Apps Script project interacts only with Google products, OAuth is handled entirely by the platform. Permissions are inferred from the services you use, Google displays the consent screen, and tokens are stored and refreshed automatically. In this context, we don’t really htink about OAuth at all.
You can see the project scopes in the information panel
This changes as soon as your script needs to communicate with a service outside Google.
Most external APIs rely on OAuth 2.0, which means your script must explicitly request user consent, obtain access tokens, refresh them when they expire, and attach them to API requests. At this point, OAuth is no longer automatic and becomes part of your implementation.
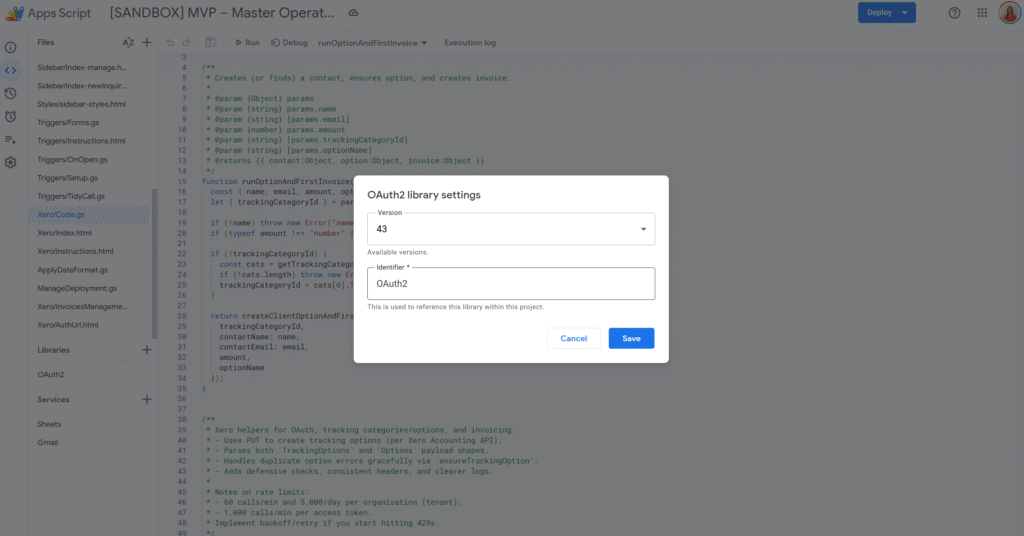
To make this manageable, Apps Script relies on a community OAuth2 library. The library implements the OAuth 2.0 protocol for you, handling redirects, callbacks, token exchanges, storage, and refresh logic. You configure it once, then reuse it whenever your script needs to authenticate with the external API.
How the OAuth2 library works in Apps Script
The OAuth2 library revolves around the idea of a service. A service represents a configured OAuth connection to an external provider. It contains everything needed to authenticate with that API:
Authorization URL This is the endpoint where the user is redirected to grant consent. It displays the provider’s login and consent screen and is the entry point of the OAuth flow.
Token endpoint This endpoint is used after consent is granted. It exchanges the authorization code for an access token (and usually a refresh token), and is also used later to refresh expired access tokens.
Client credentials (Client ID and Client Secret) These identify your Apps Script project to the OAuth provider. They are issued when you register your application and allow the provider to trust who is requesting tokens.
Requested scopes Scopes define what the application is allowed to do. They limit access to specific actions or resources and are shown to the user on the consent screen.
Callback function This is the function Apps Script calls after the provider redirects back to your project. It completes the OAuth flow by handing the response to the library, which then retrieves and stores the tokens.
Property store This defines where access and refresh tokens are persisted. The service uses PropertiesService to store tokens so the user does not need to re-authorize on every execution.
In short, the service is the OAuth contract between Apps Script and an external provider. Once configured, your code no longer deals with OAuth mechanics directly, it simply asks the service for a valid access token and makes API requests.
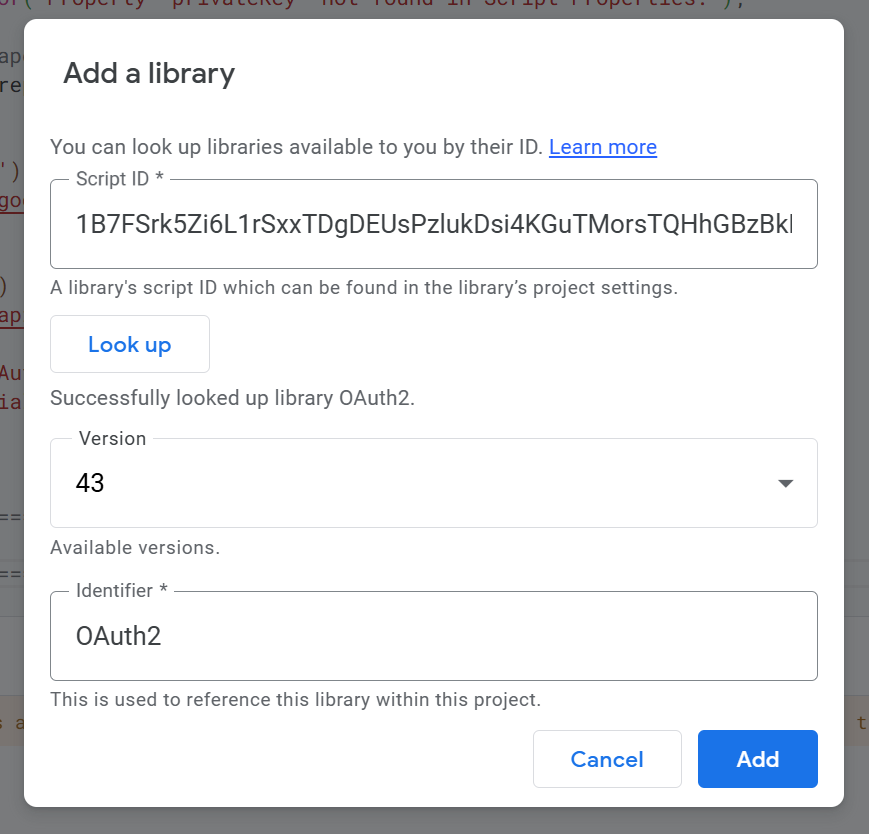
A short example
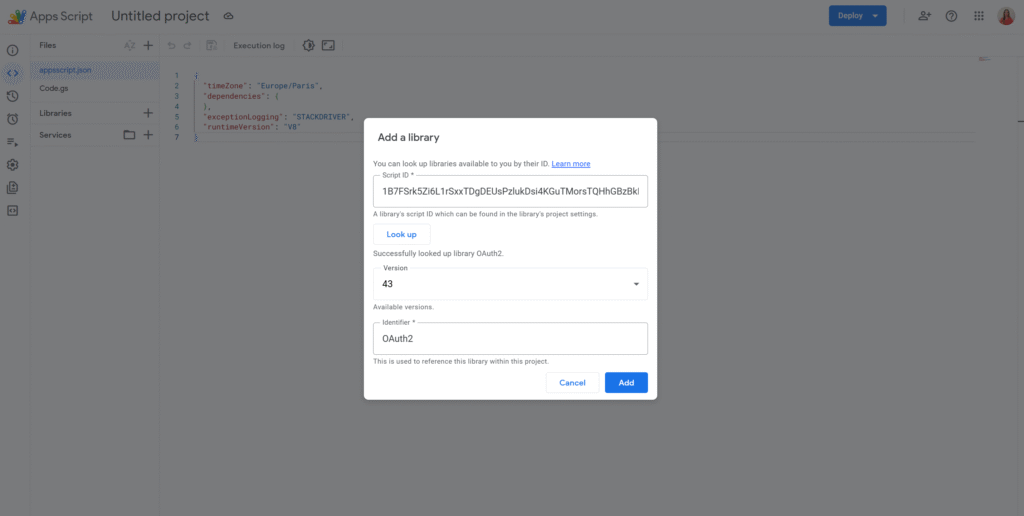
The first step is to add the OAuth2 library to your Apps Script project. This can be done by searching for the library using its script ID:
/**
 * Creates and returns the OAuth2 service.
 * @returns {OAuth2.Service}
 */
function getService_() {
  return OAuth2.createService('MyApi')

    // Authorization and token endpoints provided by the API
    .setAuthorizationBaseUrl('https://example.com/oauth/authorize')
    .setTokenUrl('https://example.com/oauth/token')

    // Credentials issued by the provider
    .setClientId('YOUR_CLIENT_ID')
    .setClientSecret('YOUR_CLIENT_SECRET')

    // Callback function called after user consent
    .setCallbackFunction('authCallback')

    // Where tokens are stored
    .setPropertyStore(PropertiesService.getUserProperties())

    // Permissions requested
    .setScope('read write');
}
Apps Script cannot redirect automatically, so you typically show the authorization URL as a link.
/**
 * Shows an authorization link if access is missing.
 */
function authorize() {
  const service = getService_();

  if (!service.hasAccess()) {
    const url = service.getAuthorizationUrl();
    Logger.log('Authorize this app by visiting: %s', url);
  }
}
This function is called by Apps Script when the provider redirects back after consent.
Once authorized, the library automatically returns a valid token and refreshes it if needed.
/**
 * Makes an authenticated API request.
 */
function callApi() {
  const service = getService_();

  if (!service.hasAccess()) {
    throw new Error('Service not authorized');
  }

  const response = UrlFetchApp.fetch('https://example.com/api/data', {
    headers: {
      Authorization: 'Bearer ' + service.getAccessToken()
    }
  });

  Logger.log(response.getContentText());
}
Conclusion
OAuth can feel complex at first, but in practice it follows a simple idea: allowing an application to act on behalf of a user without ever handling their credentials. In Google Apps Script, this complexity is often hidden when working with Google services, which is why OAuth can go unnoticed for a long time.
As soon as you integrate an external API, OAuth becomes explicit. The OAuth2 library provides a structured and reliable way to handle authorization, token storage, and refresh logic, without forcing you to reimplement the OAuth 2.0 protocol yourself. Once the service is configured, the rest of your code can focus purely on business logic and API interactions.
To go further, see the follow-up article with a complete OAuth2 implementation in Apps Script using Xero.
If you use Xero and Google Sheets on a daily basis, this automation tutorial is for you. In this post, you’ll learn how to automatically sync your Xero bills into a Google Sheet on a schedule, so your spending table stays up to date without copy-pasting.
We’ll build it in a production-friendly way: OAuth2 authorization (so Xero can securely grant access), safe credential storage in Apps Script, a sync function that writes into your sheet, and refresh tokens (via offline_access) so the automation keeps running long-term.
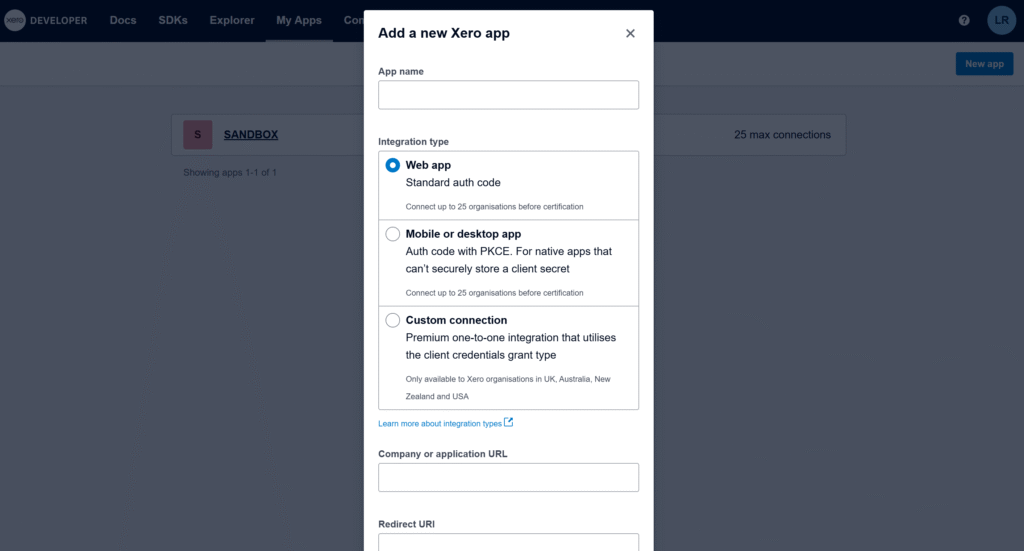
Create a Xero OAuth2 app
Create a Xero OAuth2 app in the Xero Developer portal and choose the web app / Standard auth code type (the standard flow Xero documents for third-party apps).The standard authorization code flow
The most important field is Redirect URI. Xero requires an exact, absolute redirect URI (no wildcards), so we will need the exact callback URL generated by your Apps Script project. Xero API – OAuth 2.0
Get a temporary redirect URI to create the app
In Apps Script, the OAuth2 library can generate the exact redirect URI for this project. Run the function below, copy the URL from the logs, and paste it into your Xero app settings to finish creating the app.
/**
 * Logs the Redirect URI you must paste into your Xero app settings.
 * This does NOT require Client ID/Secret.
 *
 * @returns {void}
 */
function logXeroRedirectUri() {
  const service = OAuth2.createService('Xero')
    .setCallbackFunction('xeroAuthCallback');
  Logger.log(service.getRedirectUri());
}

/**
 * OAuth callback endpoint (stub is fine for this step).
 * @param {Object} e
 * @returns {GoogleAppsScript.HTML.HtmlOutput}
 */
function xeroAuthCallback(e) {
  return HtmlService.createHtmlOutput('Callback ready.');
}
The Apps Script OAuth2 library is the standard way to handle OAuth consent and token refresh in Apps Script. (Link to the setup guide here).
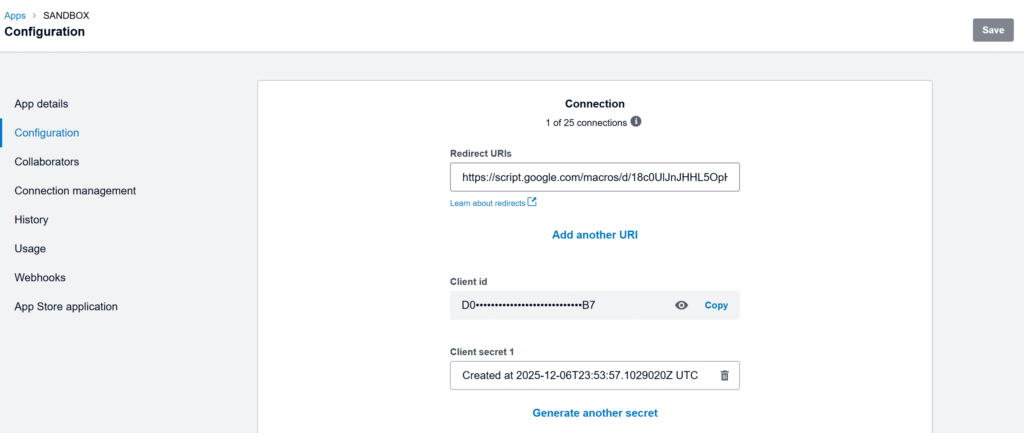
Get and store Client ID / Client Secret in Script Properties
Once the app is created, copy the Client ID and Client Secret. You’ll need them in Apps Script to complete the OAuth flow.
Store only the Client ID and Client Secret in Script Properties. OAuth tokens are user-specific, so we store them in User Properties via the OAuth2 library’s property store.
Replace the temporary callback with the real OAuth service + callback
Now that we have Client ID/Secret stored, we can build the real OAuth service and the real callback that stores tokens.
Important: tokens are user-specific, so we store them in User Properties via .setPropertyStore(PropertiesService.getUserProperties()).
Let’s replace the previous xeroAuthCallback() with this version:
/**
 * Creates and returns the OAuth2 service configured for Xero.
 * Client ID/Secret are in Script Properties; OAuth tokens are stored per-user in User Properties.
 *
 * @returns {OAuth2.Service}
 */
function getXeroService_() {
  const { clientId, clientSecret } = getXeroCredentials_();

  return OAuth2.createService('Xero')
    .setAuthorizationBaseUrl('https://login.xero.com/identity/connect/authorize')
    .setTokenUrl('https://identity.xero.com/connect/token')
    .setClientId(clientId)
    .setClientSecret(clientSecret)
    .setCallbackFunction('xeroAuthCallback')
    .setPropertyStore(PropertiesService.getUserProperties())
    .setCache(CacheService.getUserCache())
    .setLock(LockService.getUserLock())
    .setScope([
      'openid',
      'profile',
      'email',
      'offline_access',
      'accounting.transactions',
    ].join(' '))
    .setTokenHeaders({
      Authorization: 'Basic ' + Utilities.base64Encode(`${clientId}:${clientSecret}`),
    });
}

/**
 * OAuth callback endpoint called by Xero after consent.
 * This stores the access token + refresh token in the OAuth2 property store.
 *
 * @param {Object} e
 * @returns {GoogleAppsScript.HTML.HtmlOutput}
 */
function xeroAuthCallback(e) {
  const service = getXeroService_();
  const ok = service.handleCallback(e);
  return HtmlService.createHtmlOutput(ok ? 'Success! You can close this tab.' : 'Denied');
}
Authorize once
This is a one-time consent step: generate the authorization URL, open it in your browser, click Allow, then Xero redirects back to xeroAuthCallback() to finalize the connection.
You must request offline_access to receive a refresh token. Xero Developer – Offline access Xero’s docs also note refresh tokens expire after a period (so if the integration stops running for too long, you may need to re-authorize).
/**
 * Returns the Xero consent screen URL. Open it and approve access.
 *
 * @returns {string}
 */
function getXeroAuthorizationUrl_() {
  const service = getXeroService_();
  return service.getAuthorizationUrl();
}

/**
 * Logs the authorization URL in Apps Script logs.
 *
 * @returns {void}
 */
function logXeroAuthorizationUrl_() {
  Logger.log(getXeroAuthorizationUrl_());
}
Run logXeroAuthorizationUrl_(), copy the logged URL, open it, and approve access. After that, your script can call Xero without prompting again.
Sync bills into Sheets (then add a trigger)
Xero is multi-tenant: first call the Connections endpoint to get a tenantId, then include xero-tenant-id in every API request. For incremental sync, use the If-Modified-Since header so each run only pulls bills modified since your last sync timestamp.
const XERO_API_BASE_ = 'https://api.xero.com/api.xro/2.0';
const XERO_BILLS_SHEET_ = 'Xero Bills';

/**
 * Resolves the active tenant ID from Xero connections.
 *
 * @param {OAuth2.Service} service
 * @returns {string}
 */
function getXeroTenantId_(service) {
  const res = UrlFetchApp.fetch('https://api.xero.com/connections', {
    method: 'get',
    headers: { Authorization: `Bearer ${service.getAccessToken()}` },
    muteHttpExceptions: true,
  });

  if (res.getResponseCode() !== 200) {
    throw new Error(`Failed to resolve tenant. ${res.getResponseCode()} — ${res.getContentText()}`);
  }

  const tenants = JSON.parse(res.getContentText());
  const tenantId = tenants?.[0]?.tenantId;
  if (!tenantId) throw new Error('No tenant connected to this token.');
  return tenantId;
}

/**
 * Performs a JSON request to Xero with common headers.
 *
 * @param {"get"|"post"|"put"|"delete"} method
 * @param {string} url
 * @param {Object|null} body
 * @param {{ ifModifiedSinceIso?: string }} [opts]
 * @returns {{code: number, text: string, json?: Object}}
 */
function xeroJsonRequest_(method, url, body, opts = {}) {
  const service = getXeroService_();
  if (!service.hasAccess()) throw new Error('Xero access not granted. Run the authorization flow first.');

  const tenantId = getXeroTenantId_(service);

  /** @type {GoogleAppsScript.URL_Fetch.URLFetchRequestOptions} */
  const options = {
    method,
    headers: {
      Authorization: `Bearer ${service.getAccessToken()}`,
      'xero-tenant-id': tenantId,
      Accept: 'application/json',
      ...(opts.ifModifiedSinceIso ? { 'If-Modified-Since': opts.ifModifiedSinceIso } : {}),
    },
    muteHttpExceptions: true,
  };

  if (body != null) {
    options.contentType = 'application/json';
    options.payload = JSON.stringify(body);
  }

  const res = UrlFetchApp.fetch(url, options);
  const code = res.getResponseCode();
  const text = res.getContentText();

  let json;
  try {
    json = text ? JSON.parse(text) : undefined;
  } catch (e) {}

  return { code, text, json };
}

/**
 * Returns ACCPAY invoices (bills) from Xero.
 *
 * @param {{ ifModifiedSinceIso?: string }} [params]
 * @returns {Array<Object>}
 */
function listBills_(params = {}) {
  const where = encodeURIComponent('Type=="ACCPAY"');
  const url = `${XERO_API_BASE_}/Invoices?where=${where}`;

  const { code, text, json } = xeroJsonRequest_('get', url, null, {
    ifModifiedSinceIso: params.ifModifiedSinceIso,
  });

  if (code !== 200) throw new Error(`Failed to list bills. ${code} — ${text}`);
  return /** @type {Array<Object>} */ (json?.Invoices || []);
}

/**
 * Upserts bills into a sheet using InvoiceID as the key.
 *
 * @param {SpreadsheetApp.Sheet} sheet
 * @param {Array<Object>} bills
 * @returns {void}
 */
function upsertBillsToSheet_(sheet, bills) {
  const headers = [
    'InvoiceID',
    'InvoiceNumber',
    'ContactName',
    'Status',
    'Date',
    'DueDate',
    'CurrencyCode',
    'Total',
    'AmountDue',
    'UpdatedDateUTC',
  ];

  const current = sheet.getDataRange().getValues();
  if (!current.length || current[0].join() !== headers.join()) {
    sheet.clear();
    sheet.getRange(1, 1, 1, headers.length).setValues([headers]);
  }

  const data = sheet.getDataRange().getValues();
  /** @type {Map<string, number>} */
  const rowById = new Map();

  for (let r = 2; r <= data.length; r++) {
    const id = String(data[r - 1][0] || '');
    if (id) rowById.set(id, r);
  }

  const rowsToAppend = [];

  bills.forEach(b => {
    const row = [
      b.InvoiceID || '',
      b.InvoiceNumber || '',
      b.Contact?.Name || '',
      b.Status || '',
      b.Date || '',
      b.DueDate || '',
      b.CurrencyCode || '',
      b.Total ?? '',
      b.AmountDue ?? '',
      b.UpdatedDateUTC || '',
    ];

    const invoiceId = String(b.InvoiceID || '');
    const existingRow = rowById.get(invoiceId);

    if (existingRow) {
      sheet.getRange(existingRow, 1, 1, headers.length).setValues([row]);
    } else {
      rowsToAppend.push(row);
    }
  });

  if (rowsToAppend.length) {
    sheet.getRange(sheet.getLastRow() + 1, 1, rowsToAppend.length, headers.length).setValues(rowsToAppend);
  }
}

/**
 * Main sync: pulls bills changed since last sync and writes them into Google Sheets.
 *
 * @returns {void}
 */
function syncXeroBillsToSheet() {
  const ss = SpreadsheetApp.getActiveSpreadsheet();
  const sheet = ss.getSheetByName(XERO_BILLS_SHEET_) || ss.insertSheet(XERO_BILLS_SHEET_);

  const props = PropertiesService.getScriptProperties();
  const lastSyncIso = props.getProperty(XERO_PROPS_.lastSyncIso) || '';

  const bills = listBills_({ ifModifiedSinceIso: lastSyncIso || undefined });
  upsertBillsToSheet_(sheet, bills);

  props.setProperty(XERO_PROPS_.lastSyncIso, new Date().toISOString());
}

/**
 * Creates an hourly time-driven trigger for syncXeroBillsToSheet().
 *
 * @returns {void}
 */
function installXeroBillsTrigger_() {
  ScriptApp.newTrigger('syncXeroBillsToSheet')
    .timeBased()
    .everyHours(1)
    .create();
}
A clean first run is: save credentials → run logXeroAuthorizationUrl_() and approve → run syncXeroBillsToSheet() once → run installXeroBillsTrigger_() to automate the sync.
You can now install a simple time-driven trigger on syncXeroBillsToSheet() to keep your spreadsheet up to date automatically. From here, it’s easy to adapt the same structure to pull other Xero data: switch from bills (ACCPAY) to sales invoices (ACCREC), filter only paid documents, or add extra columns depending on what you want to analyse.
Here are 10 Google Sheets tips I use in my day-to-day. You might recognise a few of them, but I’m pretty confident you’ll still learn something new!
Highlight an entire row based on a single cell
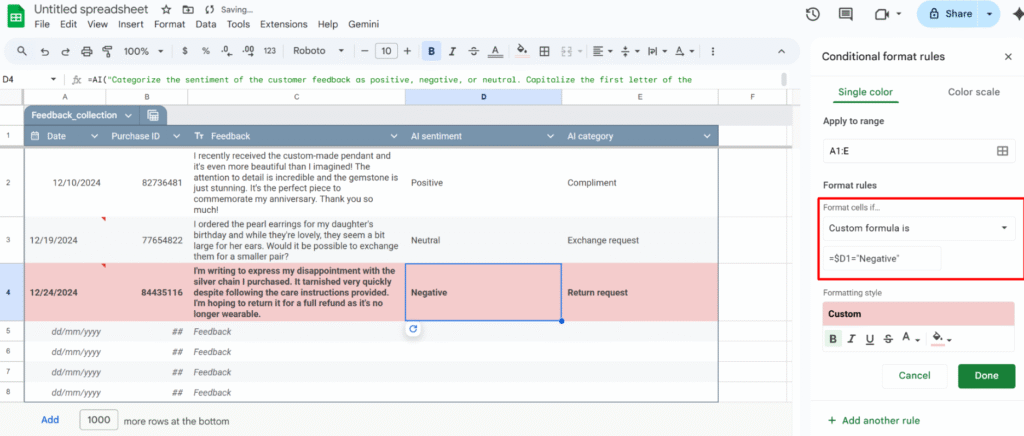
One of the most common questions: “I want the whole row to change color when the status is ‘Done’ / the date is today / the checkbox is ticked.”
Example: highlight every review row where column D is "Negative".
1 – Open Conditional format rules (Format > Conditional formatting)
2 – Select the range you want to format, e.g. A1:E1000.
3 – Under “Format rules”, choose “Custom formula is“
4 – Insert the formula:
=$D1="Negative"
5 – Choose your formatting style and click Done.
Because the range starts at row 1, the formula uses =$D1. If your range starts at row 2 (for example, you skipped the header row), you’d use:
=$D2="Negative"
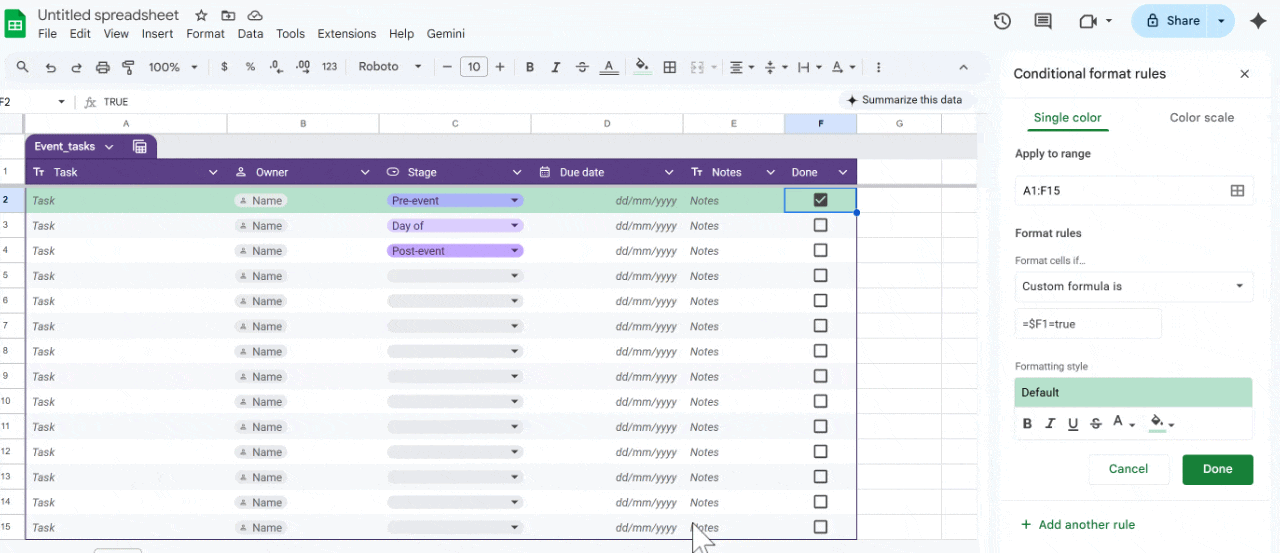
Use checkboxes to drive your formatting and logic
You can use checkboxes as a simple “on/off” switch to control formatting.
Example: highlight the entire row when the checkbox in column F is checked.
Format → Conditional formatting → Custom formula is:
Insert checkboxes in A1:F1000
Select the range to format, e.g. A1:F1000.
=$F1=true
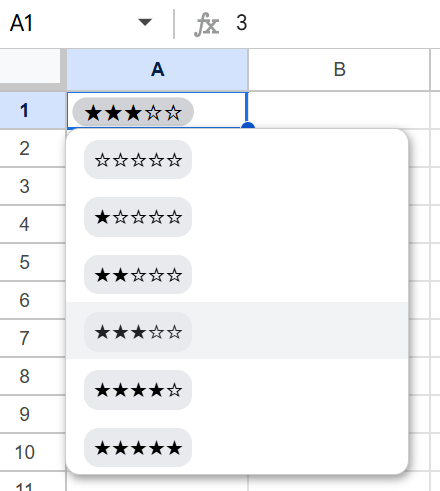
Turn ratings into a quick dropdown (@rating)
If you want fast feedback in a sheet (for tasks, clients, content, etc.), convert a column into a simple rating system.
With the Rating smart chip (@rating):
In a cell, type @rating and insert the Rating component.
It creates a small star-based rating widget you can click to set the score.
You now have:
A consistent rating scale across your sheet.
An easy way to scan what’s high/low rated at a glance.
A clean input that still behaves like a value you can reference in formulas or filters.
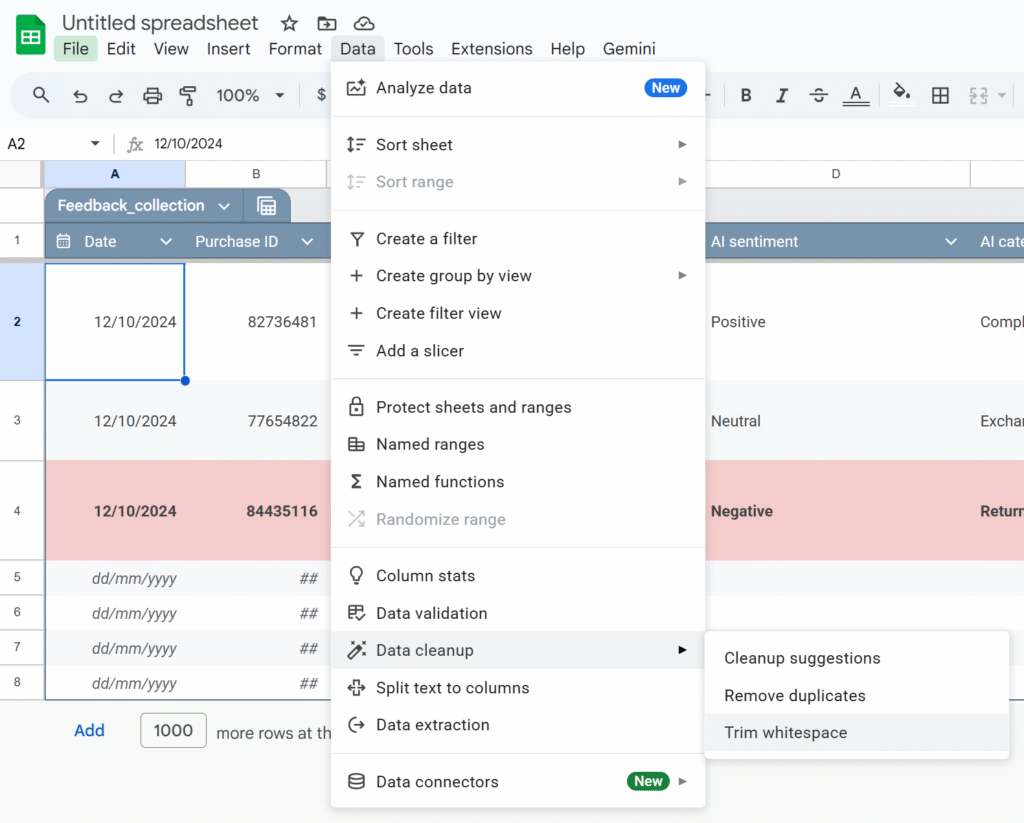
Use Data cleanup
Imported data is messy: extra spaces, duplicates, weird values. Google added built-in cleanup tools that are massively underused.
Cleanup suggestions: A sidebar proposes actions: remove duplicates, fix inconsistent capitalization, etc.
Remove duplicates: You choose the columns to check; Sheets shows how many duplicates it found and removes them.
Trim whitespace: This fixes issues where "ABC" and "ABC " look the same but don’t match in formulas.
Run these before you start building formulas. It saves a lot of debugging time later.
Stop dragging formulas: use ARRAYFORMULA
Common spreadsheet horror story: “My new rows don’t have the formula”, or “someone overwrote a formula with a value”.
ARRAYFORMULAlets you write the formula once and apply it to the whole column.
Example: instead of this in E2:
=B2*C2
and dragging it down, use:
=ARRAYFORMULA(
  IF(
    B2:B="",
    ,
    B2:B * C2:C
  )
)
This:
Applies the multiplication to every row where column B is not empty.
Automatically covers new rows as you add data.
Reduces the risk of someone “breaking” a single cell formula in the middle of your column.
Split CSV-style data into columns (without formulas)
If you’ve ever:
Pasted CSV data into column A,
Used =SPLIT() everywhere,
Then deleted column A manually…
You don’t have to.
Use Data → Split text to columns:
Paste the raw data into one column.
Select that column.
Go to Data → Split text to columns.
Choose the separator (comma, semicolon, space, custom, etc.).
Sheets automatically splits your data into multiple columns without formulas.
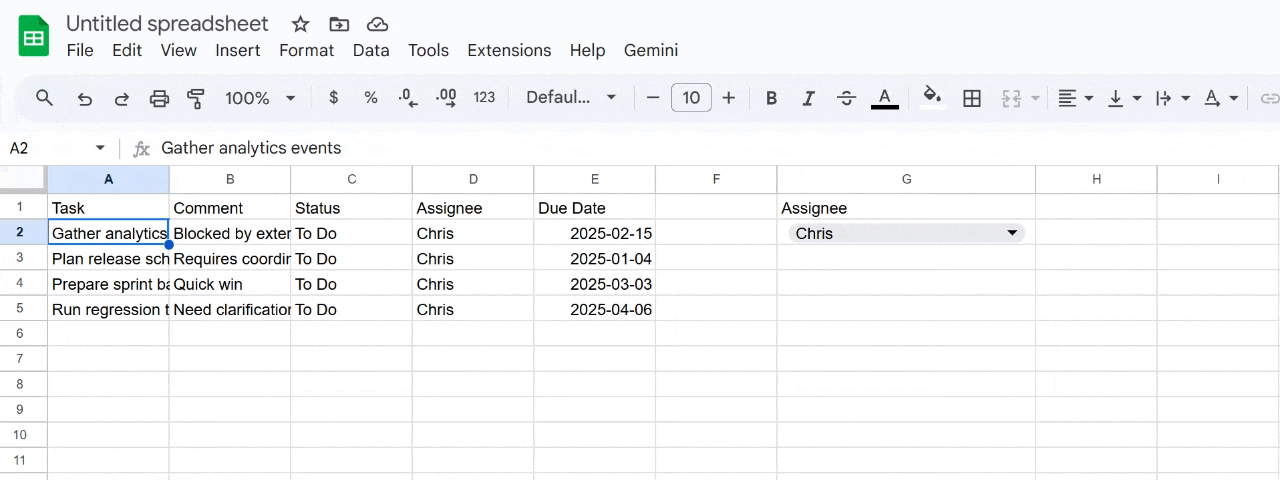
Use QUERY instead of copy-pasting filtered tables
Instead of manually filtering and copy-pasting, use QUERY and FILTER to build live views of your data.
Example: from a master task sheet (Sheet4!A1:E), create a separate view with only “To Do” tasks assigned to the person in G2:
=QUERY(
  Sheet4!A1:E,
  "select A, B, C, D, E
   where C = 'To Do'
   and D = '" & G2 & "'
   order by A",
  1
)
Whenever the main sheet is updated, this view updates automatically, no manual copy-paste needed.
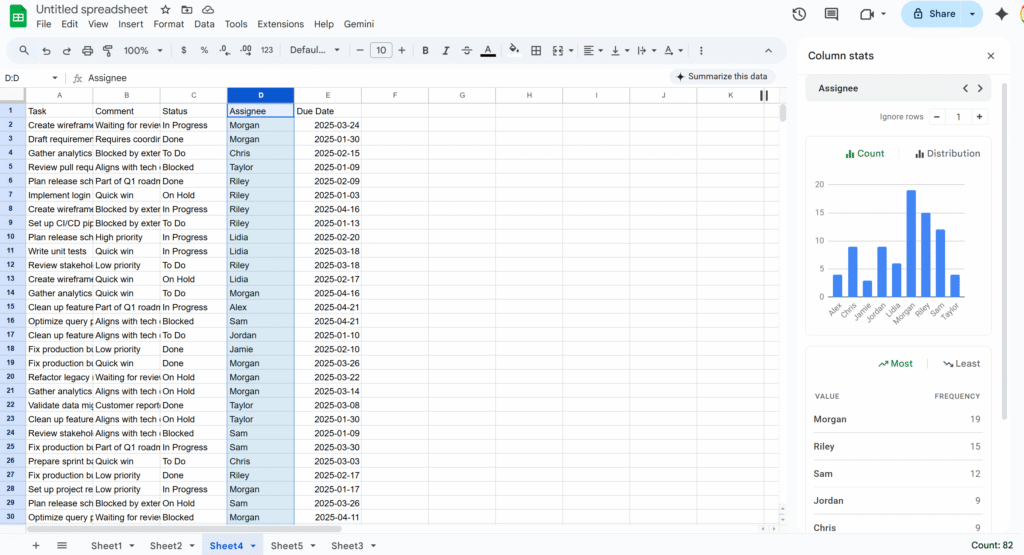
Use column stats to extract quickly key info
If you need a quick snapshot of what’s inside a column—value distribution, most common entries, min/max, etc.—use Column stats.
Right-click a column header.
Select Column stats.
You’ll get:
A count of unique values.
Basic stats (for numbers).
A small chart showing frequency by value.
Store phone numbers and IDs as text (so Sheets doesn’t “fix” them)
Sheets tries to be clever with numbers, which is bad news for things like phone numbers and IDs:
Leading zeros get removed.
Long IDs may be turned into scientific notation.
Best practices:
Set the column to Plain text: Format → Number → Plain text.
Enter numbers with a leading apostrophe: '0412 345 678
Do the same for anything that looks numeric but isn’t a real “number”: phone numbers, SKUs, customer IDs, etc.
This prevents silent changes that are hard to detect later.
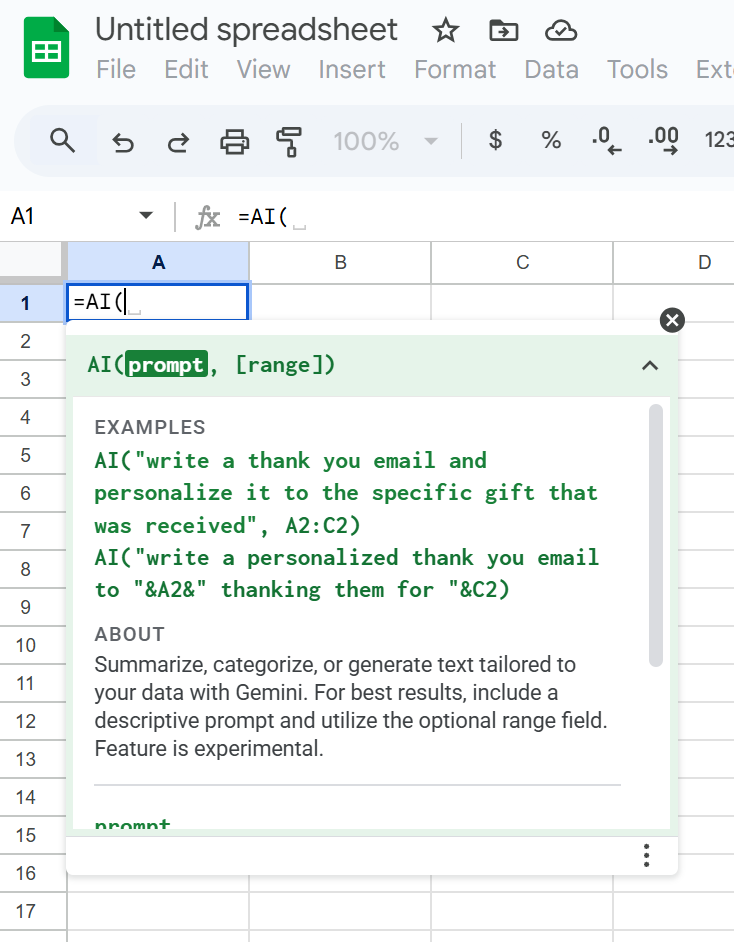
Prompt Gemini directly in your Sheets
Google Sheets now has a native AI function (often exposed as =AI() or =GEMINI(), depending on your Workspace rollout) that lets you talk directly to Google’s Gemini model from a cell.
Instead of nesting complex formulas, you can write natural-language prompts like:
=AI("Summarize this text in 3 bullet points:", A2)
You can use it to:
Summarize long text.
Classify or tag entries.
Extract key information from a sentence.
Generate content (subject lines, slogans, short paragraphs).
Because the prompt and the reference (like A2) live right in the formula, you can apply AI logic across a whole column just like any other function—without touching Apps Script or external tools.
If anything’s missing from this list, tell me! I’d love to hear your favourite Sheets tips and ideas.
Faster dashboards, cleaner code, and a rendering engine powered by the Sheets API.
Google Sheets is fantastic for quick dashboards, tracking tools, and prototypes. And with Apps Script, you can make them dynamic, automated, and even smarter.
But the moment you start building something real, a complex layout, a styled dashboard, a multi-section report, the Apps Script code quickly turns into:
messy
repetitive
slow
painful to maintain
Setting backgrounds, borders, number formats, writing values… everything requires individual calls, and your script balloon quickly.
To make this easier, you usually have two options:
Inject data into an existing template
Or…using RenderSheet
RenderSheet is a tiny, component-based renderer for Google Sheets, inspired by React’s architecture and built entirely in Apps Script. Let’s explore how it works.!
Introducing RenderSheet
RenderSheet is a lightweight, React-inspired renderer for Google Sheets.
Instead of scattering .setValue(), .setBackground(), .setFontWeight(), etc. everywhere in your script, you write components:
<Title />
<HeaderRow />
<DataTable />
<SummaryRow />
<StatusPill />, etc.
Each component knows how to render itself. Your spreadsheet becomes a clean composition of reusable blocks, just like a frontend UI.
Why a “React-like” approach?
React works because it forces you to think in components:
a Header component
a Table component
a Summary component
a StatusPill component
Each component knows how to render itself, and the app becomes a composition of smaller reusable pieces.I wanted the exact same thing, but for spreadsheets.
With RenderSheet, instead of writing:
sheet.getRange("A1").setValue("Hello");
sheet.getRange("A1").setBackground("#000");
sheet.getRange("A1").setFontWeight("bold");
// and so on...
No direct API calls. No multiple setValue() calls. Just a clean render() method.
The Core Idea: One Render = Two Sheets API Calls
To achieve this “single render” effect, we simply divide to conquer:
one API call for injecting the data
and another for applying all the styling
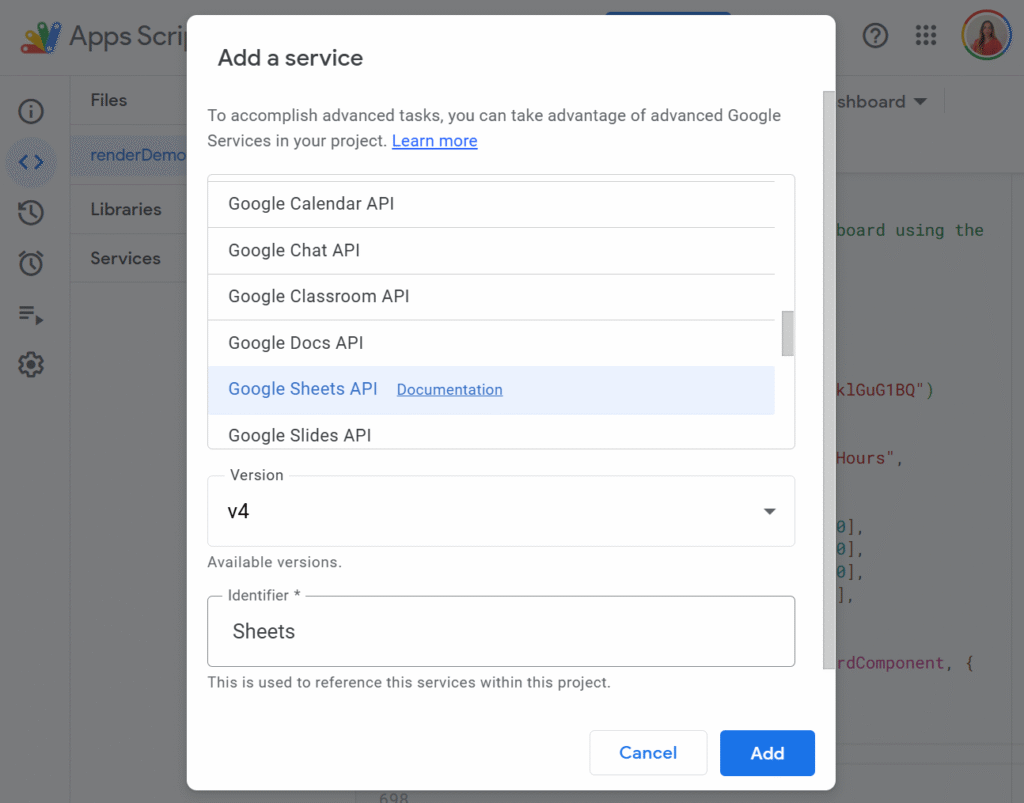
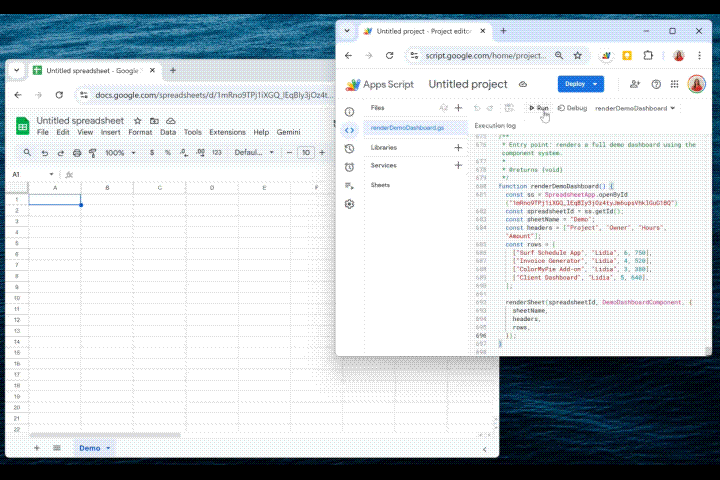
Before we can make the magic happen, we need to enable the Advanced Google Sheets API in our Apps Script project. This unlocks the batchUpdate method, the real engine behind RenderSheet.
To do so, just click the little + button on the left side panel, in front of Services, and select Google Sheets API:
This gives you access to the batchUpdate method, the real engine behind RenderSheet.
Now let’s look at the core mechanism.
The SheetContext (the Render Engine)
SheetContextis the core of RenderSheet. It collects all writes and formatting instructions and applies them in two API calls, using easy functions such as:
all data writes (writeRange)
all formatting instructions (setBackground, setTextFormat, setAlignment…)
But here’s the key:
None of these functions execute anything immediately. They only describe what the component wants to render.
The actual rendering only happens at the end, through two API calls.
You can think of SheetContext as your “toolbox”, and feel free to extend it with your own helpers.
Even though the initial setup is a bit more structured, the final result:
renders in 1 second
stays perfectly maintainable
allows components to be reused in any dashboard
Exactly the power of React, but in Google Sheets.
Final Thoughts
RenderSheet brings structure, speed, and clarity to Google Sheets development. If you’re tired of repetitive formatting code or want to build Sheets dashboards the same way you build UIs, this pattern completely changes the experience.
Let me know what you think, and feel free to contribute!
Even if I’m a real advocate of Apps Script, I’m also very aware of its limits when it comes to performance.
When a script keeps fetching the same API data or repeatedly processes large spreadsheets, things slow down fast. Each execution feels heavier than the previous one, and you end up wasting both user time and valuable API quota. Caching solves this problem by avoiding unnecessary work.
In this article, we’ll walk through what a cache actually is, how the Cache Service works in Apps Script, and the situations where it makes a real difference.
What’s a Cache?
A cache is simply a temporary storage area that keeps data ready to use. Instead of computing something again or fetching it every time, you store the result once, and reuse it for a short period.
For example, imagine calling an external API that takes half a second to respond. If you cache the result for five minutes, the next calls come back instantly. The data isn’t stored forever, just long enough to avoid waste.
This principle is everywhere in tech: browsers, databases, CDNs… and Google Apps Script has its own version too.
What Is Cache Service in Apps Script?
The Cache Service in Google Apps Script gives you a small, fast place to store temporary data. It comes in three “scopes” depending on your use case:
Data shared across all users of your script (getScriptCache)
Data specific to the current user (getUserCache)
Data linked to a particular document (getDocumentCache)
It only stores strings, which means that objects need to beserialized (JSON.stringify). The storage is also limited in size and duration: up to 100 KB per key, and a lifetime of up to 6 hours.
It’s not meant to replace a database or a sheet, it’s meant to speed up your script by avoiding repetitive or heavy work.
When Should You Use It?
Speeding up repeated API calls
If your script fetches data from GitLab, Xero, or any third-party API, calling that API every time is unnecessary. The Cache Service is ideal for storing the latest response for a few minutes. Your script becomes faster, and you avoid hitting rate limits.
Avoiding expensive spreadsheet reads
Large spreadsheets can be slow to read. If you always transform the same data (for example: building a dropdown list, preparing a JSON structure, or filtering thousands of rows), caching the processed result saves a lot of execution time.
Making HTMLService UIs feel instant
Sidebars and web apps built with HTMLService often reload data each time they open. If that data doesn’t need to be fresh every second, keeping it in cache makes the UI load instantly and improves the user experience noticeably.
Storing lightweight temporary state
For short-lived information—like a user’s last selected filter or a temporary calculation—Cache Service is much faster than PropertiesService, and avoids writing into Sheets unnecessarily.
A Simple Way to Use Cache Service
You can create a small helper function that retrieves data from the cache when available, or stores it if missing:
/**
 * Returns cached data or stores a fresh value if missing.
 * @param {string} key
 * @param {Function} computeFn Function that generates fresh data
 * @param {number} ttlSeconds Cache duration in seconds
 * @return {*} Cached or fresh data
 */
function getCached(key, computeFn, ttlSeconds = 300) {
  const cache = CacheService.getScriptCache();
  const cached = cache.get(key);
  if (cached) return JSON.parse(cached);

  const result = computeFn();
  cache.put(key, JSON.stringify(result), ttlSeconds);
  return result;
}
And use it like this:
function getProjects() {
  return getCached('gitlab_projects', () => {
    const res = UrlFetchApp.fetch('https://api.example.com/projects');
    return JSON.parse(res.getContentText());
  });
}
This approach is enough to dramatically speed up most Apps Script projects.
Final Thoughts
The Cache Service is small, simple, but incredibly effective if used well. It won’t store long-term data and it won’t replace a database, but for improving performance and reducing unnecessary work, it’s one of the easiest optimizations you can add to an Apps Script project.
If you want, I can help you write a second article with more advanced techniques: cache invalidation, dynamic keys, TTL strategies, and UI refresh patterns.
I love BigQuery. It’s the beast that handles the data Google Sheets chokes on. But let’s be honest: connecting it to Apps Script can sometimes feel like trying to open a locked door while holding a handful of different keys.
Usually, you just turn on the “BigQuery Advanced Service,” run a query, and it works, because it runs as you.
But what happens when you want your script to run at 3 AM via a trigger? Or what if you need to query a project that you, personally, shouldn’t have full access to? Or maybe you’re building a Web App and you don’t want the user to need their own GCP permissions?
That’s where the standard setup breaks. And that is exactly why I built SuperBQ.
In this article, I’m going to share a clean, functional library I wrote to handle BigQuery via a Service Account. We’ll cover why you need OAuth2, how to set it up, and the code to make it all seamless.
Auth: What is it and why do we need it?
Authentication (“Auth”) is simply the process of proving who you are. It’s the digital bouncer checking your ID at the door of your Google Cloud project.
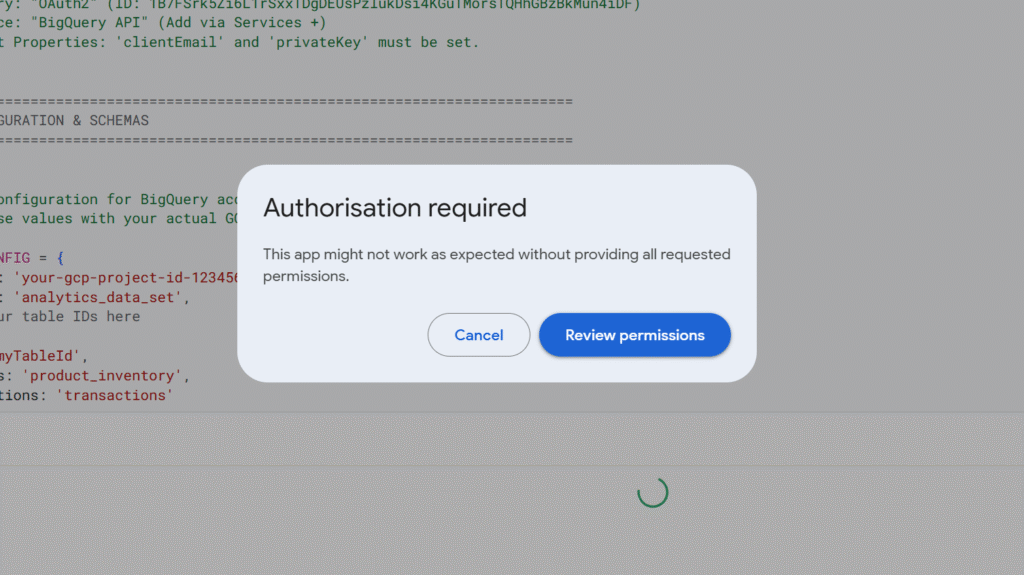
In the world of Google Apps Script, “Auth” usually happens when that pop-up appears asking you to “Review Permissions” and click “Allow.” That token proves that you (the human) are present and consenting to the script acting on your behalf.
But OAuth2 with a Service Account is different. Instead of a human clicking “Allow,” we use a Service Account, a “robot” identity. It authenticates by exchanging a cryptographic key for a temporary access pass (a token). This allows the script to prove its own identity without a human ever being involved.
Why go through the trouble? This “robot” approach gives us two massive superpowers:
“Headless” Automation: Standard scripts fail if there isn’t a user at the keyboard to click “Allow.” A Service Account allows your script to run entirely in the background (like a nightly data sync) because the robot never needs to sleep or log in.
Cross-Project Tunneling: Apps Script projects are usually bound to a specific “Default” Cloud Project. By using this custom OAuth setup, your script can ignore that default binding and “tunnel” into any GCP project where your Service Account has access keys.
The OAuth2 Library
To make the robot talk to Google, we have to generate a token. This involves creating a JWT (JSON Web Token) and signing it with a cryptographic key.
We are definitely not going to write RSA-SHA256 signatures from scratch (yikes). Instead, we rely on the standard, battle-tested OAuth2 for Apps Script library maintained by Google.
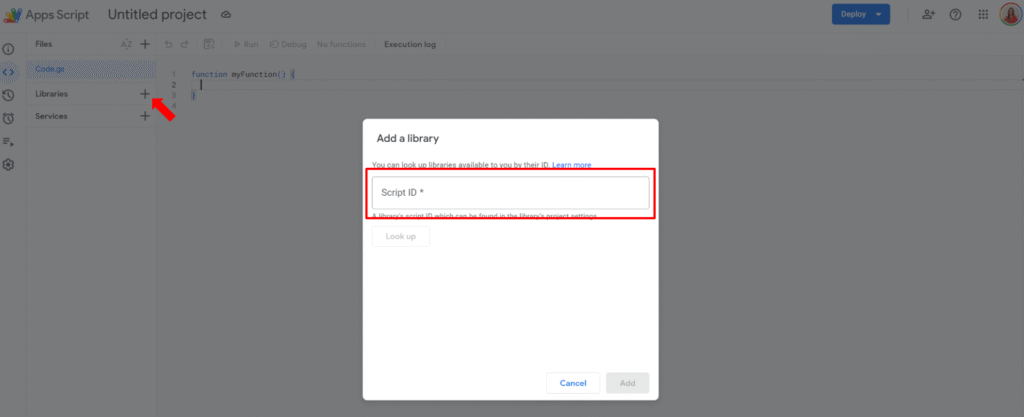
In your Apps Script editor, go to Libraries and add this Script ID:
Now we need the keys for the robot. Head over to your Google Cloud Console, create a Service Account, and give it the BigQuery Data Editor and BigQuery Job User roles.
Once created, generate a JSON Key and download it. Open that file in a text editor. You are looking for two specific values: client_email and private_key (the long string starting with -----BEGIN PRIVATE KEY-----).
Do not hardcode these in your script. If you share your code, you share your keys.
Instead, go to Project Settings > Script Properties in the Apps Script editor and add them there:
When your Apps Script project is just one tiny function attached to a Sheet, you can get away with “click Run and hope for the best”.
But as soon as your codebase grows, multiple files, complex business rules, integrations with Sheets, Docs, external APIs, that approach stops scaling. A small change in one function can silently break something completely different.
That’s where unit testing in Google Apps Script comes in.
In this article, we’ll cover:
What unit testing is and why it matters for Apps Script
The current landscape of unit testing solutions for GAS (QUnitGS2, GasT, Utgs, Jest + clasp, etc.)
Classic unit testing principles adapted to Apps Script (AAA, dependency injection)
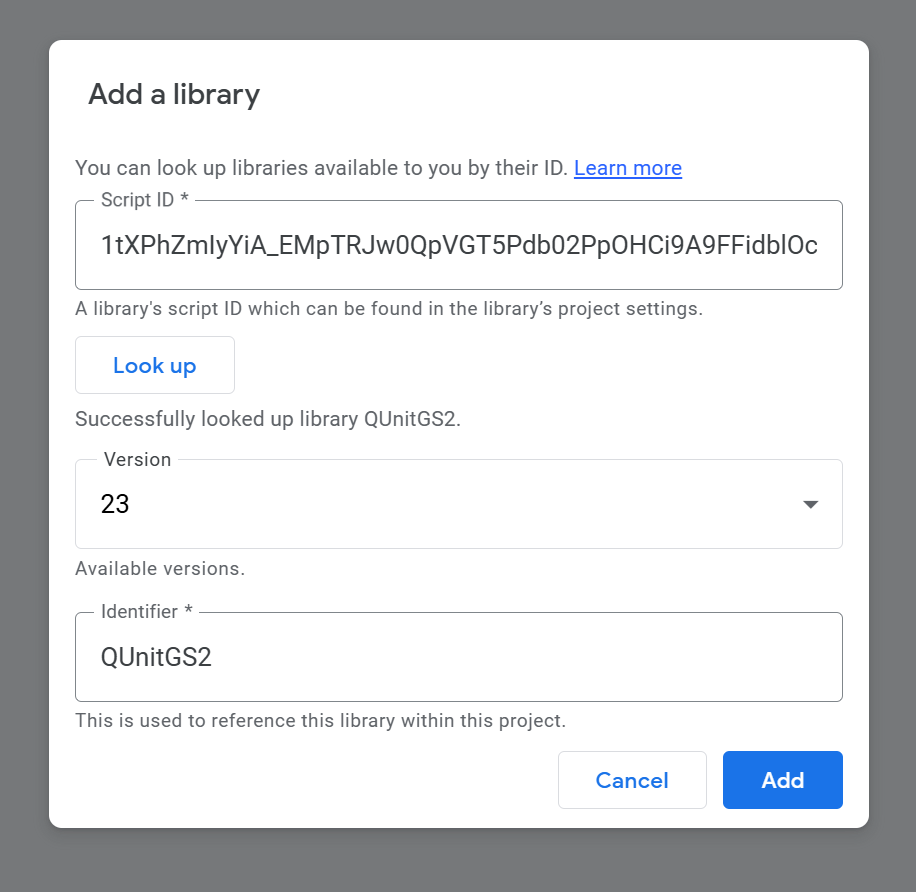
How to use QUnitGS2 / QUnit2GS to build a proper test suite in Apps Script
A lightweight console-based test runner that runs all test_ functions and logs PASS/FAIL in the execution log
By the end, you’ll have both a full-featured QUnit setup and a “zero-UI” runner you can use as a quick safety net in any project.
What is unit testing and why is it important?
Unit testing is the practice of testing small, isolated pieces of code (units), usually at the function level.
A typical unit test:
Calls a function with some inputs
Compares the result to an expected value
Fails loudly if they don’t match
In JavaScript (and therefore Apps Script), a unit test with QUnit looks like this:
QUnit.test('add() adds two numbers', (assert) => {
  const result = add(1, 2);
  assert.equal(result, 3, '1 + 2 should equal 3');
});
Why unit testing is especially useful in Google Apps Script projects:
Catch regressions early. When you refactor a Sheets automation or a Docs generator, tests tell you if something broke immediately instead of your users or clients discovering it later.
Refactor with confidence. You can rename functions, split files, change logic – and rely on tests as a safety net.
Executable documentation. A test like test_shouldApplyDiscountForTotalsOver1000 is more explicit than a vague comment buried in the code.
Faster debugging loops. Instead of manually re-running forms or simulating UI flows, you run the test suite and see exactly which scenario fails.
In “normal” JavaScript environments (Node/React), developers use tools like Jest, Mocha, QUnit, Ava… but Apps Script runs in a special environment that introduces a few constraints.
Limitations of Apps Script and existing unit testing solutions
Building a reliable unit testing structure in Google Apps Script (GAS) is essential for maintaining complex projects. But Apps Script is not a standard Node.js runtime:
No native local file system
No npm test directly inside the IDE
Limited setTimeout / async patterns
Heavy reliance on global services like SpreadsheetApp, DriveApp, MailApp, etc.
Because of that, unit testing solutions tend to fall into two big families:
In-GAS frameworks – tests run on Google’s servers inside the Apps Script runtime
Local testing – you pull code down with clasp and test it with Node tools, mocking Google services
Lightweight libs focused on simple assertions and PASS/FAIL logs in Logger.log.
Very easy to drop into any script, no web deployment required.
No GUI, you manage structure and conventions yourself.
Local testing with clasp + Jest/Ava
With the clasp CLI you can clone your Apps Script project locally, and then use any Node test framework you like (Jest, Ava, etc.) with mocks for Google services.
How it works
Use clasp to pull your code locally.
Write Jest/Ava tests.
Mock things like SpreadsheetApp and UrlFetchApp.
Run npm test locally.
Pros
Full Node ecosystem (TypeScript, Jest watch mode, coverage reports, CI/CD, VS Code integration).
Cons
Higher setup cost, especially for mocking Google services accurately.
Best suited to modular projects where business logic is already decoupled from Apps Script services.
Quick conclusion
If you want:
A visual, browser-based test runner → QUnitGS2 / QUnit2GS is an excellent choice
A blazing-fast, Node-like experience for pure logic → clasp + Jest is great.
A quick in-editor check that runs functions and logs results → a small custom console runner (or Utgs/bmUnitTest) is the most direct option.
In the rest of this article, we’ll combine both worlds:
QUnitGS2 for a “real” test suite with a UI
A tiny log-based test runner you can drop into any project
Classic unit testing principles in the Apps Script world
Before we jump into QUnit and custom runners, it’s worth aligning on some basic testing principles and how they apply to Apps Script.
AAA: Arrange, Act, Assert
A readable test follows the AAA pattern:
Arrange – set up inputs, initial state, mocks
Act – call the function under test
Assert – verify the result (return value or side effect)
Example (pseudo-code):
function test_addTwoNumbers() {
  // Arrange
  const a = 2;
  const b = 3;
  const expected = 5;

  // Act
  const actual = add(a, b);

  // Assert
  assert(actual, expected, 'add() should return 5 for (2, 3)');
}
Labeling those three steps makes your Apps Script tests much easier to read and maintain.
Isolation and dependency injection in Apps Script
True unit tests should focus on one unit of logic at a time. That’s tricky in Apps Script because your code often calls global services directly:
We’ll define a simple pure function to keep the focus on testing:
/**
 * Calculates the total amount after applying a percentage discount.
 *
 * @param {number} amount - Base amount before discount.
 * @param {number} discountPercent - Discount percentage between 0 and 100.
 * @return {number} The discounted amount, rounded to 2 decimals.
 * @throws {Error} If amount or discountPercent are invalid.
 */
function calculateDiscountedTotal(amount, discountPercent) {
  if (typeof amount !== 'number' || Number.isNaN(amount) || amount < 0) {
    throw new Error('amount must be a non-negative number');
  }

  if (
    typeof discountPercent !== 'number' ||
    Number.isNaN(discountPercent) ||
    discountPercent < 0 ||
    discountPercent > 100
  ) {
    throw new Error('discountPercent must be between 0 and 100');
  }

  const discount = (amount * discountPercent) / 100;
  const total = amount - discount;

  return Number(total.toFixed(2));
}
Wire up the QUnit web app
Add this in (for example) QUnitRunner.gs:
/* global QUnitGS2 */

/**
 * QUnit instance provided by QUnitGS2.
 * @type {QUnit}
 */
const QUnit = QUnitGS2.QUnit;

/**
 * Web app entry point that runs the QUnit test suite and returns HTML results.
 *
 * @param {Object} e - Web app request event.
 * @return {Object} HTML output with QUnit UI.
 */
function doGet(e) {
  QUnitGS2.init();

  registerTests();

  QUnit.start();
  return QUnitGS2.getHtml();
}

/**
 * Called from the client-side HTML to retrieve QUnit results
 * after the server-side test run completes.
 *
 * @return {Object} JSON results from the QUnitGS2 server.
 */
function getResultsFromServer() {
  return QUnitGS2.getResultsFromServer();
}
Define QUnit tests
Now create registerTests() and write your tests:
/**
 * Registers all QUnit test modules.
 */
function registerTests() {
  QUnit.module('calculateDiscountedTotal', () => {
    QUnit.test('returns original amount when discount is 0%', (assert) => {
      const result = calculateDiscountedTotal(100, 0);
      assert.equal(result, 100, '100 with 0% discount should stay 100');
    });

    QUnit.test('applies percentage discount correctly', (assert) => {
      const result = calculateDiscountedTotal(200, 10);
      assert.equal(result, 180, '10% discount on 200 should be 180');
    });

    QUnit.test('rounds to 2 decimals', (assert) => {
      const result = calculateDiscountedTotal(99.99, 5);
      assert.equal(result, 94.99, 'Should round result to 2 decimals');
    });

    QUnit.test('throws on negative amount', (assert) => {
      assert.throws(
        () => calculateDiscountedTotal(-10, 10),
        /amount must be a non-negative number/,
        'Negative amounts should throw'
      );
    });

    QUnit.test('throws when discount > 100%', (assert) => {
      assert.throws(
        () => calculateDiscountedTotal(100, 150),
        /discountPercent must be between 0 and 100/,
        'Discount > 100% should throw'
      );
    });
  });
}
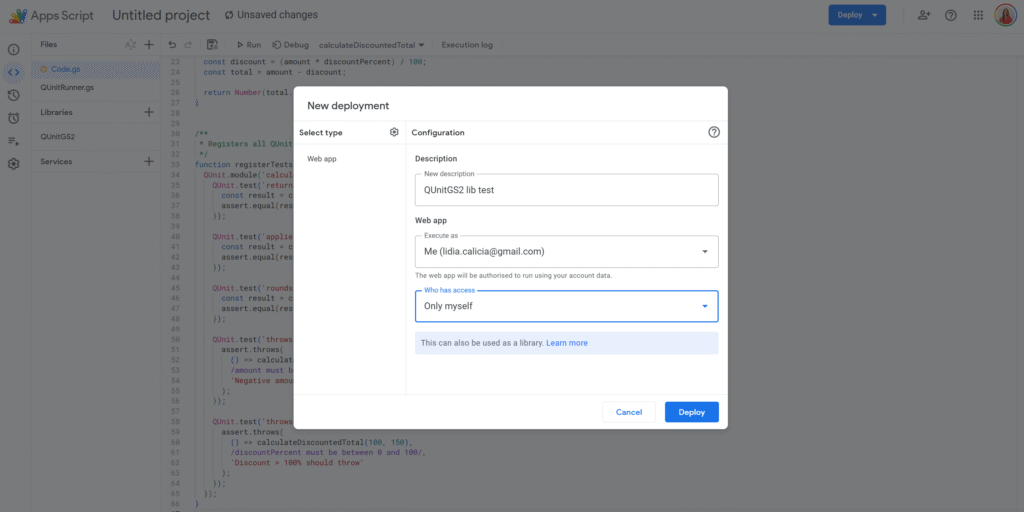
Deploy as a web app and run tests
Deploy → New deployment → Web app
Execute as: your account
Who has access: as you prefer (e.g. “Only me”)
Copy the web app URL and open it in your browser
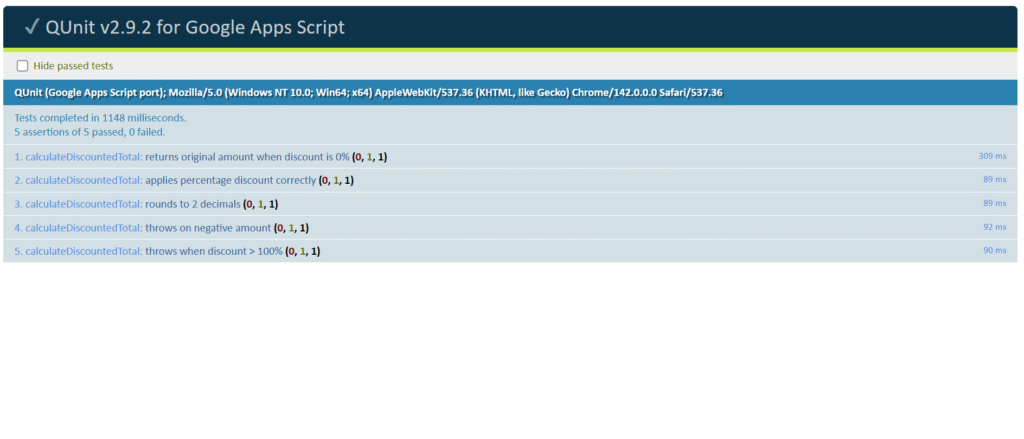
QUnitGS2 will:
Initialize QUnit
Run your registerTests()
Show a full QUnit HTML report with passing/failing tests
A simple console-based unit test runner (no web app required)
Sometimes you just want a quick pass/fail check in the Execution log without deploying a web app or integrating a full framework.
The script below implements a self-contained test runner that:
Looks for all global functions whose names start with test_
Runs them one by one
Logs PASS / FAIL and a short summary in the Apps Script execution log
// --- TEST UTILITIES: Place this in a file named 'TestRunner.gs' ---
/** @type {string} */
const TEST_PREFIX = 'test_';
/**
* Checks if two values are strictly equal and logs a PASS/FAIL message.
*
* @param {unknown} actual - The value returned by the function under test (Act).
* @param {unknown} expected - The predetermined correct value (Arrange).
* @param {string} message - Description of the assertion.
* @return {boolean} True if the assertion passes, false otherwise.
*/
function assert(actual, expected, message) {
if (actual === expected) {
Logger.log(`✅ PASS: ${message}`);
return true;
}
Logger.log(`❌ FAIL: ${message} - Expected: ${expected}, Actual: ${actual}`);
return false;
}
/**
* Iterates through all global functions and runs those prefixed with 'test_'.
* This acts as the central test runner.
*
* Run this manually from the Apps Script editor to execute the whole suite.
*/
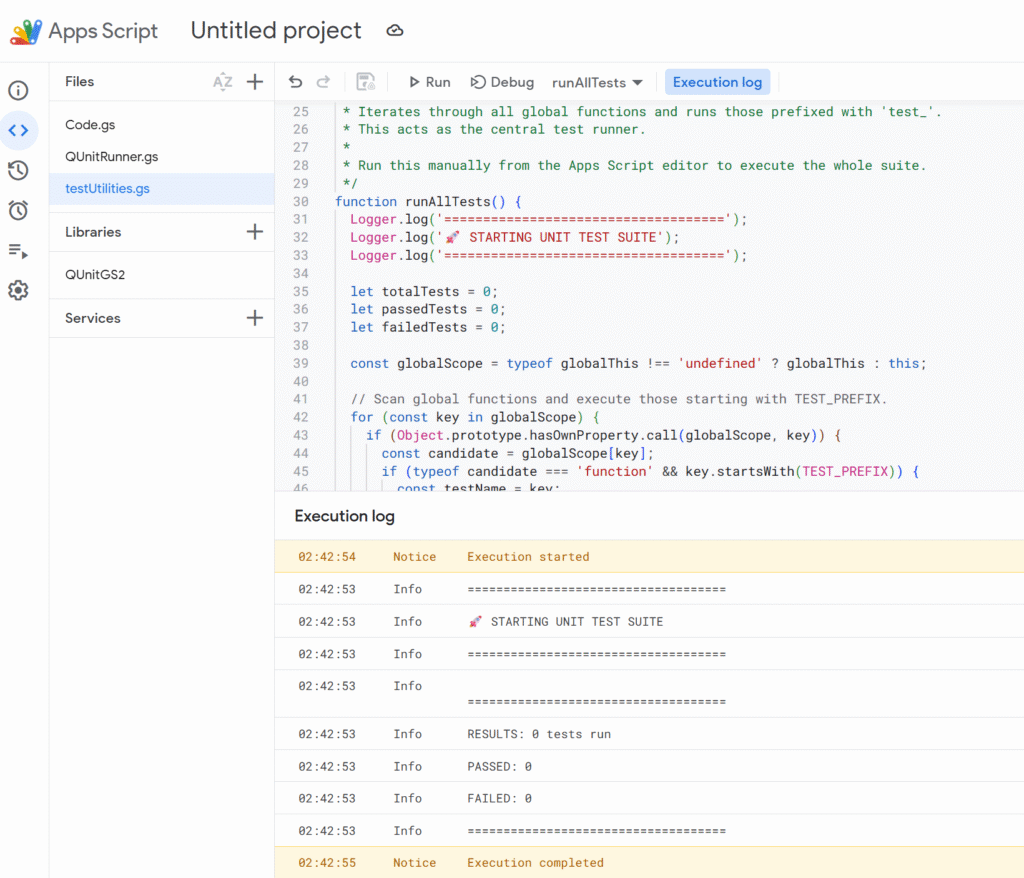
function runAllTests() {
Logger.log('====================================');
Logger.log('🚀 STARTING UNIT TEST SUITE');
Logger.log('====================================');
let totalTests = 0;
let passedTests = 0;
let failedTests = 0;
const globalScope = typeof globalThis !== 'undefined' ? globalThis : this;
// Scan global functions and execute those starting with TEST_PREFIX.
for (const key in globalScope) {
if (Object.prototype.hasOwnProperty.call(globalScope, key)) {
const candidate = globalScope[key];
if (typeof candidate === 'function' && key.startsWith(TEST_PREFIX)) {
const testName = key;
Logger.log(`\n--- Running: ${testName} ---`);
try {
candidate();
passedTests++;
} catch (e) {
failedTests++;
const message = e instanceof Error ? e.message : String(e);
Logger.log(`💥 ERROR in ${testName}: ${message}`);
}
totalTests++;
}
}
}
Logger.log('\n====================================');
Logger.log(`RESULTS: ${totalTests} tests run`);
Logger.log(`PASSED: ${passedTests}`);
Logger.log(`FAILED: ${failedTests}`);
Logger.log('====================================');
}
Paste TestRunner.gs into your Apps Script project.
Add tests by creating functions whose names start with test_ (in the same project).
In the editor, select runAllTests and click Run ▶️.
Open View → Logs to see a step-by-step PASS/FAIL log and the final summary.
This gives you:
A very fast feedback loop while coding
No web app deployment required
A simple way to run a quick suite every time you touch the script
If you like this pattern, you can evolve it:
Add more assertion helpers (assertNotEquals, assertTrue, assertDeepEqual, …)
Add timing information per test
Exit early if a critical test fails (for long suites)
Putting it together
There’s no single “right” way to do unit testing in Google Apps Script, but a good strategy looks like this:
Use pure functions + dependency injection for your core business logic
Cover that logic with tests – either with QUnitGS2 (web UI) or your own console runner
Keep Apps Script service calls (SpreadsheetApp, DriveApp, etc.) thin and easy to mock
For bigger projects or front-end code, consider clasp + Jest and a local toolchain
Start small: pick one critical module (invoice calculation, validation rules, date logic…), write a handful of tests, and get used to running them every time you make a change.
Once you’ve seen a refactor go through while your QUnitGS2 panel and/or console runner stays fully green, you’ll never want to go back to “click Run and cross your fingers” again.
I’ve been doing freelancing for 5+ years now. Every month, I’d add a new row in my follow-up spreadsheet, duplicate my invoice, and export it as PDF to send by email. Yes, manually.
In French we say: “les cordonniers sont toujours les plus mal chaussés”. (or “the cobbler’s children go barefoot” in English).
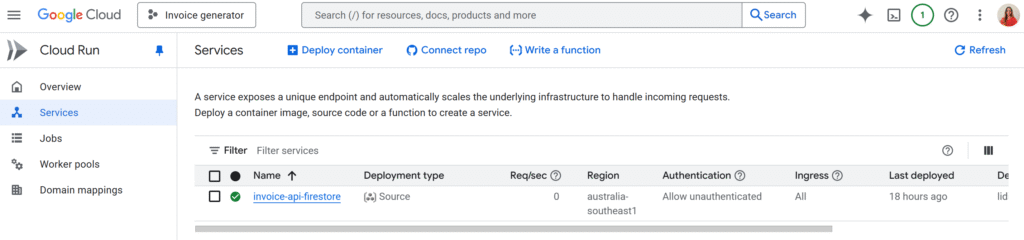
Well I’ve decided this has to stop, and I’ve been working on a custom SaaS to handle my invoices in a proper way! Backend runs on Cloud Run, the UI is a simple web app. And for the invoice document generation itself… I’m using Apps Script!
In this article, I’ll focus on the Apps Script project itself, and its deployment so that it can be called from another app or from Postman to start with.
The connection with the SaaS itself will be for another article!
Why use Apps Script as an API?
You get a lot for free!
Google Docs is your template engine (layout, fonts, logo… all in the editor)
Drive stores your invoices in the right folder
Apps Script can run as you and use your Drive/Docs permissions
You get an HTTP endpoint that your backend (or Postman) can POST JSON to
Also, my entire blog is about Apps Script, so…
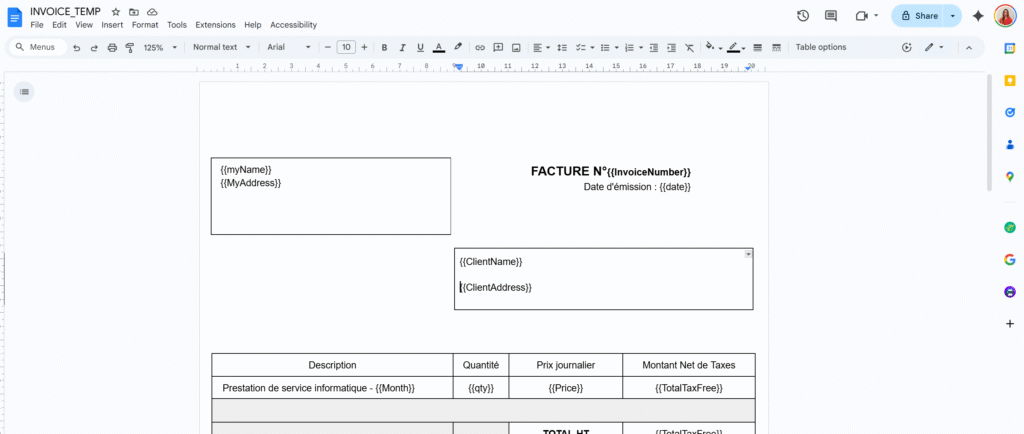
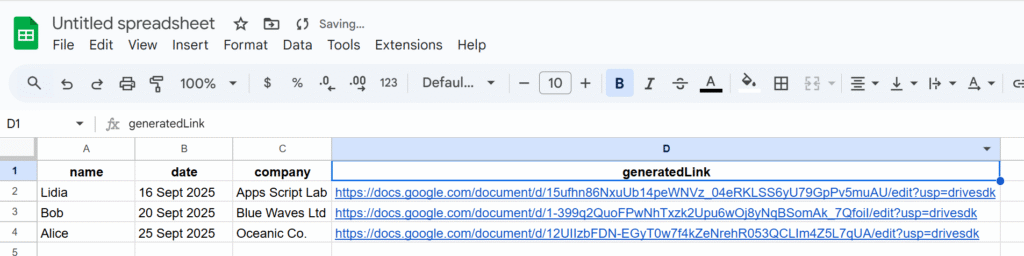
So the main idea in our example is:
Have a Docs template with placeholders like {{ClientName}}, {{TotalPrice}}.
Send a JSON payload to a Web App URL.
Apps Script copies the template, replaces the tags, and returns the document URL.
No custom PDF rendering, no extra infra.
The Apps Script “Invoice API” code
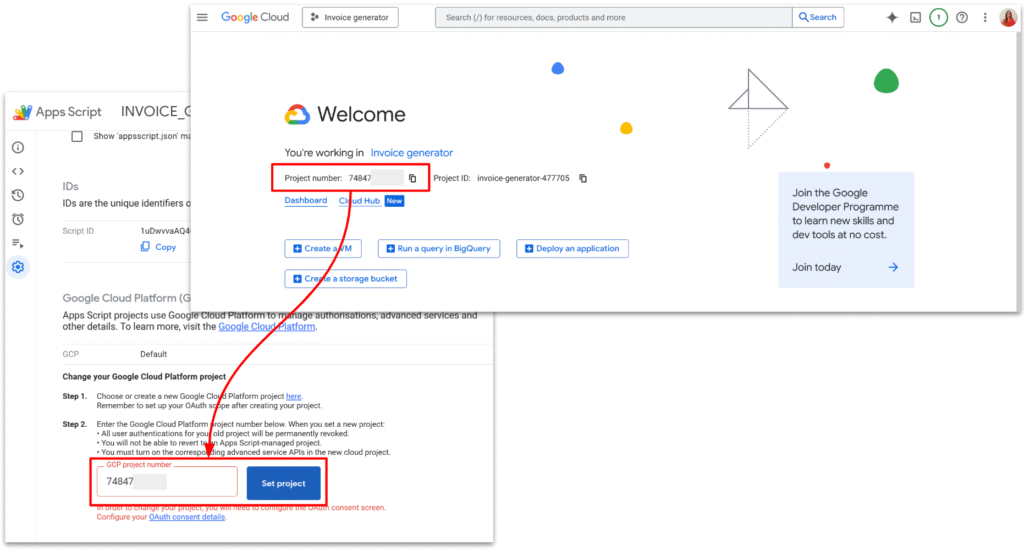
We will first create a new Apps Script project. By default, Apps Script links new project to GCP, but for the next steps, we will need to manually link our GCP project.
I also setup a very simple invoice template, with the tags I wanted.
Here is the full code.
/**
* Web app entry point for POST requests.
* Expects JSON payload with:
* {
* "tempId": "TEMPLATE_DOC_ID" | "templateId",
* "folderId": "DRIVE_FOLDER_ID",
* "filename": "Invoice 001",
* "tags": {
* "InvoiceNumber": "Lidia",
* "date": "123 €",
* "ClientName":"",
* }
* }
*
* @param {GoogleAppsScript.Events.DoPost} e - The POST event.
* @returns {GoogleAppsScript.Content.TextOutput} JSON response.
*/
function doPost(e) {
let output;
try {
if (!e || !e.postData || !e.postData.contents) {
throw new Error("Missing POST body.");
}
const payload = JSON.parse(e.postData.contents);
const result = createInvoiceFromTemplate_(payload);
const response = {
success: true,
invoiceId: result.id,
invoiceUrl: result.url,
filename: result.name,
};
output = ContentService
.createTextOutput(JSON.stringify(response))
.setMimeType(ContentService.MimeType.JSON);
} catch (err) {
const errorResponse = {
success: false,
error: String(err && err.message ? err.message : err),
};
output = ContentService
.createTextOutput(JSON.stringify(errorResponse))
.setMimeType(ContentService.MimeType.JSON);
}
return output;
}
/**
* @typedef {Object} InvoiceRequestPayload
* @property {string} [tempId] - Template document ID (legacy name).
* @property {string} [templateId] - Template document ID (preferred name).
* @property {string} [folderId] - Drive folder ID where the new doc should be stored.
* @property {string} filename - Name for the new document.
* @property {Object.<string, string|number|boolean|null>} tags - Map of placeholders to values.
*/
/**
* @typedef {Object} InvoiceCreationResult
* @property {string} id - Created document ID.
* @property {string} url - Created document URL.
* @property {string} name - Created document name.
*/
/**
* Creates an invoice document from a template and replaces placeholders.
*
* @param {InvoiceRequestPayload} payload - Data describing the invoice to create.
* @returns {InvoiceCreationResult} Information about the created document.
*/
function createInvoiceFromTemplate_(payload) {
if (!payload) {
throw new Error("Payload is required.");
}
const templateId = payload.templateId || payload.tempId;
if (!templateId) {
throw new Error("templateId (or tempId) is required.");
}
if (!payload.filename) {
throw new Error("filename is required.");
}
let templateFile;
try {
templateFile = DriveApp.getFileById(templateId)
} catch (err) {
throw new Error("Template file not found or inaccessible.");
}
/** @type {GoogleAppsScript.Drive.Folder} */
let targetFolder;
if (payload.folderId) {
try {
targetFolder = DriveApp.getFolderById(payload.folderId);
} catch (err) {
throw new Error("Target folder not found or inaccessible.");
}
} else {
// Fallback: use the template's parent folder if possible, or root
const parents = templateFile.getParents();
targetFolder = parents.hasNext() ? parents.next() : DriveApp.getRootFolder();
}
const copy = templateFile.makeCopy(payload.filename, targetFolder);
const newDocId = copy.getId();
const newDocUrl = copy.getUrl();
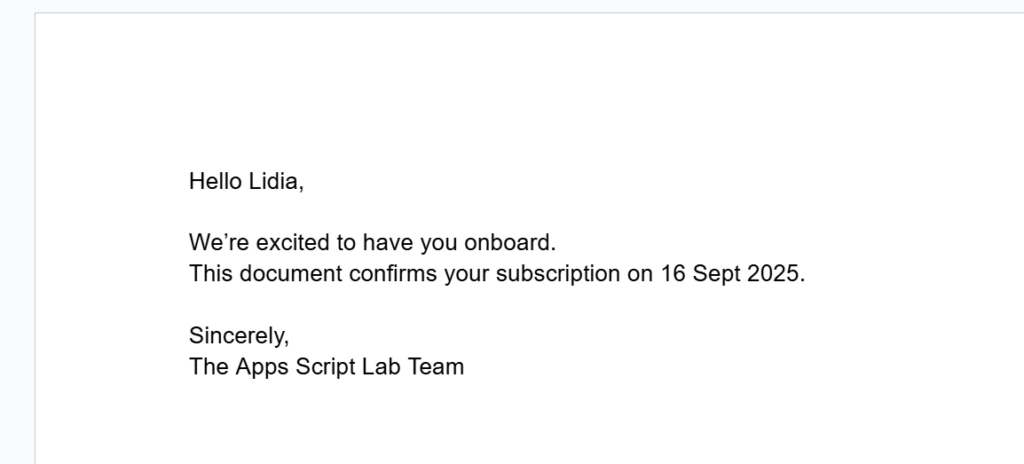
const tags = payload.tags || {};
if (Object.keys(tags).length > 0) {
replaceTagsInDocument_(newDocId, tags);
}
return {
id: newDocId,
url: newDocUrl,
name: copy.getName(),
};
}
/**
* Replaces placeholders in a Google Docs document body.
* Placeholders are expected in the form {{key}}.
*
* @param {string} docId - ID of the document to update.
* @param {Object.<string, string|number|boolean|null>} tags - Map of placeholders to values.
* @returns {void}
*/
function replaceTagsInDocument_(docId, tags) {
const doc = DocumentApp.openById(docId);
const body = doc.getBody();
const entries = Object.entries(tags);
for (const [key, rawValue] of entries) {
const value = rawValue === null || rawValue === undefined ? "" : String(rawValue);
const placeholder = "{{" + key + "}}";
body.replaceText(escapeForRegex_(placeholder), value);
}
doc.saveAndClose();
}
/**
* Escapes a string to be used safely inside a regular expression.
*
* @param {string} text - Raw text to escape.
* @returns {string} Escaped text safe to use in a regex.
*/
function escapeForRegex_(text) {
return text.replace(/[.*+?^${}()|[\]\\]/g, "\\$&");
}
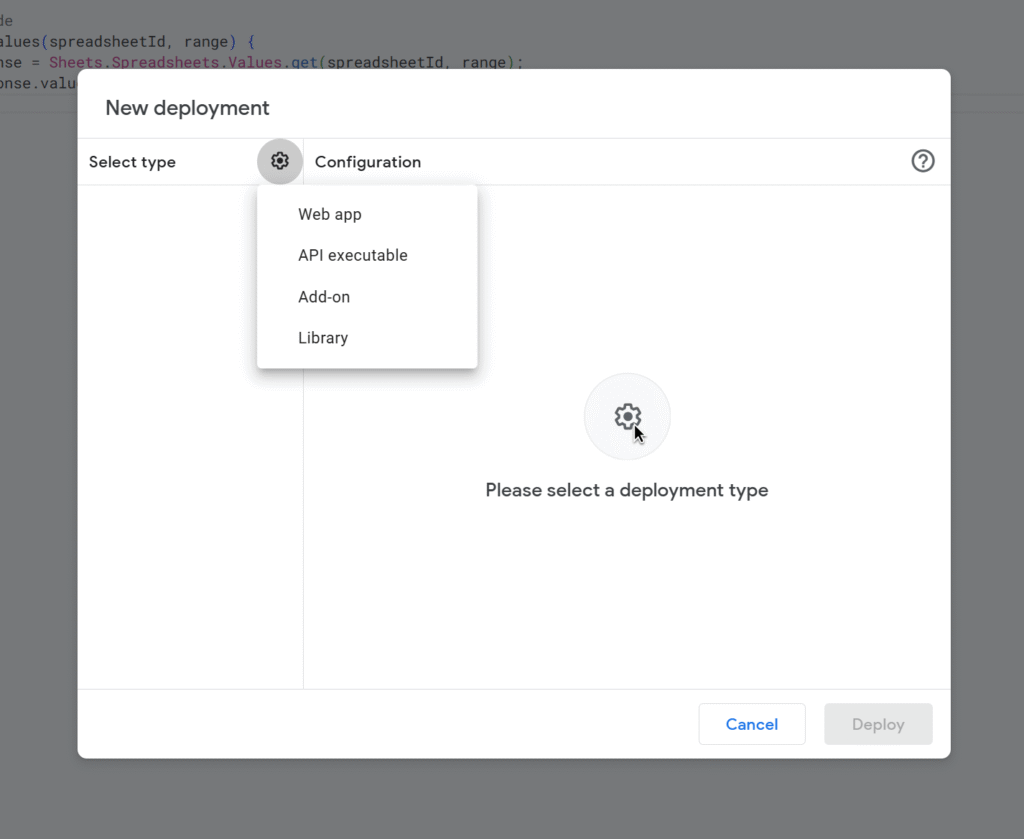
Web App vs Execution API vs Library, in plain terms
There are three “flavours” of Apps Script that often get mixed up:
Web App: you deploy doGet / doPost, you get a /exec URL. Perfect for what we’re doing: lightweight HTTP API.
Execution API: URL on script.googleapis.com like .../scripts/ID:run. Needs OAuth tokens, used to run script functions from other backends. Great, but heavier.
Library: reusable code for other Apps Script projects. Not an HTTP endpoint.
In this tutorial, the only one we need is the Web App deployment. In the upcoming article, we will focus on how to setup OAuth tokens with the execution API.
Deploying as Web App
In the Apps Script editor:
Deploy → Manage deployments → New deployment
Type: Web app
Execute as: Me
Who has access: Anyone (or “Anyone with the link” while testing)
Deploy and copy the Web app URL (ends in /exec)
Open that URL once in your browser, go through the “unverified app” screen, and accept the scopes.
From now on:
The script runs as you (so it can access your Docs and Drive)
Your backend and Postman can call the /exec URL without any extra OAuth dance
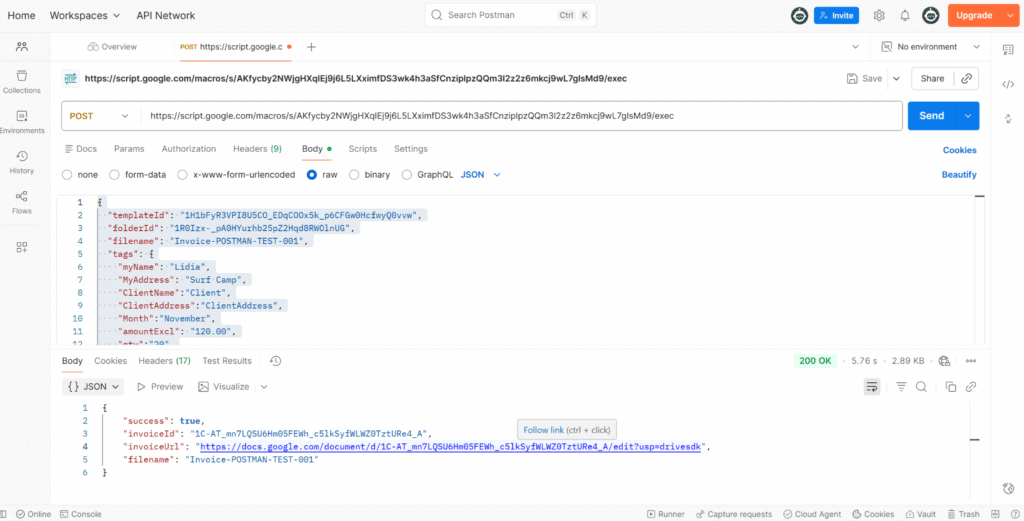
Click Send. If everything is set up correctly, you should get JSON like:
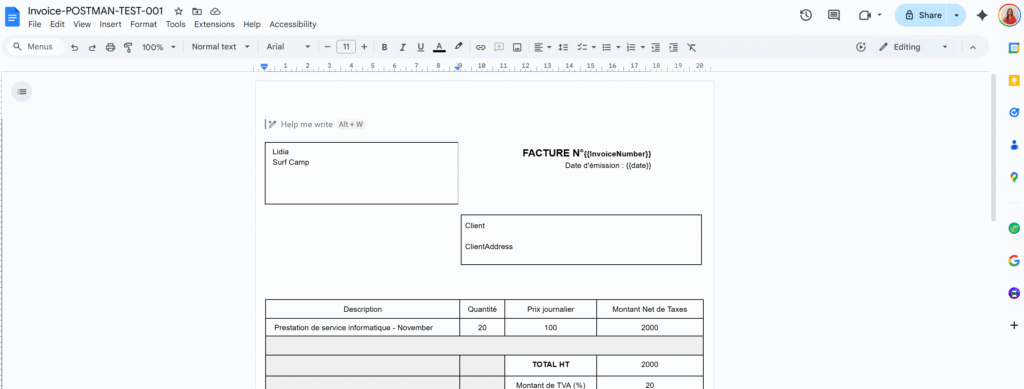
And the tags have been replaced!
The weird Drive “server error” and apps-macros@system.gserviceaccount.com
When I first tried calling DriveApp.getFileById(templateId), I had the following error:
And in the console of Apps Script:
The template existed. It opened fine in Drive. The script was running as the same user. But inside the Apps Script project (linked to a Cloud project), Drive access was just… failing.
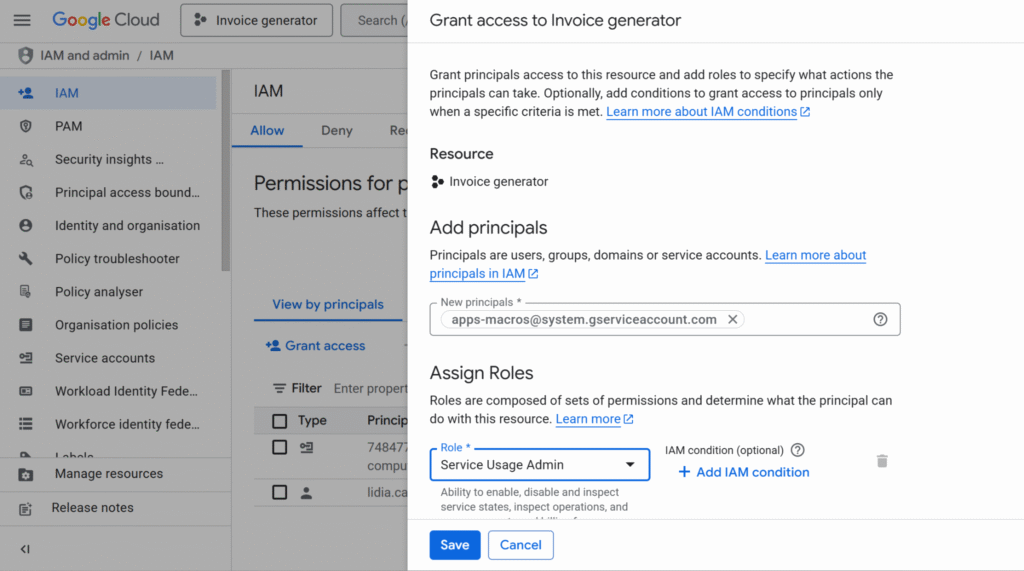
This error happens because Apps Script relies on a Google-managed system account behind the scenes, and that account doesn’t have the permissions it needs to run your script. To fix it, you have to manually grant the right role to apps-macros@system.gserviceaccount.com.
You won’t see this address in the “Service Accounts” list, but it’s still a real identity in your project that you can add in IAM and assign roles to.
To fix it, I had to:
Go to IAM & Admin → IAM in the Cloud Console.
Click Grant access.
Add a new principal: apps-macros@system.gserviceaccount.com
Give it the role: Service Usage Admin.
Save.
After that, API began returning normal JSON responses instead of that generic “server error”.
Wrapping up
Using Apps Script as an API is a nice combo when:
You already live in Google Workspace
You want invoices/letters/contracts as Docs, not PDFs generated from scratch
You’re happy to let Google Drive handle storage and sharing
The flow looks like this:
Frontend or backend creates invoice data.
Backend calls the Apps Script Web App with JSON.
Apps Script copies the template, replaces tags, and responds with the document URL.
You store the URL in your database and show it in your UI.
And if you ever see that mysterious Drive “server error” in a linked project, check the logs and don’t be afraid to give apps-macros@system.gserviceaccount.com the role it’s asking for.
In the next article, we’ll look at how to connect an app to this API and how to integrate Apps Script into more complex, real-world workflows.
If you’ve been living in the comfy world of Apps Script and suddenly need “a real backend”, Google Cloud Run is a perfect next step.
You still don’t manage servers. But now you can run any containerized app: Node, React SSR, Python, Go, whatever.
In this tutorial, we’ll:
Explain what Cloud Run is in simple terms.
Build a tiny Node.js HTTP API (which could just as well serve a React app).
Deploy it to Cloud Run from source with a single gcloud run deploy command (no Docker installed locally).
Get a public HTTPS URL you can call from your frontend (React, Apps Script, or anything).
I will also include every relevant links in order to have evrything in one place 🙂
What is Cloud Run (in human words)?
Cloud Run is a serverless platform for containers:
You package your code as a container image(or just push your source code and let Google build that image).
Cloud Run runs that container on Google’s infrastructure, scaling up and down automatically depending on traffic.
It can even scale to zero when nobody calls your service, so you don’t pay when it’s idle. Cloud Run documentation
It works with any language or framework that can run in a container and listen for HTTP requests on the port specified by the PORT environment variable. Build sources to containers
If you’re used to Apps Script web apps:
Think of Cloud Run as “Web Apps, but for any container you want, not just Apps Script.”
What we’ll build
We’ll deploy a very small Node.js backend:
GET / → returns a JSON message.
It listens on the PORT environment variable (so Cloud Run can wire it correctly).
Cloud Run’s Node buildpack knows how to run npm start by default.
Step 3 – Test locally
npm install
npm start
You should see:
Server listening on port 8080
In another terminal:
curl http://localhost:8080
You’ll get a JSON response with your message and a timestamp.
If it works locally, you’re ready for the cloud.
Step 4 – Configure gcloud
Log in:
gcloud auth login
Set your project and region (example: australia-southeast1):
gcloud config set project YOUR_PROJECT_ID<br>gcloud config set run/region australia-southeast1
Pick the region closest to your users.
You can find your project ID in the Cloud Overview dashboard of your project:
Step 5 – Deploy to Cloud Run from source
From inside cloud-run-backend:
gcloud run deploy cloud-run-backend \
--source . \
--allow-unauthenticated
This single command:
Sends your source code to Cloud Build
Builds a container image (using buildpacks or Docker under the hood)
Creates a Cloud Run service called cloud-run-backend
Gives it a public HTTPS URL
At the end you’ll see something like:
Service [cloud-run-backend] revision [cloud-run-backend-00001-abc]
has been deployed and is serving 100 percent of traffic at:
https://cloud-run-backend-xxxxx-uc.a.run.app
Copy that URL, that’s your backend, live on the internet 🎉
Step 6 – Call your new backend
From anywhere:
curl https://cloud-run-backend-xxxxx-uc.a.run.app
or open it in the browser.
Cloud Run gives you:
HTTPS by default
Auto-scaling
A generous free tier (millions of requests/month) to experiment safely
TL;DR
If you’ve been living in Apps Script land and need a “real backend”, Cloud Run lets you run any containerized app (Node, Python, Go, React SSR…) without managing servers.
You build a tiny Node.js HTTP API that listens on the PORT environment variable.
You deploy it with a single command: gcloud run deploy cloud-run-backend \ --source . \ --allow-unauthenticated
Google Cloud builds the container for you, creates a Cloud Run service, and gives you a public HTTPS URL.
That URL can be called from React, Apps Script, or any frontend, and Cloud Run handles scaling, HTTPS, and a generous free tier in the background.
Conclusion
Cloud Run is a really nice bridge between the simplicity of Apps Script and the flexibility of “real” backends. You keep the good parts (no servers to manage, automatic scaling, pay-per-use) and you unlock the ability to run any language or framework you like.
In this tutorial, you:
Created a small Node.js API
Tested it locally
Deployed it to Cloud Run from source
Got a live HTTPS URL you can plug into any frontend
From here, you can start wiring Cloud Run into your own projects: connect it to a React app, protect your endpoints with authentication, or add a database like Firestore or Cloud SQL.
If you try this out or deploy your own mini SaaS on Cloud Run, let me know, I’d love to see what you build !
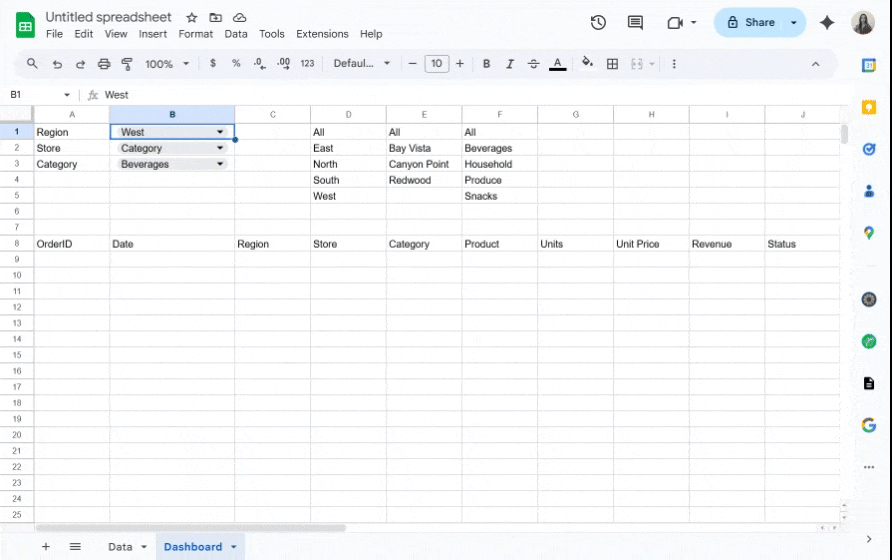
Dashboards feel magical when they react instantly to a selection, no scripts, no reloads, just smooth changes as you click a dropdown.
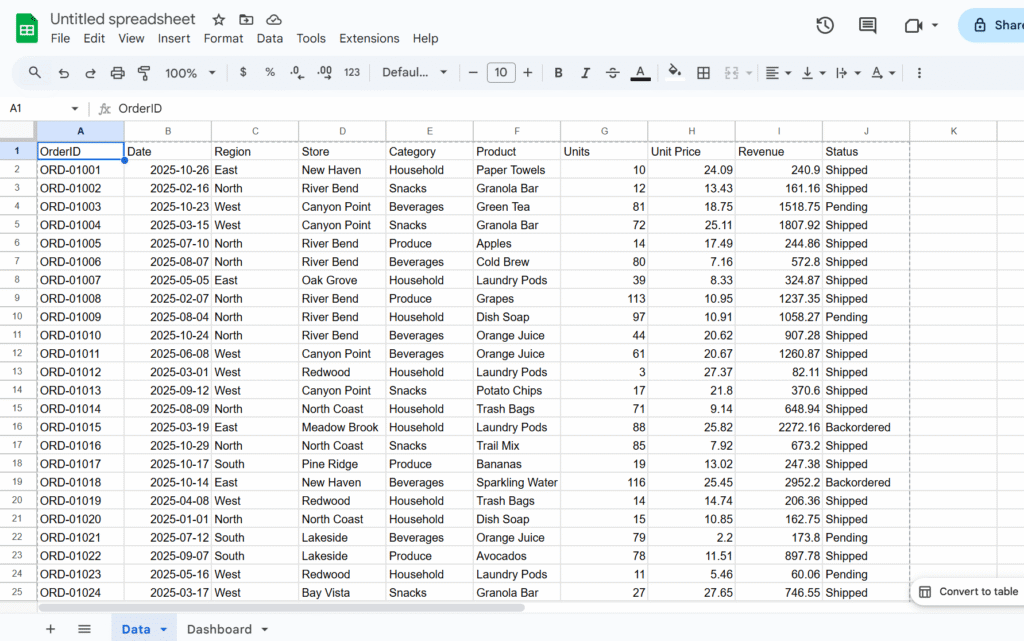
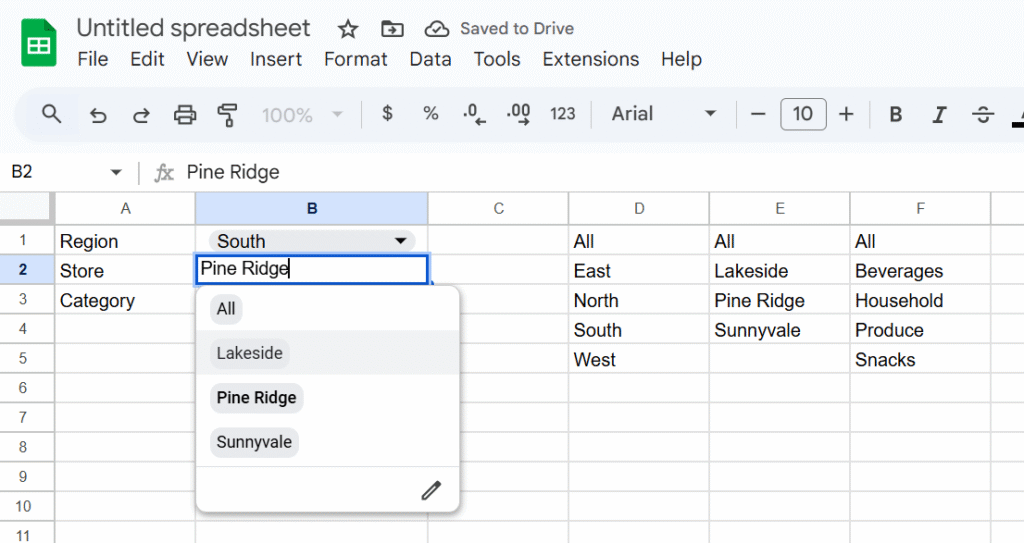
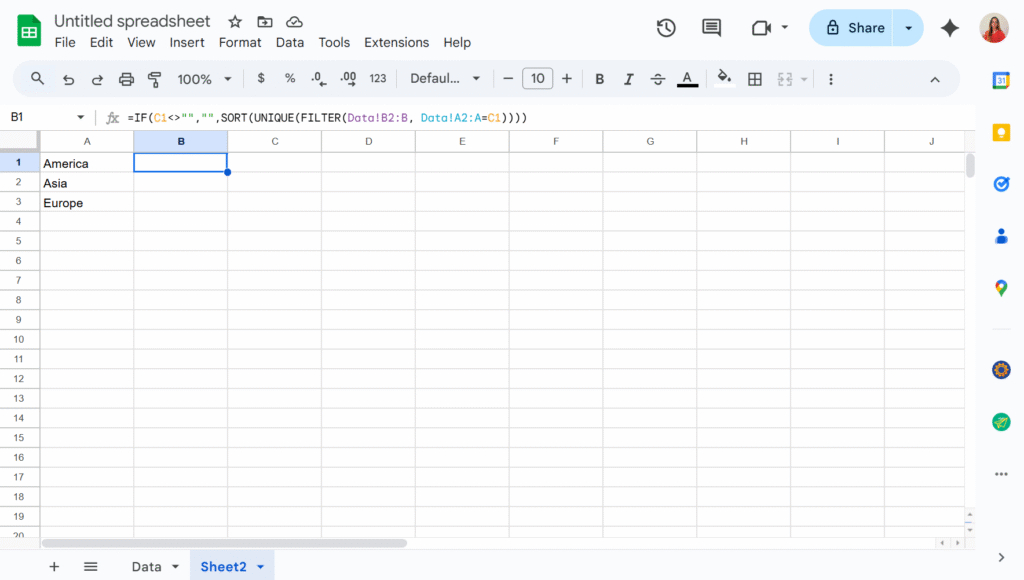
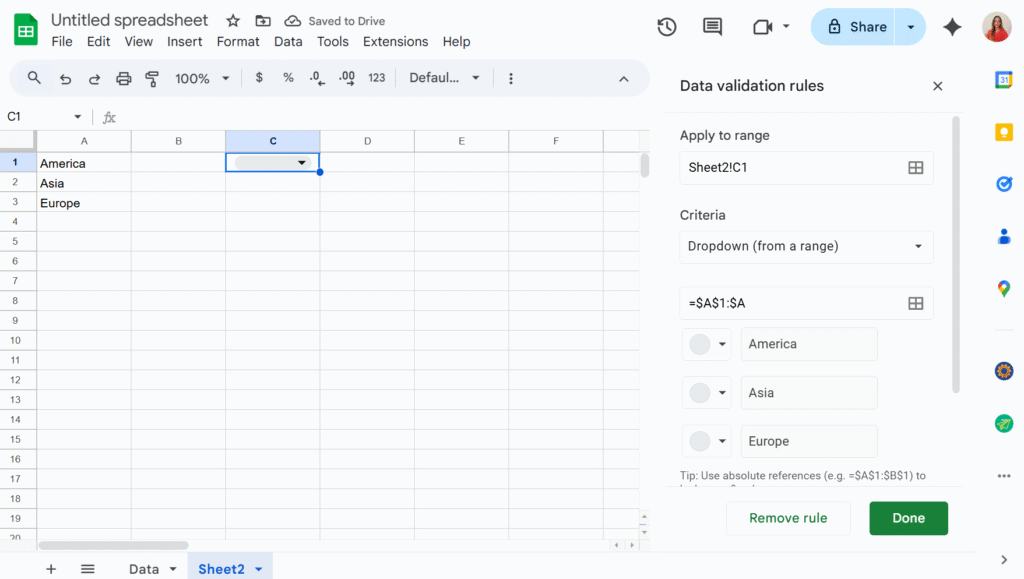
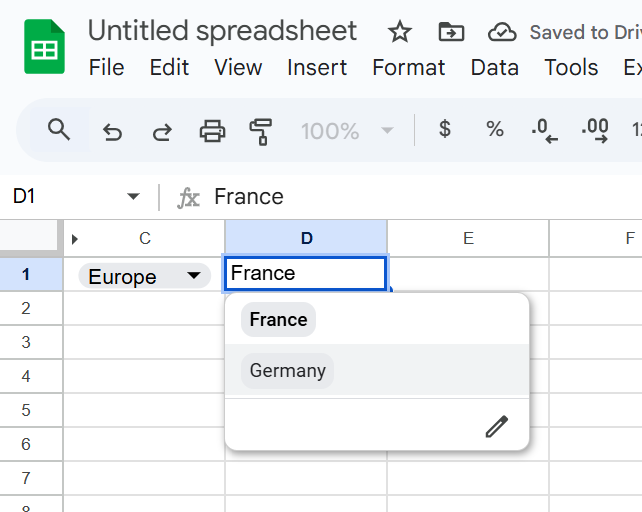
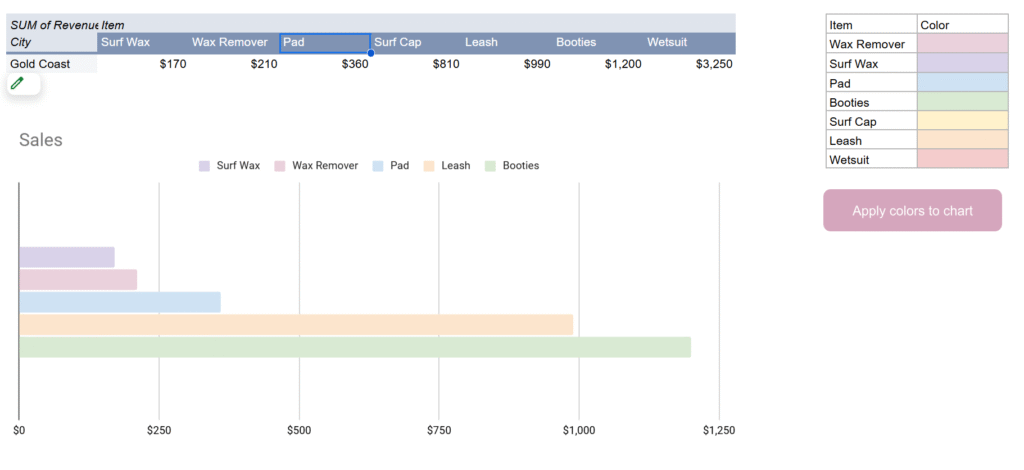
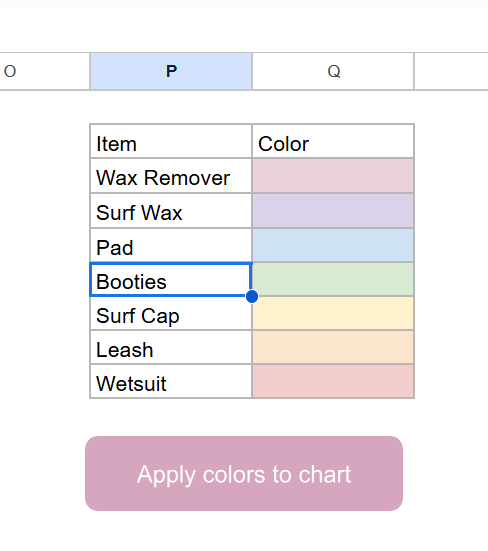
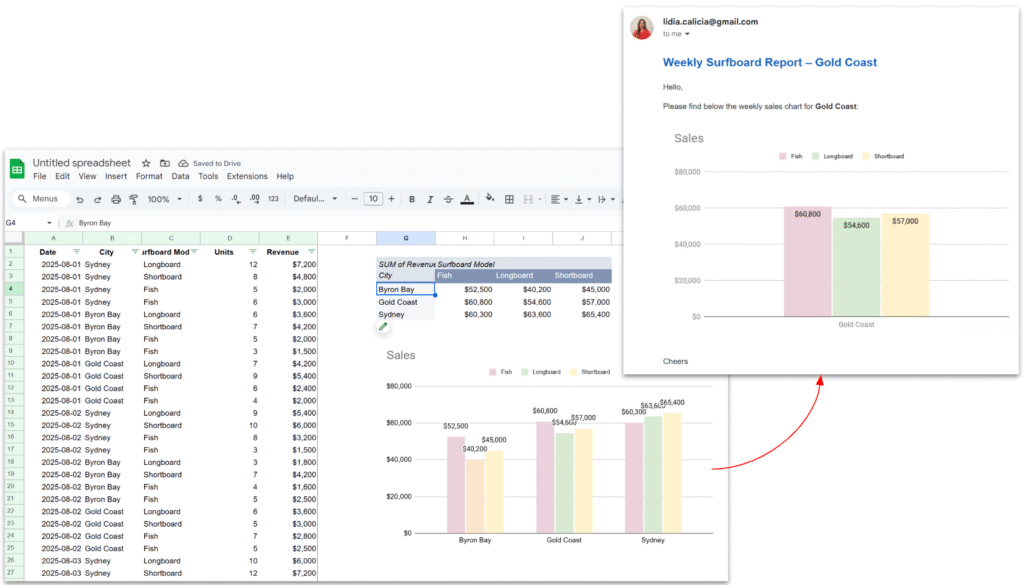
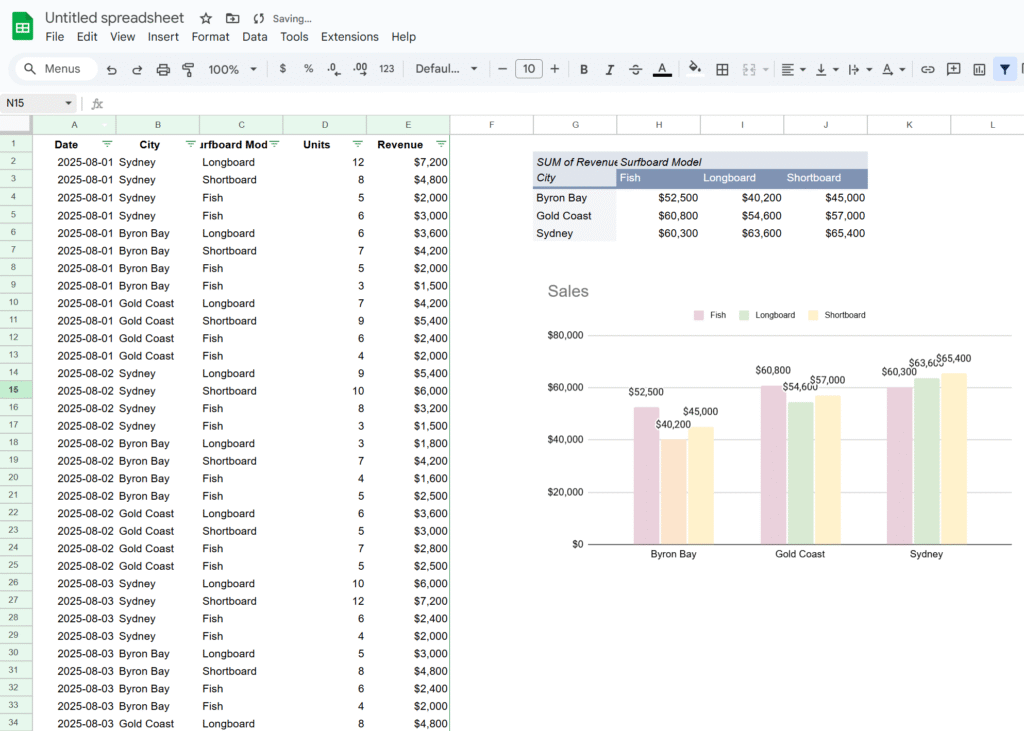
In this tutorial, we will build exactly that in Google Sheets: pick a Region, optionally refine by Store and Category, and watch your results table update in real time. We’ll use built-in tools, Data validation for dropdowns and QUERY for the live results, so it’s fast, maintainable, and friendly for collaborators.
In this example, we’ll use a sales dataset and create dropdowns for Region, Store, and Category, but you can easily adapt the approach to your own data and fields.
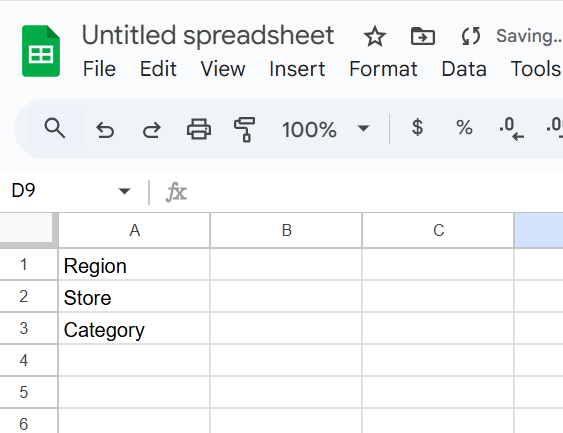
Step 1 – Add control labels
Let’s create a sheet, named Dashbaord, and add
A1:Region
A2:Store (dependent on Region)
A3:Category
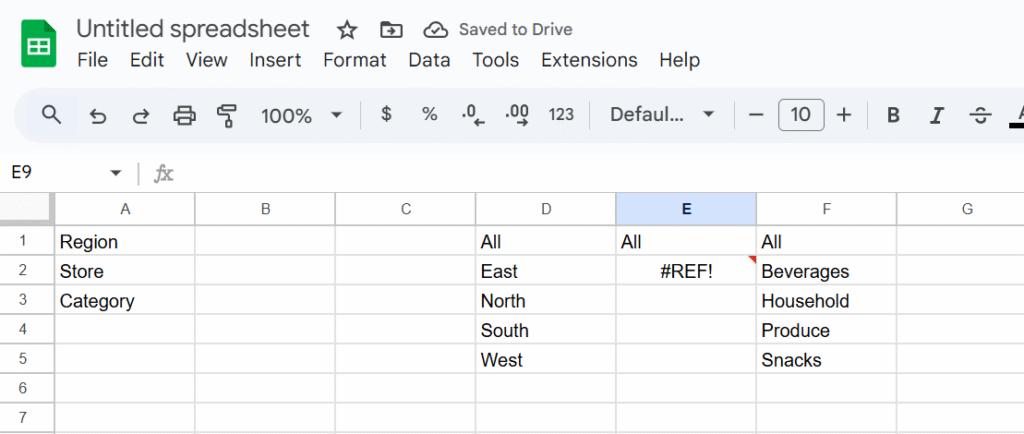
Step 2 – Build dynamic lists (helper formulas)
In column D, we will create a dynamic list of region with the following formula (insert the formula in D1):
If you work on Google Workspace automation, sooner or later the online editor slows you down.
clasp (Command Line Apps Script Projects) lets you develop Apps Script locally, use VS Code, commit to Git, automate deployments, and generally work like a modern JS team. This guide covers installation, daily commands, project structure, TypeScript, logs, deploys, and real-world troubleshooting (including Windows/PowerShell quirks) so you can ship faster and safer.
What is clasp (and why use it)?
clasp is Google’s official CLI for Apps Script. It syncs code between your local folder and your Script project, manages versions/deployments, and unlocks editor-quality DX in VS Code (intellisense, linting, formatting, test runners, etc.). Core benefits:
Local dev + Git: edit with your toolchain, review PRs, branch safely.
Faster iteration: push/pull instead of copy/paste.
Typed workflows: use TypeScript + @types/google-apps-script.
Automations: wire into CI to version & deploy.
Prerequisites
Node.js (current LTS recommended) and npm.
Enable “Apps Script API” for your account at Apps Script > Settings > Enable Apps Script API (one-time).
Install & authenticate
npm install -g @google/clasp
clasp -v
clasp login
clasp login opens a browser to authorize your Google account and stores a credential file named .clasprc.json (password-like; don’t commit it). On some commands you may also see a project-local.clasprc.json—more on this in Troubleshooting.
Create or clone a project
Create a brand new script in the current folder:
mkdir my-script && cd my-script
clasp create --type standalone --title "My Script"
appsscript.json – the Apps Script manifest (scopes, time zone, etc.) You can also clone an existing project if you have the scriptId:
clasp clone <SCRIPT_ID>
Daily workflow (push/pull/run/logs/open)
# Pull remote changes (online editor → local)
clasp pull

# Push local changes (local → Apps Script)
clasp push

# Run a server-side function
clasp run myFunction

# Tail logs (Cloud Logging)
clasp logs --watch

# Open the project in the web editor
clasp open
Tips:
Use clasp push --watch during rapid editing.
If clasp run complains about auth, see the Local vs Global .clasprc note below.
Smart project structure with rootDir
Want clean source in src/ and compiled output in build/? Configure rootDir in .clasp.json:
clasp will sync the rootDir to Apps Script, your source can live elsewhere and be built into build/. There’s also filePushOrder when you must guarantee upload order (rare, but handy).
Ignore junk with .claspignore (similar to .gitignore):
Set outDir to build and target ES2019+ in tsconfig.json.
2. Point .clasp.json → "rootDir": "build", "fileExtension": "ts" (above). 3. Now write .ts in src/, compile to build/, then clasp push. The @types/google-apps-script package gives VS Code autocompletion for Services like SpreadsheetApp, DriveApp, etc
clasp deploy creates a version and a deployment in one step—ideal for Web Apps where you need a stable URL tied to a version. You can manage multiple deployments (e.g., dev vs prod).
Note: Web Apps also require you to set Execute as / Who has access in the online editor’s Deploy → Manage deployments once. After that you can update via CLI.
Working in VS Code (snappy checklist)
Install ESLint + Prettier to keep Apps Script code consistent.
Use “JavaScript and TypeScript Nightly” for latest TS features.
Add @types/google-apps-script for smart autocompletion.
Optional: a minimal GAS snippets extension can speed boilerplate.
Useful commands you’ll actually use
clasp list # list your scripts
clasp status # see local vs remote diffs
clasp apis enable sheets # enable Advanced Service / API in the project
clasp open --webapp # jump straight to Web App deploy screen
clasp help # docs for any command
(Availability of some subcommands can change; always check clasp help and the README.)
CI/CD with GitHub Actions (or Jenkins)
You can deploy from CI by injecting CLASPRC_JSON (the contents of your .clasprc.json after clasp login) as a secret:
This pattern mirrors community guidance for headless deploys. It relies on user OAuth tokens (service-account login isn’t officially supported by clasp today). Rotate tokens/secrets carefully.
Subtle but important things most guides miss
1) Local vs Global .clasprc.json Some commands (notably clasp run) historically looked for a project-local.clasprc.json. If you see “Could not read API credentials” even though you ran clasp login, try placing the same file both in ~/.clasprc.jsonand your project folder. This quirk appears mostly on Windows.
2) .clasp.json + rootDir behaviors The rootDir controls which local directory is synced. If your files don’t upload, double-check the path and where .clasp.json lives—there have been behavior changes across versions; keep it simple: put .clasp.json in your project root and use a plain relative rootDir.
3) Don’t commit secrets Never commit .clasprc.json. Treat it like a password. In CI, store its contents as a secret (base64 if you prefer), then reconstruct it in the build step.
4) Logs aren’t Stackdriver anymore clasp logs streams Cloud Logging for the project; it’s the fastest way to see console.log output from deployed code. Use --watch during debugging.
5) Advanced Services vs. Google APIs Enabling an “Advanced Service” (e.g., Drive) within appsscript.json is distinct from enabling the underlying Google API. You can use clasp apis enable <name> to help, but you may still need to confirm in the console the first time.
Troubleshooting (copy/paste savers)
“Unexpected token … is not valid JSON” on login Your .clasprc.json is corrupt (often due to accidental binary/encoding writes or half-written file). Fix: delete both local and home copies, then clasp login again. Ensure your shell didn’t write non-text bytes into the file (common when redirecting Windows commands). (General JSON error context; root cause is a malformed cred file.)
“Could not read API credentials / are you logged in globally?” Create both: ~/.clasprc.json and ./.clasprc.json (project root) by copying the home one locally. Then retry clasp run / clasp versions.
Clone says .clasp.json already exists clasp clone wants a clean directory. Create a new empty folder, cd into it, then run clasp clone <SCRIPT_ID>.
Push/pull not picking your compiled files Confirm rootDir in .clasp.json points to your build output (not src/). Re-build, then clasp push.
This gives you a single npm run push that compiles and syncs in one go. (Versions differ—adjust semvers.)
VS Code productivity add-ons (optional but nice)
ESLint with eslint-config-google for consistent style.
Jest for pure functions (keep Apps Script globals mocked).
EditorConfig for team consistency. (Use sparingly to keep your repo lean—your readers love vanilla setups.) (General ecosystem advice; no citation required.)
If the Apps Script online editor is your bike, clasp + VS Code is your electric bike: same destination, much faster and safer.
With a local workflow, Git history, TypeScript typings, and one-command deploys, you’ll spend less time copy-pasting and more time shipping reliable Google Workspace automations. The subtle bits, rootDir, .clasprc.json placement, and deployment versions, are where most teams stumble; now you’ve got them covered.
If you found this guide useful, bookmark it, then try converting one existing script to the clasp workflow. You’ll feel the speedup on day one.
Google Sheets is amazing, until it isn’t. As your spreadsheets grow with formulas, collaborators, and live data, they can get painfully slow. Here are all the tricks I’ve found to help my clients get better performances.
Why Google Sheets Get Slow
Too many formulas, especially volatile ones (NOW(), TODAY(), RAND())
Large datasets (thousands of rows/columns)
Repeated or redundant calculations
Overuse of heavy formulas or IMPORTRANGE, ARRAYFORMULA, QUERY…
Dozens of collaborators editing simultaneously
Conditional formatting or custom functions on big ranges
Quick Fixes to Speed Things Up
✔️ Tidy Up Your Formulas
Start by removing or replacing volatile functions like NOW() or RAND() with static values when you don’t need them to update constantly. Use helper columns to calculate something once and reference that instead of repeating logic across rows.
Use fixed ranges (A2:A1000) instead of full-column references. Every formula referencing A:A makes Google Sheets look at all 50,000+ possible rows, even if you’re only using 1,000.
✔️ Lighten the Load
Think of your sheet as a backpack: if it’s stuffed with years of unused data and unnecessary features, it’ll be slow to move. Delete unused rows and columns. Archive old data to separate files. Keep the main spreadsheet focused on what matters now.
✔️ Be Visual, Not Flashy
Conditional formatting, while beautiful, is a silent performance killer. Use it selectively and avoid applying rules to entire columns or rows. Likewise, go easy on charts and embedded images. Move your dashboards to a separate file if needed.
Apps Script and Heavy-Duty Sheets
When dealing with large spreadsheets, your scripting strategy matters. Google Apps Script offers two main interfaces: SpreadsheetApp and the advanced Sheets API. While SpreadsheetApp is easier to use, it becomes painfully slow with big datasets because it handles operations cell by cell.
Instead, for serious performance, we lean heavily on the Sheets API and its batchUpdate method. This allows us to push changes to many cells at once, minimizing round trips and drastically speeding up execution.
Here’s a simple example that injects data into a large range using the Sheets API, not SpreadsheetApp:
// Example of data
const data = [{
  "range": "A35",
  "values": [["TEST"]]
}];

/**
 * Write to multiple, disjoint data ranges.
 * @param {string} spreadsheetId The spreadsheet ID to write to.
 * @see https://developers.google.com/sheets/api/reference/rest/v4/spreadsheets.values/batchUpdate
 */
function writeToMultipleRanges(spreadsheetId, data, sheetName) {

  let ssGetUrl = `https://sheets.googleapis.com/v4/spreadsheets/${spreadsheetId}`
  let options = {
    muteHttpExceptions: false,
    contentType: 'application/json',
    method: 'get',
    headers: { Authorization: 'Bearer ' + ScriptApp.getOAuthToken() }
  };
  let ssGetresponse = JSON.parse(UrlFetchApp.fetch(ssGetUrl, options));
  let sheets = ssGetresponse.sheets;
  let rowCount = 0;
  let sheetId = 0;
  sheets.forEach(sheet => {
    if (sheet.properties.title == sheetName) {
      rowCount = sheet.properties.gridProperties.rowCount
      sheetId = sheet.properties.sheetId;
    }
  });

  let num = parseInt(String(data[0]["range"]).split("!")[1].replace(/[^0-9]/g, ''));
  if (rowCount < num) {
    let diff = num - rowCount;
    let resource = {
      "requests": [
        {
          "appendDimension": {
            "length": diff,
            "dimension": "ROWS",
            "sheetId": sheetId
          }
        }
      ]
    };
    let ssBatchUpdateUrl = `https://sheets.googleapis.com/v4/spreadsheets/${spreadsheetId}:batchUpdate`
    let options = {
      muteHttpExceptions: true,
      contentType: 'application/json',
      method: 'post',
      payload: JSON.stringify(resource),
      headers: { Authorization: 'Bearer ' + ScriptApp.getOAuthToken() }
    };
    let response = JSON.parse(UrlFetchApp.fetch(ssBatchUpdateUrl, options));
  }

  const request = {
    'valueInputOption': 'USER_ENTERED',
    'data': data
  };

  try {
    const response = Sheets.Spreadsheets.Values.batchUpdate(request, spreadsheetId);
    if (response) {
      return;
    }
    console.log('response null');
  } catch (e) {
    console.log('Failed with error %s', e.message);
  }
}

/**
 * Converts a row and column index to A1 notation (e.g., 3, 5 → "E3").
 *
 * @param {number} rowIndex - The 1-based row index.
 * @param {number} colIndex - The 1-based column index.
 * @returns {string} The A1 notation corresponding to the given indices.
 */
function getA1Notation(rowIndex, colIndex) {
  if (rowIndex < 1 || colIndex < 1) {
    throw new Error("Both rowIndex and colIndex must be greater than or equal to 1.");
  }
  let columnLabel = "";
  let col = colIndex;
  while (col > 0) {
    const remainder = (col - 1) % 26;
    columnLabel = String.fromCharCode(65 + remainder) + columnLabel;
    col = Math.floor((col - 1) / 26);
  }
  return columnLabel + rowIndex;
}
Freeze Formulas
Often, you only need a formula to calculate once, not every time the sheet updates.
Instead of leaving it active and recalculating endlessly, you can use Apps Script to compute the values once and then lock them in as static data.
The script below is designed for that: it keeps the original formulas in the second row (as a reference and for future recalculations), then copies those formulas down the column, computes all results, and finally replaces everything below the second row with raw values. The result? A faster sheet that still preserves its logic blueprint in row two.
/**
 *
 */
function Main_Update_Formula_Data(ssId, sheet) {

  // Get formulas in first row
  const formulas = sheet.getRange(2, 1, 1, sheet.getLastColumn()).getFormulas()[0];

  // Get last row index
  const lastRowIndex = sheet.getLastRow();

  // Prepare ranges to treat
  const ranges = [];

  // Loop through formulas to expand until the end
  for (let i = 0; i < formulas.length; i++) {

    if (formulas[i] != ""
      && !String(formulas[i]).startsWith("=arrayformula")
      && !String(formulas[i]).startsWith("=ARRAYFORMULA")
      && !String(formulas[i]).startsWith("=ArrayFormula")) {

      const thisRange = {
        startRowIndex: 1,
        endRowIndex: lastRowIndex - 1,
        startColumnIndex: i,
        endColumnIndex: i + 1,
        formulas: [formulas[i]],
      };

      ranges.push(thisRange);
    }
  }

  // Inject and freeze data except first row of formulas
  injectAndFreezeFormulas(ssId, sheet.getSheetId(), sheet.getName(), ranges);
}


/**
 * Injects formulas into multiple ranges, waits for computation, then replaces them with static values.
 * @param {string} spreadsheetId - Spreadsheet ID.
 * @param {number} sheetId - Numeric sheet ID.
 * @param {string} sheetName - Sheet name (for value reads/writes).
 * @param {Array<Object>} ranges - Array of range configs like:
 * @return {void}
 */
function injectAndFreezeFormulas(spreadsheetId, sheetId, sheetName, ranges) {
  // --- Inject formulas via batchUpdate
  const requests = [];
  ranges.forEach(rangeDef => {
    const {
      startRowIndex,
      endRowIndex,
      startColumnIndex,
      endColumnIndex,
      formulas,
    } = rangeDef;

    formulas.forEach((formula, idx) => {
      requests.push({
        repeatCell: {
          range: {
            sheetId,
            startRowIndex,
            endRowIndex,
            startColumnIndex: startColumnIndex + idx,
            endColumnIndex: startColumnIndex + idx + 1,
          },
          cell: {
            userEnteredValue: { formulaValue: formula },
          },
          fields: 'userEnteredValue',
        },
      });
    });
  });

  Sheets.Spreadsheets.batchUpdate({ requests }, spreadsheetId);
  Logger.log(`Formulas injected into ${ranges.length} range(s)`);

  // --- Wait briefly to ensure calculations are done
  Utilities.sleep(1000);

  // --- Read computed values via API (valueRenderOption: UNFORMATTED_VALUE)
  const readRanges = ranges.map(r =>
    `${sheetName}!${columnLetter(r.startColumnIndex + 1)}3:` +
    `${columnLetter(r.endColumnIndex)}${r.endRowIndex + 1}`
  );

  const readResponse = Sheets.Spreadsheets.Values.batchGet(spreadsheetId, {
    ranges: readRanges,
    valueRenderOption: 'UNFORMATTED_VALUE',
  });

  // --- Reinject values (overwrite formulas)
  const writeData = readResponse.valueRanges.map((vr, idx) => ({
    range: readRanges[idx],
    values: vr.values || [],
  }));

  Sheets.Spreadsheets.Values.batchUpdate(
    {
      valueInputOption: 'RAW',
      data: writeData,
    },
    spreadsheetId
  );

  Logger.log(`Formulas replaced by static values in ${writeData.length} range(s)`);
}

/**
 * Helper — Convert a column index (1-based) to A1 notation.
 *
 * @param {number} colIndex - 1-based column index.
 * @return {string}
 */
function columnLetter(colIndex) {
  let letter = '';
  while (colIndex > 0) {
    const remainder = (colIndex - 1) % 26;
    letter = String.fromCharCode(65 + remainder) + letter;
    colIndex = Math.floor((colIndex - 1) / 26);
  }
  return letter;
}
Did you know all of these tricks? If you’ve got a favorite performance tip, clever automation, or formula hack, drop it in the comments! Let’s keep our Sheets smart, fast, and fun to work with.
Working with Google Apps Script and Google Forms often means mapping answers to the right question. For that, you need the question ID, a stable identifier that won’t change if you edit the title.
In this post, we’ll cover two simple ways to grab it: with Apps Script (getItems()) and via DevTools inspection of the live form. These methods are perfect for automation, building prefilled URLs, and keeping your form integrations reliable.
With Apps Script (getItems())
Use FormApp to loop through all items and match on the title. Great when you already know the exact question label.
/**
 * Return the question ID (string) that matches a given title.
 * @param {FormApp.Form} form
 * @param {string} questionTitle
 * @return {string|null}
 */
function retrieveItemId(form, questionTitle) {
  const items = form.getItems();
  for (let i of items) {
    if (i.getTitle().trim() == questionTitle.trim()) {
      return i.getId().toString();
    }
  }
  return null;
}
Why this is useful: you can rename a question in the UI without breaking scripts that rely on the ID later (IDs are stable; titles are not).
DevTools inspection (quick & dirty)
If you only need a question ID once and you have the live Google Form open, you can grab it straight from the page markup.
Steps:
Open the live form (the “view” URL, not the editor).
Right-click → Inspect (Chrome DevTools).
Press Ctrl/Cmd + F and search for the exact question title (e.g., Name).
Look for a parent <div> with attributes like jsmodel and data-params. Inside that blob you’ll typically see both IDs:
The first number after the title block is the Apps Script itemId (what FormApp.getItems() returns).
Inside a nested array you’ll also see the prefill entry id used in URLs.
826355120 → itemId (returned by item.getId() in Apps Script)
2092238618 → prefill entry id (used as entry.2092238618=... in a prefilled link)
When to use this approach: fast, one-off lookup while you’re building your Apps Script, testing a prefilled URL, or debugging. Caveat: this relies on the page’s internal structure, which can change. For anything automated or repeatable, prefer Method 1 (FormApp) or Method 3 (Forms API).
One of the common traps with Apps Script libraries is when the library uses an Advanced Google Service (like the Sheets API). Even if the logic lives in the library, the calling script must also enable and authorize the same service.
1. Library Project
Let’s say you create a project called SheetsHelper. It has one function to read sheet values using the Advanced Sheets API:
This uses the Sheets API, not the simpler SpreadsheetApp. This service needs to be enabled manually from the left side panel in the Apps Script UI.
2. Deploy the Library
Save your project.
Go to File > Project properties > Script ID, copy the ID.
In your target script, go to Services > Libraries, paste the Script ID, and give it a name like SheetsHelper.
3. Calling Script
Now in another project you call your newly deployed library:
function testLibrary() {
  const ssId = SpreadsheetApp.getActiveSpreadsheet().getId();
  const data = SheetsHelper.getValues(ssId, "Sheet1!A1:C5");
  Logger.log(data);
}
Sheets service must also be enabled in the calling script. Otherwise, this will throw an error.
Apps Script libraries don’t run in isolation. The execution environment is always the calling script. That means:
Scopes are declared in the caller’s appsscript.json.
Advanced Services must be enabled in the caller’s project.
Authorizations are stored per user + calling project, not in the library.
The library is just code, the permissions live in the project that calls it.
When using a library that depends on APIs, you must configure the calling project with the same advanced settings. Libraries don’t transfer authorizations — they only share code.
Google Sheets drop-downs are a great way to control inputs and keep your data clean. A classic use case is to have different options for a drop down, depending on what was selecting in another.
That’s where dependent drop-down lists (also called cascading drop-downs) come in. For example:
In Drop-Down 1, you select a Region (Europe, Asia, America).
In Drop-Down 2, you only see the Countries from that region (Europe → France, Germany, Spain).
This guide shows you step by step how to build dependent drop-downs in Google Sheets — without named ranges, using formulas and a simple script for better usability.
Step 1 – Organize your source data
On a sheet named Data, enter your list in two columns:
Important: Use one row per country (don’t put “France, Germany, Spain” in a single cell).
Step 2 – Create the drop-down lists
The key is not to link drop-downs directly to your raw lists, but to use formulas that generate the lists dynamically. These formulas can live on the same sheet as your data or on a separate one. In this example, I’ll place them in Sheet2 to keep the Data sheet uncluttered.
In A2, I will add the formula:
=SORT(UNIQUE(FILTER(Data!A2:A, Data!A2:A<>"")))
This way, the first drop-down will display a clean list of countries without any duplicates.
And in B2, assuming the country drop-down will be in C1 :
Now we can simply add two drop-downs in C1 and D1, using the “Dropdown from a range” option in the Data validation menu.
The second drop-down will now display only the values that match the selection from the first drop-down. You can then hide columns A and B to keep your sheet tidy — and voilà!
In othe previous article, we learned how to replace placeholders like [name] or [date] inside a Google Doc using Apps Script. We also made sure to keep the original file intact by creating a copy before applying replacements.
That’s great for a single document… but what if you need to create dozens of personalized files? Contracts, certificates, letters, all with different values?
The answer: connect your Google Doc template to a Google Sheet. Each row of your sheet will represent a new document, and the script will:
Create a copy of the template
Replace all placeholders with values from the sheet
Paste the link of the generated file back into the spreadsheet
Step 1 – Prepare your Spreadsheet
Create a sheet with the following structure (headers in the first row):
Notice the last column generatedLink, that’s where the script will paste the URL of each generated document.
Step 2 – Prepare your Google Doc Template
In your template, write placeholders between brackets:
Step 3 – The Script
This time the script will be bounded to our Google Sheets.
Open the Apps Script editor from your Spreadsheet (Extensions → Apps Script) and paste:
/**
 * Generate documents from a template Doc,
 * replacing placeholders with data from the sheet,
 * and storing links back in the sheet.
 */
function generateDocsFromSheet() {
  // IDs
  const TEMPLATE_ID = 'YOUR_TEMPLATE_DOC_ID_HERE';
  const FOLDER_ID = 'YOUR_TARGET_FOLDER_ID_HERE';

  const ss = SpreadsheetApp.getActiveSpreadsheet();
  const sheet = ss.getActiveSheet();
  const data = sheet.getDataRange().getValues();
  const headers = data[0];

  // Loop through each row (skip headers)
  for (let i = 1; i < data.length; i++) {
    const row = data[i];

    // Skip if doc already generated
    if (row[headers.indexOf('generatedLink')]) continue;

    // Build replacements
    const replacements = {};
    headers.forEach((h, idx) => {
      if (h !== 'generatedLink') {
        replacements[`\\[.*${h}.*\\]`] = row[idx];
      }
    });

    // Make copy of template
    const templateFile = DriveApp.getFileById(TEMPLATE_ID);
    const copyFile = templateFile.makeCopy(
      `Generated_${row[0]}_${new Date().toISOString().slice(0,10)}`,
      DriveApp.getFolderById(FOLDER_ID)
    );

    // Open and replace placeholders
    const doc = DocumentApp.openById(copyFile.getId());
    const body = doc.getBody();
    for (let tag in replacements) {
      body.replaceText(tag, replacements[tag]);
    }
    doc.saveAndClose();

    // Save link back into sheet
    sheet.getRange(i+1, headers.indexOf('generatedLink')+1)
      .setValue(copyFile.getUrl());
  }
}
Step 4 – Run the Script
Replace YOUR_TEMPLATE_DOC_ID_HERE with your template’s Doc ID
Replace YOUR_TARGET_FOLDER_ID_HERE with the ID of the folder where generated docs should be stored
Run the script → authorize it → watch your documents appear!
Each row in your sheet now produces a new Google Doc, and the link is written back automatically:
Wrap Up
With just a few lines of code, you’ve upgraded your document automation:
One Google Doc becomes a reusable template
One Google Sheet becomes a data source
Each row produces a personalized document with its link logged back
This setup is basically a DIY mail-merge for Docs
In the next article, we’ll explore how to send those generated documents automatically by email, turning your workflow into a fully automated system.
Ever needed to prepare a contract, a template, or a letter where you just replace placeholders like [Client Name] or [Date] with real values? Instead of manually editing each tag, we can automate the process with Google Apps Script.
This article shows you how to:
Add placeholders in your document
Replace them with real values in one click
Keep your templates clean and reusable
Why use placeholders?
Placeholders are short markers inside your document that can later be replaced with actual content. For example:
With Apps Script, you can easily replace [name] with “Lidia”, or any other dynamic value from a sheet, a form, or an API.
Step 1 – Prepare your Google Docs
Open a new Google Docs file, or write docs.new in your search bar, and write some sample content with tags between square brackets [ ].
Step 2 – Open the Script Editor
In your Google Doc, go to Extensions → Apps Script
2. Delete the default code and paste the following function:
function replaceAllPlaceholders() {
  const body = DocumentApp.getActiveDocument()
    .getActiveTab()
    .asDocumentTab()
    .getBody();

  const replacements = {
    '\\[.*name.*\\]': 'Lidia',
    '\\[.*date.*\\]': '16 Sept 2025',
    '\\[.*company.*\\]': 'Apps Script Lab'
  };

  for (let tag in replacements) {
    body.replaceText(tag, replacements[tag]);
  }
}
You can adapt the placeholders to match whatever data you need to inject. Each occurrence of the placeholder will be swapped automatically using the replaceText() method.
Keep in mind: the function expects a regular expression as the search patter
Let’s make our template reusable
In this first example, we simply replaced the placeholders directly in the document. But if you need to generate multiple documents while keeping your original file intact, it’s better to create a copy of the template and run the replacements in the copy.
/**
 * Creates a copy of the active Google Doc,
 * replaces placeholders in the copy,
 * and returns the URL of the generated document.
 */
function generateDocFromTemplate() {
  // Define placeholder values
  const replacements = {
    '\\[.*name.*\\]': 'Lidia',
    '\\[.*date.*\\]': '16 Sept 2025',
    '\\[.*company.*\\]': 'Apps Script Lab'
  };

  // Get the template (active document)
  const templateDoc = DocumentApp.getActiveDocument();
  const templateFile = DriveApp.getFileById(templateDoc.getId());

  // Create a copy next to the original
  const copyFile = templateFile.makeCopy(
    templateFile.getName() + ' - Generated ' + new Date().toISOString().slice(0, 10),
    templateFile.getParents().next() // same folder
  );

  // Open the copy for editing
  const copyDoc = DocumentApp.openById(copyFile.getId());
  const body = copyDoc.getBody();

  // Replace all placeholders
  for (let tag in replacements) {
    body.replaceText(tag, replacements[tag]);
  }

  // Save & close
  copyDoc.saveAndClose();

  // Return the URL (for logs or UI)
  Logger.log('Generated doc: ' + copyFile.getUrl());
  return copyFile.getUrl();
}
The script will create a new document based on your template. Your original file remains untouched, and the placeholders are replaced only in the generated copy.
Much cleaner than editing manually, and your template is always safe for the next run.
Next Steps
In this tutorial, we learned how to:
Use placeholders in a Google Doc
Replace them automatically with Apps Script
Keep our original template safe by generating copies
The natural next step is to connect this process with Google Sheets. That way, you can store your tags and values in a spreadsheet (e.g. [name], [date], [company]), run the script for each row, and automatically log the links to the generated documents back into the sheet.
This turns your simple template into a full document generation system
That format is fine for small scripts, but it quickly becomes messy. You end up with unreadable code like:
const data = sheet.getDataRange().getValues();
for (let i = 1; i < data.length; i++) {
  const name = data[i][0];
  const email = data[i][1];
  const role = data[i][2];
  // ...
}
Hard to read. Easy to break. And if someone reorders the spreadsheet columns, your code will suddenly pull the wrong data.
A Cleaner Way: Convert to Array of Objects
Instead of juggling indexes, let’s wrap the data in a class that automatically maps each row into an object , using the first row of the sheet as headers.
class Data {
  constructor(sheetName) {
    this.spreadsheet = SpreadsheetApp.getActiveSpreadsheet();
    this.sheetName = sheetName;
    this.sheet = this.spreadsheet.getSheetByName(this.sheetName);

    if (!this.sheet) throw `Sheet ${this.sheetName} not found.`;

    const data = this.sheet.getDataRange().getValues();
    this.headers = data.shift();
    this.rows = data.map(row =>
      row.reduce((record, value, i) => {
        record[this.headers[i]] = value;
        return record;
      }, {})
    );
  }
}
Now, when we create a new Data instance:
function demo() {
  const users = new Data("Users");
  Logger.log(users.rows);
}
Have you ever noticed that chart colors in Google Sheets sometimes shuffle around when your data changes? This usually happens when you build a chart on top of a pivot table. If one of the series (like a product or category) isn’t present in the filtered data, Google Sheets automatically re-assigns colors.
The result: one week “Surf Wax” is blue, the next week it’s orange, and your report suddenly looks inconsistent. Not great if you’re sending charts to clients or managers who expect a clean, consistent palette.
In this tutorial, we’ll fix the problem once and for all by locking chart colors using the Google Sheets API from Apps Script.
Why the colors shuffle
Charts in Google Sheets don’t store colors per label by default, they store them per series position. So if your chart shows [Surf Wax, Leash, Wetsuit] this week, those get assigned colors 0, 1, 2. But if next week [Pad] is missing, everything shifts left and the colors move with them.
That’s why you see colors “jump” around when some categories are empty.
The fix: define your own color map
The solution is to create a color map table in your sheet that tells Apps Script what color each item should always use.
Example in range P2:Q:
The trick is that we don’t actually use the text in the “Color” column, we use the cell background color. This makes it easy to set and change colors visually.
Using the Sheets API to lock colors
The built-in SpreadsheetApp class in Apps Script doesn’t let us fully control chart series. For that, we need the Advanced Sheets Service (a wrapper around the Google Sheets REST API).
To enable it:
In the Apps Script editor, go to Services > Add a service > turn on Google Sheets API v4.
The Apps Script solution
Here’s the script that applies your custom colors to the first chart on the Sales sheet:
/**
 * Apply chart colors from mapping in P2:Q to the first chart in "Sales".
 */
function updateChartColors() {
  const ss = SpreadsheetApp.getActiveSpreadsheet();
  const sheet = ss.getSheetByName("Sales");
  const spreadsheetId = ss.getId();

  // 1. Build color map (Item -> hex from background)
  const mapRange = sheet.getRange("P2:Q");
  const values = mapRange.getValues();
  const bgs = mapRange.getBackgrounds();

  const colorMap = {};
  values.forEach((row, i) => {
    const item = row[0];
    const color = bgs[i][1];
    if (item && color && color !== "#ffffff") {
      colorMap[item] = color;
    }
  });

  // 2. Get chart spec from Sheets API
  const sheetResource = Sheets.Spreadsheets.get(spreadsheetId, {
    ranges: [sheet.getName()],
    fields: "sheets(charts(chartId,spec))"
  }).sheets[0];

  if (!sheetResource.charts) return;
  const chart = sheetResource.charts[0];
  const chartId = chart.chartId;
  const spec = chart.spec;

  // 3. Apply colors by matching series headers with map
  if (spec.basicChart && spec.basicChart.series) {
    spec.basicChart.series.forEach((serie, i) => {
      const src = serie.series?.sourceRange?.sources?.[0];
      if (!src) return;

      // Get header label (like "Surf Wax", "Leash", etc.)
      const header = sheet.getRange(
        src.startRowIndex + 1,
        src.startColumnIndex + 1
      ).getValue();

      if (colorMap[header]) {
        spec.basicChart.series[i].colorStyle = {
          rgbColor: hexToRgbObj(colorMap[header])
        };
      }
    });
  }

  // 4. Push update back into the chart
  Sheets.Spreadsheets.batchUpdate(
    {
      requests: [
        {
          updateChartSpec: {
            chartId,
            spec
          }
        }
      ]
    },
    spreadsheetId
  );
}

/**
 * Convert #RRGGBB hex to Sheets API {red, green, blue}.
 */
function hexToRgbObj(hex) {
  const bigint = parseInt(hex.slice(1), 16);
  return {
    red: ((bigint >> 16) & 255) / 255,
    green: ((bigint >> 8) & 255) / 255,
    blue: (bigint & 255) / 255
  };
}
How it works
Read the color map from P2:Q using the cell background color.
Fetch the chart spec from the Sheets API.
For each series, look up the header label from the pivot table (like “Wax Remover”).
If it exists in the map, apply the mapped color using colorStyle: { rgbColor: … }.
Push the modified spec back to the chart with updateChartSpec.
The result: your chart always uses the same colors, no matter which categories are present.
Wrapping up
With this approach, you’ll never have to worry about Google Sheets “helpfully” reshuffling your chart colors again. Once you set your palette in the sheet, a single click on a button can re-apply it to your chart. And because it uses the Sheets API directly, the colors are actually saved in the chart definition itself.
That means your reports stay consistent, your managers stop asking “why is Surf Wax orange this week?”, and your charts look clean and professional every time.
In many reporting workflows, it’s helpful to send reports straight from a spreadsheet, complete with a chart inside the email. Imagine you’re running a surf shop with branches in different cities. Every week, the managers are waiting for their sales report: you filter the data for Sydney, copy the chart, paste it into an email, then repeat the same steps for Byron Bay and the Gold Coast. Before long, it feels like you’re stuck doing the same routine again and again.
Instead of preparing these reports by hand, the whole process can be automated. With a little help from Google Apps Script, the spreadsheet can filter the data for each city, update the chart, and send the report by email automatically.
In this tutorial, we will see how to:
Extract a list of unique cities from the sales data.
Apply a pivot filter dynamically for each city.
Capture the chart as an image.
Send a nicely formatted email with the chart embedded directly in the body.
We’ll go through the script function by function.
Here’s the Google Sheet we’ll be using in this tutorial, containing a simple dataset along with a pivot table and a chart.
1. Main function – looping through cities
Our entry point is the sendWeeklyReports() function.
function sendWeeklyReports() {
  // Getting sheet and data
  const ss = SpreadsheetApp.getActiveSpreadsheet();
  const salesSheet = ss.getSheetByName("Sales");
  const salesData = salesSheet.getDataRange().getValues();
  const headers = salesData.shift();

  // Extract cities
  const cities = salesData.map(x => x[headers.indexOf("City")]);

  // Get unique list of cities
  const unqiueCities = new Set(cities);

  // Get pivot table
  const pivotTable = salesSheet.getPivotTables()[0];

  // Get chart
  const chart = salesSheet.getCharts()[0];

  unqiueCities.forEach(city => {
    applyPivotFilter(city, pivotTable);
    const chartBlob = getPivotChartAsImage(chart, city);
    sendEmailReport(city, chartBlob);
  });
}
Explanation:
We grab the entire dataset from the Sales sheet.
From the data, we extract all values in the City column and convert them into a Set → this gives us a unique list of cities. This way, if a new city is added in the future (e.g. Melbourne), it’s automatically included.
We grab the pivot table and chart already created in the sheet.
Finally, we loop through each city, apply a filter, generate the chart image, and send the email.
This main function orchestrates the entire workflow.
2. Filtering the Pivot Table
We need to update the pivot table filter so that it only shows results for one city at a time.
function applyPivotFilter(city, pivotTable) {
  // Remove existing filter
  pivotTable.getFilters().forEach(f => f.remove());

  // Create a criteria for the city
  const criteria = SpreadsheetApp.newFilterCriteria().whenTextContains(city);
  pivotTable.addFilter(2, criteria);

  SpreadsheetApp.flush();
}
Explanation:
First, we clear existing filters. This ensures we don’t stack multiple filters and accidentally hide everything.
Then, we create a new filter criteria for the city.
The addFilter(2, criteria) call means “apply this filter on column index 2” (update this index if your “City” column is different).
Finally, we call SpreadsheetApp.flush() to force Sheets to update the pivot table immediately before we grab the chart.
This function makes the pivot behave as if you clicked the filter dropdown manually and selected just one city.
3. Exporting the Chart as an Image
Once the pivot table is filtered, the chart updates automatically. We can then capture it as an image Blob.
function getPivotChartAsImage(chart, city) {
  return chart.getAs("image/png").setName(`Sales_${city}.png`);
}
Explanation:
chart.getAs("image/png") converts the chart object into an image blob.
We rename the file with the city name, which is handy if you want to attach it or archive it.
This blob can be sent in an email, saved to Drive, or inserted into a Slide deck.
4. Sending the Email
Finally, we embed the chart directly in an HTML email body.
<img src="cid:chartImage"> is a placeholder that’s replaced by the inline chart image.
In the sendEmail call, we pass both the HTML body and inlineImages: { chartImage: chartBlob }.
Result → the chart is embedded in the email itself, not just attached.
This makes the report feel polished and professional.
In conclusion, this workflow shows how easy it is to turn a manual reporting routine into a smooth, automated process. By letting Apps Script filter the pivot table, capture the chart, and send it directly inside an email, you get consistent weekly updates without lifting a finger. It’s a small piece of automation that saves time, reduces errors, and keeps your reports looking professional.
If you’re building Google Workspace Add-ons or Editor Add-ons, there’s a good chance you’ve encountered mysterious PERMISSION_DENIED errors, especially when using google.script.run in custom sidebars.
The kicker? The same code works flawlessly for some users, and fails catastrophically for others — without any obvious reason.
Welcome to the multi-account execution context problem.
In this article, I’ll break down:
When and why this error occurs
How to reproduce it
What you can do to avoid it (or at least handle it gracefully)
Ever wanted to track paragraphs in a Google Doc without adding visible clutter? Whether you’re syncing content with an external system, managing edits across collaborators, or linking comments to specific sections, this technique lets you embed invisible unique IDs inside your document using zero-width characters.
Let’s dive into how this works, and how you can use it in your own Docs.
Ever wished you could get an instant email when someone submits your Google Form complete with their answers and any files they uploaded? With a few lines of Apps Script, you can!
Let’s break it down
Why Use This Script?
This solution answers a common need: getting notified via email when someone submits a form response. Especially useful when:
You’re collecting job applications or portfolios.
You want to automate intake notifications.
Your form includes file uploads, and you want the file attached in the email.
In Google Apps Script, execution time matters. With quotas on simultaneous runs and total runtime, long or inconsistent function execution can cause failures or delays. This is especially important when using services like LockService, where you need to define realistic wait times.
This article shows how to track execution time and errors in your functions—helping you stay within limits and optimize performance as your scripts grow.
The Apps Script debugger lets you pause your code at any point and step through it line-by-line to see what’s really happening. You can inspect variables, monitor execution flow, and identify exactly where your script is misbehaving.
One of the most underrated (but powerful) features of Google Apps Script is its autocompletion system. Once you get used to it, you’ll barely need to open the official documentation ever again!
Apps Script is built on top of JavaScript, but its real strength comes from how it exposes Google services through method chaining. Whenever you type a dot (.) after an object—like SpreadsheetApp.getActiveSpreadsheet().—you instantly see a list of methods available to you. This isn’t just convenient; it’s essential for writing code quickly and confidently.