Automatically import Xero bills into Google Sheets (Google Apps Script + OAuth2)

If you use Xero and Google Sheets on a daily basis, this automation tutorial is for you. In this post, you’ll learn how to automatically sync your Xero bills into a Google Sheet on a schedule, so your spending table stays up to date without copy-pasting.

We’ll build it in a production-friendly way: OAuth2 authorization (so Xero can securely grant access), safe credential storage in Apps Script, a sync function that writes into your sheet, and refresh tokens (via offline_access) so the automation keeps running long-term.

Create a Xero OAuth2 app

Create a Xero OAuth2 app in the Xero Developer portal and choose the web app / Standard auth code type (the standard flow Xero documents for third-party apps). The standard authorization code flow

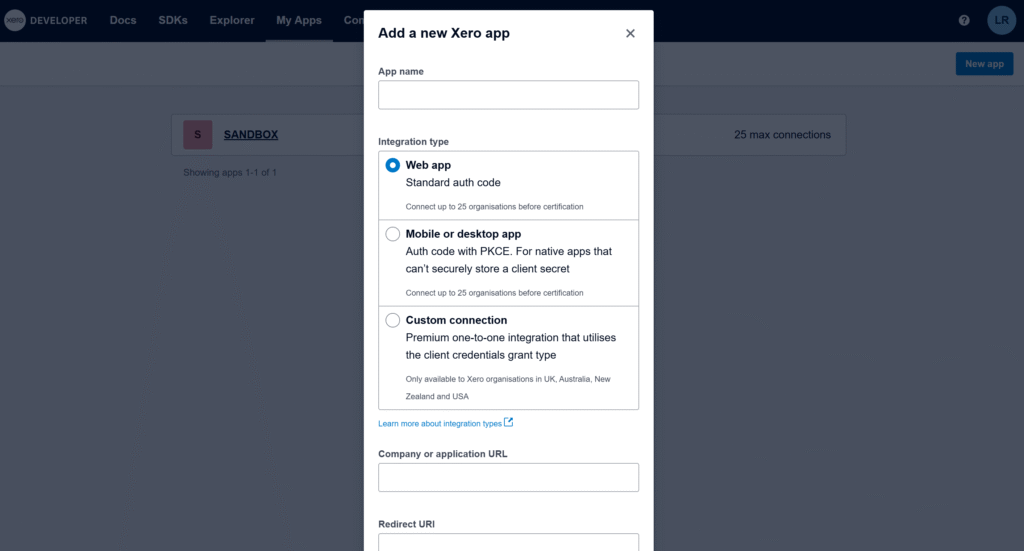
The most important field is Redirect URI. Xero requires an exact, absolute redirect URI (no wildcards), so we will need the exact callback URL generated by your Apps Script project. Xero API – OAuth 2.0

Get a temporary redirect URI to create the app

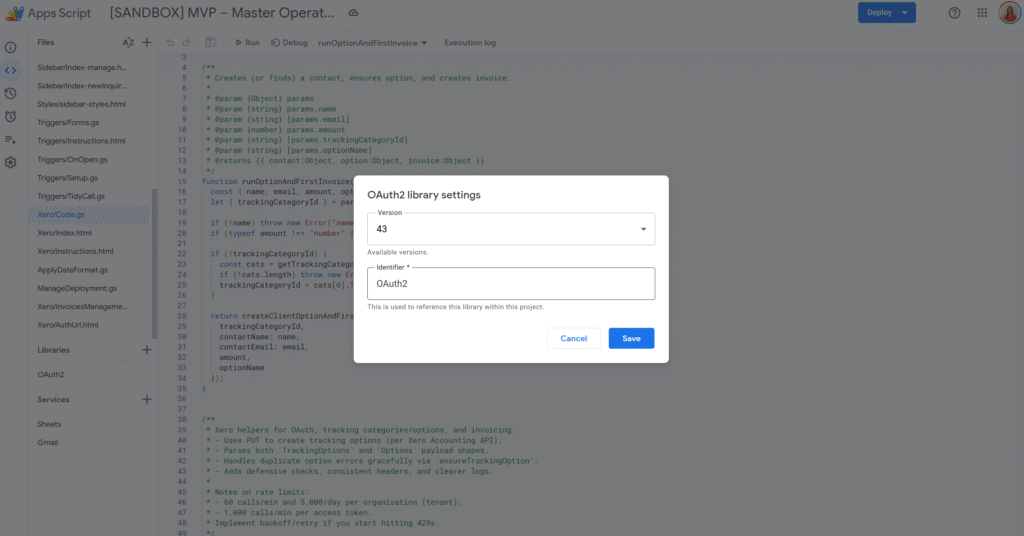
In Apps Script, the OAuth2 library can generate the exact redirect URI for this project. Run the function below, copy the URL from the logs, and paste it into your Xero app settings to finish creating the app.

/**
 * Logs the Redirect URI you must paste into your Xero app settings.
 * This does NOT require Client ID/Secret.
 *
 * @returns {void}
 */
function logXeroRedirectUri() {
  const service = OAuth2.createService('Xero')
    .setCallbackFunction('xeroAuthCallback');
  Logger.log(service.getRedirectUri());
}

/**
 * OAuth callback endpoint (stub is fine for this step).
 * @param {Object} e
 * @returns {GoogleAppsScript.HTML.HtmlOutput}
 */
function xeroAuthCallback(e) {
  return HtmlService.createHtmlOutput('Callback ready.');
}

The Apps Script OAuth2 library is the standard way to handle OAuth consent and token refresh in Apps Script. (Link to the setup guide here).

Get and store Client ID / Client Secret in Script Properties

Once the app is created, copy the Client ID and Client Secret. You’ll need them in Apps Script to complete the OAuth flow.

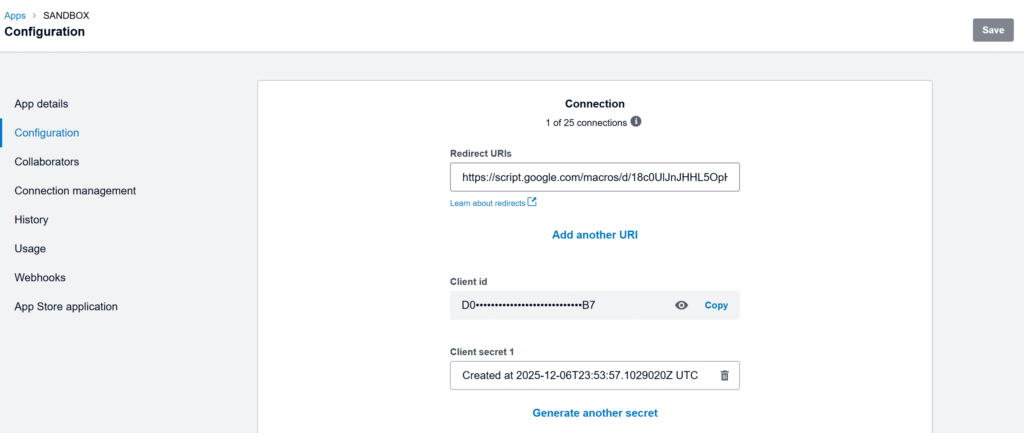
Store only the Client ID and Client Secret in Script Properties. OAuth tokens are user-specific, so we store them in User Properties via the OAuth2 library’s property store.

const XERO_PROPS_ = {
  clientId: 'XERO_CLIENT_ID',
  clientSecret: 'XERO_CLIENT_SECRET',
  lastSyncIso: 'XERO_BILLS_LAST_SYNC_ISO',
};

/**
 * Saves Xero app credentials to Script Properties.
 * @param {string} clientId
 * @param {string} clientSecret
 * @returns {void}
 */
function saveXeroCredentials_(clientId, clientSecret) {
  PropertiesService.getScriptProperties()
    .setProperty(XERO_PROPS_.clientId, clientId)
    .setProperty(XERO_PROPS_.clientSecret, clientSecret);
}

/**
 * Reads Xero app credentials from Script Properties.
 * @returns {{clientId: string, clientSecret: string}}
 */
function getXeroCredentials_() {
  const props = PropertiesService.getScriptProperties();
  const clientId = props.getProperty(XERO_PROPS_.clientId) || '';
  const clientSecret = props.getProperty(XERO_PROPS_.clientSecret) || '';
  if (!clientId || !clientSecret) throw new Error('Missing Xero credentials in Script Properties.');
  return { clientId, clientSecret };
}

Replace the temporary callback with the real OAuth service + callback

Now that we have Client ID/Secret stored, we can build the real OAuth service and the real callback that stores tokens.

Important: tokens are user-specific, so we store them in User Properties via .setPropertyStore(PropertiesService.getUserProperties()).

Let’s replace the previous xeroAuthCallback() with this version:

/**
 * Creates and returns the OAuth2 service configured for Xero.
 * Client ID/Secret are in Script Properties; OAuth tokens are stored per-user in User Properties.
 *
 * @returns {OAuth2.Service}
 */
function getXeroService_() {
  const { clientId, clientSecret } = getXeroCredentials_();

  return OAuth2.createService('Xero')
    .setAuthorizationBaseUrl('https://login.xero.com/identity/connect/authorize')
    .setTokenUrl('https://identity.xero.com/connect/token')
    .setClientId(clientId)
    .setClientSecret(clientSecret)
    .setCallbackFunction('xeroAuthCallback')
    .setPropertyStore(PropertiesService.getUserProperties())
    .setCache(CacheService.getUserCache())
    .setLock(LockService.getUserLock())
    .setScope([
      'openid',
      'profile',
      'email',
      'offline_access',
      'accounting.transactions',
    ].join(' '))
    .setTokenHeaders({
      Authorization: 'Basic ' + Utilities.base64Encode(`${clientId}:${clientSecret}`),
    });
}

/**
 * OAuth callback endpoint called by Xero after consent.
 * This stores the access token + refresh token in the OAuth2 property store.
 *
 * @param {Object} e
 * @returns {GoogleAppsScript.HTML.HtmlOutput}
 */
function xeroAuthCallback(e) {
  const service = getXeroService_();
  const ok = service.handleCallback(e);
  return HtmlService.createHtmlOutput(ok ? 'Success! You can close this tab.' : 'Denied');
}

Authorize once

This is a one-time consent step: generate the authorization URL, open it in your browser, click Allow, then Xero redirects back to xeroAuthCallback() to finalize the connection.

You must request offline_access to receive a refresh token. Xero Developer – Offline access
Xero’s docs also note refresh tokens expire after a period (so if the integration stops running for too long, you may need to re-authorize).

/**
 * Returns the Xero consent screen URL. Open it and approve access.
 *
 * @returns {string}
 */
function getXeroAuthorizationUrl_() {
  const service = getXeroService_();
  return service.getAuthorizationUrl();
}

/**
 * Logs the authorization URL in Apps Script logs.
 *
 * @returns {void}
 */
function logXeroAuthorizationUrl_() {
  Logger.log(getXeroAuthorizationUrl_());
}

Run logXeroAuthorizationUrl_(), copy the logged URL, open it, and approve access. After that, your script can call Xero without prompting again.

Sync bills into Sheets (then add a trigger)

Xero is multi-tenant: first call the Connections endpoint to get a tenantId, then include xero-tenant-id in every API request. For incremental sync, use the If-Modified-Since header so each run only pulls bills modified since your last sync timestamp.

const XERO_API_BASE_ = 'https://api.xero.com/api.xro/2.0';
const XERO_BILLS_SHEET_ = 'Xero Bills';

/**
 * Resolves the active tenant ID from Xero connections.
 *
 * @param {OAuth2.Service} service
 * @returns {string}
 */
function getXeroTenantId_(service) {
  const res = UrlFetchApp.fetch('https://api.xero.com/connections', {
    method: 'get',
    headers: { Authorization: `Bearer ${service.getAccessToken()}` },
    muteHttpExceptions: true,
  });

  if (res.getResponseCode() !== 200) {
    throw new Error(`Failed to resolve tenant. ${res.getResponseCode()} — ${res.getContentText()}`);
  }

  const tenants = JSON.parse(res.getContentText());
  const tenantId = tenants?.[0]?.tenantId;
  if (!tenantId) throw new Error('No tenant connected to this token.');
  return tenantId;
}

/**
 * Performs a JSON request to Xero with common headers.
 *
 * @param {"get"|"post"|"put"|"delete"} method
 * @param {string} url
 * @param {Object|null} body
 * @param {{ ifModifiedSinceIso?: string }} [opts]
 * @returns {{code: number, text: string, json?: Object}}
 */
function xeroJsonRequest_(method, url, body, opts = {}) {
  const service = getXeroService_();
  if (!service.hasAccess()) throw new Error('Xero access not granted. Run the authorization flow first.');

  const tenantId = getXeroTenantId_(service);

  /** @type {GoogleAppsScript.URL_Fetch.URLFetchRequestOptions} */
  const options = {
    method,
    headers: {
      Authorization: `Bearer ${service.getAccessToken()}`,
      'xero-tenant-id': tenantId,
      Accept: 'application/json',
      ...(opts.ifModifiedSinceIso ? { 'If-Modified-Since': opts.ifModifiedSinceIso } : {}),
    },
    muteHttpExceptions: true,
  };

  if (body != null) {
    options.contentType = 'application/json';
    options.payload = JSON.stringify(body);
  }

  const res = UrlFetchApp.fetch(url, options);
  const code = res.getResponseCode();
  const text = res.getContentText();

  let json;
  try {
    json = text ? JSON.parse(text) : undefined;
  } catch (e) {}

  return { code, text, json };
}

/**
 * Returns ACCPAY invoices (bills) from Xero.
 *
 * @param {{ ifModifiedSinceIso?: string }} [params]
 * @returns {Array<Object>}
 */
function listBills_(params = {}) {
  const where = encodeURIComponent('Type=="ACCPAY"');
  const url = `${XERO_API_BASE_}/Invoices?where=${where}`;

  const { code, text, json } = xeroJsonRequest_('get', url, null, {
    ifModifiedSinceIso: params.ifModifiedSinceIso,
  });

  if (code !== 200) throw new Error(`Failed to list bills. ${code} — ${text}`);
  return /** @type {Array<Object>} */ (json?.Invoices || []);
}

/**
 * Upserts bills into a sheet using InvoiceID as the key.
 *
 * @param {SpreadsheetApp.Sheet} sheet
 * @param {Array<Object>} bills
 * @returns {void}
 */
function upsertBillsToSheet_(sheet, bills) {
  const headers = [
    'InvoiceID',
    'InvoiceNumber',
    'ContactName',
    'Status',
    'Date',
    'DueDate',
    'CurrencyCode',
    'Total',
    'AmountDue',
    'UpdatedDateUTC',
  ];

  const current = sheet.getDataRange().getValues();
  if (!current.length || current[0].join() !== headers.join()) {
    sheet.clear();
    sheet.getRange(1, 1, 1, headers.length).setValues([headers]);
  }

  const data = sheet.getDataRange().getValues();
  /** @type {Map<string, number>} */
  const rowById = new Map();

  for (let r = 2; r <= data.length; r++) {
    const id = String(data[r - 1][0] || '');
    if (id) rowById.set(id, r);
  }

  const rowsToAppend = [];

  bills.forEach(b => {
    const row = [
      b.InvoiceID || '',
      b.InvoiceNumber || '',
      b.Contact?.Name || '',
      b.Status || '',
      b.Date || '',
      b.DueDate || '',
      b.CurrencyCode || '',
      b.Total ?? '',
      b.AmountDue ?? '',
      b.UpdatedDateUTC || '',
    ];

    const invoiceId = String(b.InvoiceID || '');
    const existingRow = rowById.get(invoiceId);

    if (existingRow) {
      sheet.getRange(existingRow, 1, 1, headers.length).setValues([row]);
    } else {
      rowsToAppend.push(row);
    }
  });

  if (rowsToAppend.length) {
    sheet.getRange(sheet.getLastRow() + 1, 1, rowsToAppend.length, headers.length).setValues(rowsToAppend);
  }
}

/**
 * Main sync: pulls bills changed since last sync and writes them into Google Sheets.
 *
 * @returns {void}
 */
function syncXeroBillsToSheet() {
  const ss = SpreadsheetApp.getActiveSpreadsheet();
  const sheet = ss.getSheetByName(XERO_BILLS_SHEET_) || ss.insertSheet(XERO_BILLS_SHEET_);

  const props = PropertiesService.getScriptProperties();
  const lastSyncIso = props.getProperty(XERO_PROPS_.lastSyncIso) || '';

  const bills = listBills_({ ifModifiedSinceIso: lastSyncIso || undefined });
  upsertBillsToSheet_(sheet, bills);

  props.setProperty(XERO_PROPS_.lastSyncIso, new Date().toISOString());
}

/**
 * Creates an hourly time-driven trigger for syncXeroBillsToSheet().
 *
 * @returns {void}
 */
function installXeroBillsTrigger_() {
  ScriptApp.newTrigger('syncXeroBillsToSheet')
    .timeBased()
    .everyHours(1)
    .create();
}

A clean first run is: save credentials → run logXeroAuthorizationUrl_() and approve → run syncXeroBillsToSheet() once → run installXeroBillsTrigger_() to automate the sync.


You can now install a simple time-driven trigger on syncXeroBillsToSheet() to keep your spreadsheet up to date automatically. From here, it’s easy to adapt the same structure to pull other Xero data: switch from bills (ACCPAY) to sales invoices (ACCREC), filter only paid documents, or add extra columns depending on what you want to analyse.

Google Apps Script in VS Code with clasp: Local Dev, Git, and CI/CD the Right Way

If you work on Google Workspace automation, sooner or later the online editor slows you down.

clasp (Command Line Apps Script Projects) lets you develop Apps Script locally, use VS Code, commit to Git, automate deployments, and generally work like a modern JS team. This guide covers installation, daily commands, project structure, TypeScript, logs, deploys, and real-world troubleshooting (including Windows/PowerShell quirks) so you can ship faster and safer.

What is clasp (and why use it)?

clasp is Google’s official CLI for Apps Script. It syncs code between your local folder and your Script project, manages versions/deployments, and unlocks editor-quality DX in VS Code (intellisense, linting, formatting, test runners, etc.). Core benefits:

  • Local dev + Git: edit with your toolchain, review PRs, branch safely.
  • Faster iteration: push/pull instead of copy/paste.
  • Typed workflows: use TypeScript + @types/google-apps-script.
  • Automations: wire into CI to version & deploy.

Prerequisites

  • Node.js (current LTS recommended) and npm.
  • Enable “Apps Script API” for your account at Apps Script > Settings > Enable Apps Script API (one-time).

    Install & authenticate

    npm install -g @google/clasp
    clasp -v
    clasp login

    clasp login opens a browser to authorize your Google account and stores a credential file named .clasprc.json (password-like; don’t commit it). On some commands you may also see a project-local .clasprc.json—more on this in Troubleshooting.

    Create or clone a project

    Create a brand new script in the current folder:

    mkdir my-script && cd my-script
    clasp create --type standalone --title "My Script"

    This writes two important files locally:

    • .clasp.json – project settings (scriptId, rootDir, etc.)
    • appsscript.json – the Apps Script manifest (scopes, time zone, etc.)
      You can also clone an existing project if you have the scriptId:
    clasp clone <SCRIPT_ID>

    Daily workflow (push/pull/run/logs/open)

    # Pull remote changes (online editor → local)
    clasp pull
    
    # Push local changes (local → Apps Script)
    clasp push
    
    # Run a server-side function
    clasp run myFunction
    
    # Tail logs (Cloud Logging)
    clasp logs --watch
    
    # Open the project in the web editor
    clasp open

    Tips:

    • Use clasp push --watch during rapid editing.
    • If clasp run complains about auth, see the Local vs Global .clasprc note below.

    Smart project structure with rootDir

    Want clean source in src/ and compiled output in build/? Configure rootDir in .clasp.json:

    {
      "scriptId": "YOUR_SCRIPT_ID",
      "rootDir": "build",
      "fileExtension": "ts"
    }

    clasp will sync the rootDir to Apps Script, your source can live elsewhere and be built into build/. There’s also filePushOrder when you must guarantee upload order (rare, but handy).

    Ignore junk with .claspignore (similar to .gitignore):

    node_modules/
    .git/
    .vscode/
    **/*.test.ts

    TypeScript + typings (recommended)

    1. Add dev deps:
    npm init -y
    npm i -D typescript @types/google-apps-script
    npx tsc --init

    Set outDir to build and target ES2019+ in tsconfig.json.

    2. Point .clasp.json"rootDir": "build", "fileExtension": "ts" (above).
    3. Now write .ts in src/, compile to build/, then clasp push. The @types/google-apps-script package gives VS Code autocompletion for Services like SpreadsheetApp, DriveApp, etc

    Managing versions & deployments (Web App, Libraries, Add-ons)

    Version the current code:

    clasp version "Initial release"

    List versions:

    clasp versions

    Deploy (Web App / Add-on / Library slot):

    clasp deploy --description "v1.0.0"
    clasp deployments

    Update an existing deployment:

    clasp deploy --deploymentId --description "Bugfix"

    clasp deploy creates a version and a deployment in one step—ideal for Web Apps where you need a stable URL tied to a version. You can manage multiple deployments (e.g., dev vs prod).

    Note: Web Apps also require you to set Execute as / Who has access in the online editor’s Deploy → Manage deployments once. After that you can update via CLI.

    Working in VS Code (snappy checklist)

    • Install ESLint + Prettier to keep Apps Script code consistent.
    • Use “JavaScript and TypeScript Nightly” for latest TS features.
    • Add @types/google-apps-script for smart autocompletion.
    • Optional: a minimal GAS snippets extension can speed boilerplate.

    Useful commands you’ll actually use

    clasp list # list your scripts
    clasp status # see local vs remote diffs
    clasp apis enable sheets # enable Advanced Service / API in the project
    clasp open --webapp # jump straight to Web App deploy screen
    clasp help # docs for any command

    (Availability of some subcommands can change; always check clasp help and the README.)

    CI/CD with GitHub Actions (or Jenkins)

    You can deploy from CI by injecting CLASPRC_JSON (the contents of your .clasprc.json after clasp login) as a secret:

    .github/workflows/deploy.yml

    name: Deploy GAS
    on: [push]
    jobs:
    deploy:
    runs-on: ubuntu-latest
    steps:
    - uses: actions/checkout@v4
    - uses: actions/setup-node@v4
    with: { node-version: '20' }
    - run: npm i -g @google/clasp
    - name: Restore clasp credentials
    run: |
    echo "${{ secrets.CLASPRC_JSON }}" > ~/.clasprc.json
    # Optional: project-local credentials (for commands that need it)
    cp ~/.clasprc.json ./.clasprc.json || true
    - run: clasp push --force
    - run: clasp deploy --description "CI deploy $GITHUB_SHA"

    This pattern mirrors community guidance for headless deploys. It relies on user OAuth tokens (service-account login isn’t officially supported by clasp today). Rotate tokens/secrets carefully.

    Subtle but important things most guides miss

    1) Local vs Global .clasprc.json
    Some commands (notably clasp run) historically looked for a project-local .clasprc.json. If you see “Could not read API credentials” even though you ran clasp login, try placing the same file both in ~/.clasprc.json and your project folder. This quirk appears mostly on Windows.

    2) .clasp.json + rootDir behaviors
    The rootDir controls which local directory is synced. If your files don’t upload, double-check the path and where .clasp.json lives—there have been behavior changes across versions; keep it simple: put .clasp.json in your project root and use a plain relative rootDir.

    3) Don’t commit secrets
    Never commit .clasprc.json. Treat it like a password. In CI, store its contents as a secret (base64 if you prefer), then reconstruct it in the build step.

    4) Logs aren’t Stackdriver anymore
    clasp logs streams Cloud Logging for the project; it’s the fastest way to see console.log output from deployed code. Use --watch during debugging.

    5) Advanced Services vs. Google APIs
    Enabling an “Advanced Service” (e.g., Drive) within appsscript.json is distinct from enabling the underlying Google API. You can use clasp apis enable <name> to help, but you may still need to confirm in the console the first time.

    Troubleshooting (copy/paste savers)

    “Unexpected token … is not valid JSON” on login
    Your .clasprc.json is corrupt (often due to accidental binary/encoding writes or half-written file). Fix: delete both local and home copies, then clasp login again. Ensure your shell didn’t write non-text bytes into the file (common when redirecting Windows commands). (General JSON error context; root cause is a malformed cred file.)

    “Could not read API credentials / are you logged in globally?”
    Create both: ~/.clasprc.json and ./.clasprc.json (project root) by copying the home one locally. Then retry clasp run / clasp versions.

    Clone says .clasp.json already exists
    clasp clone wants a clean directory. Create a new empty folder, cd into it, then run clasp clone <SCRIPT_ID>.

    Push/pull not picking your compiled files
    Confirm rootDir in .clasp.json points to your build output (not src/). Re-build, then clasp push.

    Example: minimal TS setup you can reuse

    my-app/
    ├─ src/
    │ └─ main.ts
    ├─ build/ # compiled output (synced by clasp)
    ├─ .clasp.json # { "scriptId": "…", "rootDir": "build", "fileExtension": "ts" }
    ├─ .claspignore
    ├─ appsscript.json # manifest (committed)
    ├─ package.json
    ├─ tsconfig.json

    scripts in package.json:

    {
      "scripts": {
        "build": "tsc",
        "push": "npm run build && clasp push",
        "watch": "tsc -w",
        "deploy": "npm run build && clasp deploy --description \"release\""
      },
      "devDependencies": {
        "@types/google-apps-script": "^1.0.86",
        "typescript": "^5.0.0"
      }
    }

    This gives you a single npm run push that compiles and syncs in one go. (Versions differ—adjust semvers.)

    VS Code productivity add-ons (optional but nice)

    • ESLint with eslint-config-google for consistent style.
    • Jest for pure functions (keep Apps Script globals mocked).
    • EditorConfig for team consistency.
      (Use sparingly to keep your repo lean—your readers love vanilla setups.) (General ecosystem advice; no citation required.)

    If the Apps Script online editor is your bike, clasp + VS Code is your electric bike: same destination, much faster and safer.

    With a local workflow, Git history, TypeScript typings, and one-command deploys, you’ll spend less time copy-pasting and more time shipping reliable Google Workspace automations. The subtle bits, rootDir, .clasprc.json placement, and deployment versions, are where most teams stumble; now you’ve got them covered.

    If you found this guide useful, bookmark it, then try converting one existing script to the clasp workflow. You’ll feel the speedup on day one.

    From Google Docs Placeholders to Spreadsheet Automation

    In othe previous article, we learned how to replace placeholders like [name] or [date] inside a Google Doc using Apps Script. We also made sure to keep the original file intact by creating a copy before applying replacements.

    That’s great for a single document… but what if you need to create dozens of personalized files? Contracts, certificates, letters, all with different values?

    The answer: connect your Google Doc template to a Google Sheet.
    Each row of your sheet will represent a new document, and the script will:

    1. Create a copy of the template
    2. Replace all placeholders with values from the sheet
    3. Paste the link of the generated file back into the spreadsheet

    Step 1 – Prepare your Spreadsheet

    Create a sheet with the following structure (headers in the first row):

    Notice the last column generatedLink, that’s where the script will paste the URL of each generated document.

    Step 2 – Prepare your Google Doc Template

    In your template, write placeholders between brackets:

    Step 3 – The Script

    This time the script will be bounded to our Google Sheets.

    Open the Apps Script editor from your Spreadsheet (Extensions → Apps Script) and paste:

    /**
     * Generate documents from a template Doc,
     * replacing placeholders with data from the sheet,
     * and storing links back in the sheet.
     */
    function generateDocsFromSheet() {
      // IDs
      const TEMPLATE_ID = 'YOUR_TEMPLATE_DOC_ID_HERE';
      const FOLDER_ID = 'YOUR_TARGET_FOLDER_ID_HERE';
    
      const ss = SpreadsheetApp.getActiveSpreadsheet();
      const sheet = ss.getActiveSheet();
      const data = sheet.getDataRange().getValues();
      const headers = data[0];
    
      // Loop through each row (skip headers)
      for (let i = 1; i < data.length; i++) {
        const row = data[i];
    
        // Skip if doc already generated
        if (row[headers.indexOf('generatedLink')]) continue;
    
        // Build replacements
        const replacements = {};
        headers.forEach((h, idx) => {
          if (h !== 'generatedLink') {
            replacements[`\\[.*${h}.*\\]`] = row[idx];
          }
        });
    
        // Make copy of template
        const templateFile = DriveApp.getFileById(TEMPLATE_ID);
        const copyFile = templateFile.makeCopy(
          `Generated_${row[0]}_${new Date().toISOString().slice(0,10)}`,
          DriveApp.getFolderById(FOLDER_ID)
        );
    
        // Open and replace placeholders
        const doc = DocumentApp.openById(copyFile.getId());
        const body = doc.getBody();
        for (let tag in replacements) {
          body.replaceText(tag, replacements[tag]);
        }
        doc.saveAndClose();
    
        // Save link back into sheet
        sheet.getRange(i+1, headers.indexOf('generatedLink')+1)
          .setValue(copyFile.getUrl());
      }
    }

    Step 4 – Run the Script

    1. Replace YOUR_TEMPLATE_DOC_ID_HERE with your template’s Doc ID
    2. Replace YOUR_TARGET_FOLDER_ID_HERE with the ID of the folder where generated docs should be stored
    3. Run the script → authorize it → watch your documents appear!

    Each row in your sheet now produces a new Google Doc, and the link is written back automatically:

    Wrap Up

    With just a few lines of code, you’ve upgraded your document automation:

    • One Google Doc becomes a reusable template
    • One Google Sheet becomes a data source
    • Each row produces a personalized document with its link logged back

    This setup is basically a DIY mail-merge for Docs

    In the next article, we’ll explore how to send those generated documents automatically by email, turning your workflow into a fully automated system.

    Replace Tags in a Google Docs with Apps Script

    Ever needed to prepare a contract, a template, or a letter where you just replace placeholders like [Client Name] or [Date] with real values?
    Instead of manually editing each tag, we can automate the process with Google Apps Script.

    This article shows you how to:

    • Add placeholders in your document
    • Replace them with real values in one click
    • Keep your templates clean and reusable

    Why use placeholders?

    Placeholders are short markers inside your document that can later be replaced with actual content.
    For example:

    With Apps Script, you can easily replace [name] with “Lidia”, or any other dynamic value from a sheet, a form, or an API.

    Step 1 – Prepare your Google Docs

    Open a new Google Docs file, or write docs.new in your search bar, and write some sample content with tags between square brackets [ ].

    Step 2 – Open the Script Editor

    1. In your Google Doc, go to Extensions → Apps Script

    2. Delete the default code and paste the following function:

    function replaceAllPlaceholders() {
      const body = DocumentApp.getActiveDocument()
        .getActiveTab()
        .asDocumentTab()
        .getBody();
        
      const replacements = {
        '\\[.*name.*\\]': 'Lidia',
        '\\[.*date.*\\]': '16 Sept 2025',
        '\\[.*company.*\\]': 'Apps Script Lab'
      };
      
      for (let tag in replacements) {
        body.replaceText(tag, replacements[tag]);
      }
    }

    You can adapt the placeholders to match whatever data you need to inject.
    Each occurrence of the placeholder will be swapped automatically using the replaceText() method.

    Keep in mind: the function expects a regular expression as the search patter

    Let’s make our template reusable

    In this first example, we simply replaced the placeholders directly in the document.
    But if you need to generate multiple documents while keeping your original file intact, it’s better to create a copy of the template and run the replacements in the copy.

    /**
     * Creates a copy of the active Google Doc,
     * replaces placeholders in the copy,
     * and returns the URL of the generated document.
     */
    function generateDocFromTemplate() {
      // Define placeholder values
      const replacements = {
        '\\[.*name.*\\]': 'Lidia',
        '\\[.*date.*\\]': '16 Sept 2025',
        '\\[.*company.*\\]': 'Apps Script Lab'
      };
    
      // Get the template (active document)
      const templateDoc = DocumentApp.getActiveDocument();
      const templateFile = DriveApp.getFileById(templateDoc.getId());
    
      // Create a copy next to the original
      const copyFile = templateFile.makeCopy(
        templateFile.getName() + ' - Generated ' + new Date().toISOString().slice(0, 10),
        templateFile.getParents().next() // same folder
      );
    
      // Open the copy for editing
      const copyDoc = DocumentApp.openById(copyFile.getId());
      const body = copyDoc.getBody();
    
      // Replace all placeholders
      for (let tag in replacements) {
        body.replaceText(tag, replacements[tag]);
      }
    
      // Save & close
      copyDoc.saveAndClose();
    
      // Return the URL (for logs or UI)
      Logger.log('Generated doc: ' + copyFile.getUrl());
      return copyFile.getUrl();
    }

    The script will create a new document based on your template.
    Your original file remains untouched, and the placeholders are replaced only in the generated copy.

    Much cleaner than editing manually, and your template is always safe for the next run.

    Next Steps

    In this tutorial, we learned how to:

    • Use placeholders in a Google Doc
    • Replace them automatically with Apps Script
    • Keep our original template safe by generating copies

    The natural next step is to connect this process with Google Sheets.
    That way, you can store your tags and values in a spreadsheet (e.g. [name], [date], [company]), run the script for each row, and automatically log the links to the generated documents back into the sheet.

    This turns your simple template into a full document generation system

    Create dynamic charts from Pivot Tables with Google Apps Script

    In many reporting workflows, it’s helpful to send reports straight from a spreadsheet, complete with a chart inside the email. Imagine you’re running a surf shop with branches in different cities. Every week, the managers are waiting for their sales report: you filter the data for Sydney, copy the chart, paste it into an email, then repeat the same steps for Byron Bay and the Gold Coast. Before long, it feels like you’re stuck doing the same routine again and again.

    Instead of preparing these reports by hand, the whole process can be automated. With a little help from Google Apps Script, the spreadsheet can filter the data for each city, update the chart, and send the report by email automatically.

    In this tutorial, we will see how to:

    1. Extract a list of unique cities from the sales data.
    2. Apply a pivot filter dynamically for each city.
    3. Capture the chart as an image.
    4. Send a nicely formatted email with the chart embedded directly in the body.

    We’ll go through the script function by function.

    Here’s the Google Sheet we’ll be using in this tutorial, containing a simple dataset along with a pivot table and a chart.

    1. Main function – looping through cities

    Our entry point is the sendWeeklyReports() function.

    function sendWeeklyReports() {
      // Getting sheet and data
      const ss = SpreadsheetApp.getActiveSpreadsheet();
      const salesSheet = ss.getSheetByName("Sales");
      const salesData = salesSheet.getDataRange().getValues();
      const headers = salesData.shift();
    
      // Extract cities
      const cities = salesData.map(x => x[headers.indexOf("City")]);
    
      // Get unique list of cities
      const unqiueCities = new Set(cities);
    
      // Get pivot table
      const pivotTable = salesSheet.getPivotTables()[0];
    
      // Get chart
      const chart = salesSheet.getCharts()[0];
    
      unqiueCities.forEach(city => {
        applyPivotFilter(city, pivotTable);
        const chartBlob = getPivotChartAsImage(chart, city);
        sendEmailReport(city, chartBlob);
      });
    }

    Explanation:

    • We grab the entire dataset from the Sales sheet.
    • From the data, we extract all values in the City column and convert them into a Set → this gives us a unique list of cities. This way, if a new city is added in the future (e.g. Melbourne), it’s automatically included.
    • We grab the pivot table and chart already created in the sheet.
    • Finally, we loop through each city, apply a filter, generate the chart image, and send the email.

    This main function orchestrates the entire workflow.

    2. Filtering the Pivot Table

    We need to update the pivot table filter so that it only shows results for one city at a time.

    function applyPivotFilter(city, pivotTable) {
      // Remove existing filter
      pivotTable.getFilters().forEach(f => f.remove());
    
      // Create a criteria for the city
      const criteria = SpreadsheetApp.newFilterCriteria().whenTextContains(city);
      pivotTable.addFilter(2, criteria);
    
      SpreadsheetApp.flush();
    }

    Explanation:

    • First, we clear existing filters. This ensures we don’t stack multiple filters and accidentally hide everything.
    • Then, we create a new filter criteria for the city.
    • The addFilter(2, criteria) call means “apply this filter on column index 2” (update this index if your “City” column is different).
    • Finally, we call SpreadsheetApp.flush() to force Sheets to update the pivot table immediately before we grab the chart.

    This function makes the pivot behave as if you clicked the filter dropdown manually and selected just one city.

    3. Exporting the Chart as an Image

    Once the pivot table is filtered, the chart updates automatically.
    We can then capture it as an image Blob.

    function getPivotChartAsImage(chart, city) {
      return chart.getAs("image/png").setName(`Sales_${city}.png`);
    }

    Explanation:

    • chart.getAs("image/png") converts the chart object into an image blob.
    • We rename the file with the city name, which is handy if you want to attach it or archive it.

    This blob can be sent in an email, saved to Drive, or inserted into a Slide deck.

    4. Sending the Email

    Finally, we embed the chart directly in an HTML email body.

    function sendEmailReport(city, chartBlob) {
      const recipient = "manager@example.com";
      const subject = `Weekly Surfboard Report – ${city}`;
    
      const htmlBody = `
        <div style="font-family:Arial, sans-serif; color:#333;">
          <h2 style="color:#1565c0;">Weekly Surfboard Report – ${city}</h2>
          <p>Hello,</p>
          <p>Please find below the weekly sales chart for <b>${city}</b>:</p>
          <img src="cid:chartImage">
          <p style="margin-top:20px;">Cheers,<br>Your Automation Bot 🤖</p>
        </div>
      `;
    
      GmailApp.sendEmail(recipient, subject, "See the HTML version", {
        htmlBody: htmlBody,
        inlineImages: {
          chartImage: chartBlob
        }
      });
    }

    Explanation:

    • The htmlBody contains a nicely styled email.
    • <img src="cid:chartImage"> is a placeholder that’s replaced by the inline chart image.
    • In the sendEmail call, we pass both the HTML body and inlineImages: { chartImage: chartBlob }.
    • Result → the chart is embedded in the email itself, not just attached.

    This makes the report feel polished and professional.

    In conclusion, this workflow shows how easy it is to turn a manual reporting routine into a smooth, automated process. By letting Apps Script filter the pivot table, capture the chart, and send it directly inside an email, you get consistent weekly updates without lifting a finger. It’s a small piece of automation that saves time, reduces errors, and keeps your reports looking professional.