I’ve been doing freelancing for 5+ years now. Every month, I’d add a new row in my follow-up spreadsheet, duplicate my invoice, and export it as PDF to send by email. Yes, manually.
In French we say: “les cordonniers sont toujours les plus mal chaussés”. (or “the cobbler’s children go barefoot” in English).
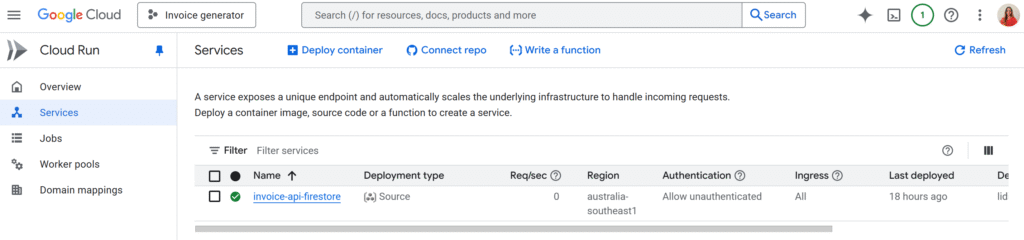
Well I’ve decided this has to stop, and I’ve been working on a custom SaaS to handle my invoices in a proper way! Backend runs on Cloud Run, the UI is a simple web app. And for the invoice document generation itself… I’m using Apps Script!
In this article, I’ll focus on the Apps Script project itself, and its deployment so that it can be called from another app or from Postman to start with.
The connection with the SaaS itself will be for another article!
Why use Apps Script as an API?
You get a lot for free!
- Google Docs is your template engine (layout, fonts, logo… all in the editor)
- Drive stores your invoices in the right folder
- Apps Script can run as you and use your Drive/Docs permissions
- You get an HTTP endpoint that your backend (or Postman) can
POSTJSON to
Also, my entire blog is about Apps Script, so…
So the main idea in our example is:
- Have a Docs template with placeholders like
{{ClientName}},{{TotalPrice}}. - Send a JSON payload to a Web App URL.
- Apps Script copies the template, replaces the tags, and returns the document URL.
No custom PDF rendering, no extra infra.
The Apps Script “Invoice API” code
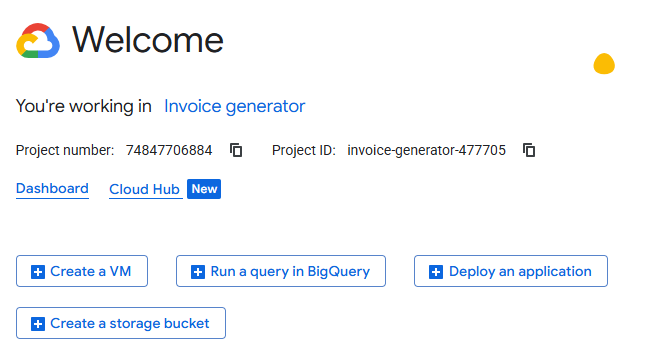
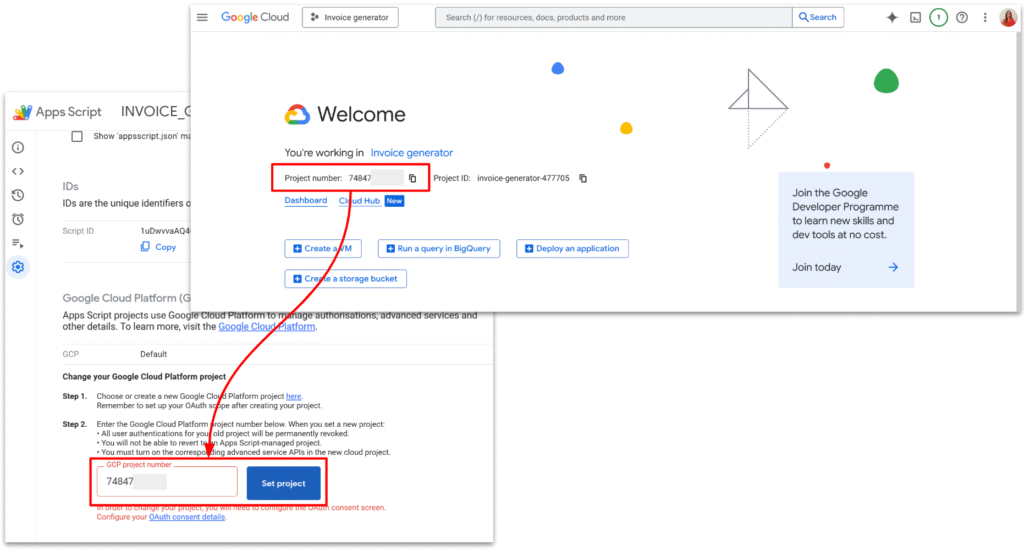
We will first create a new Apps Script project. By default, Apps Script links new project to GCP, but for the next steps, we will need to manually link our GCP project.
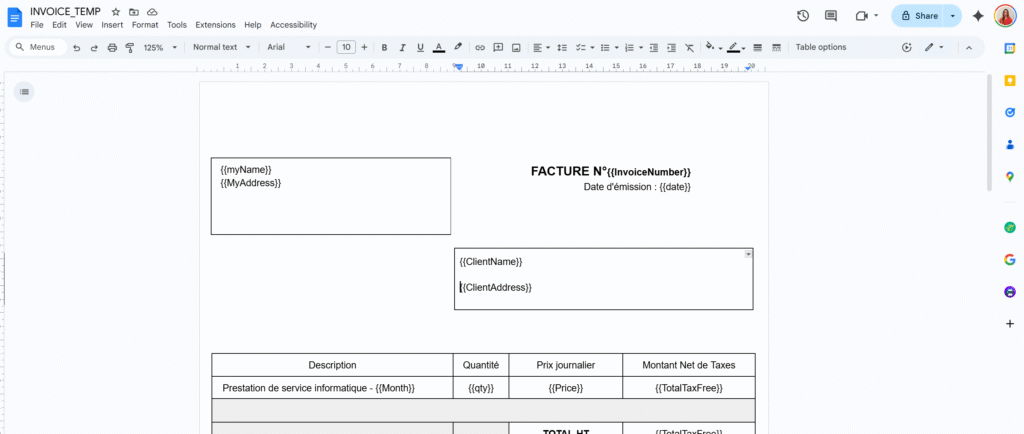
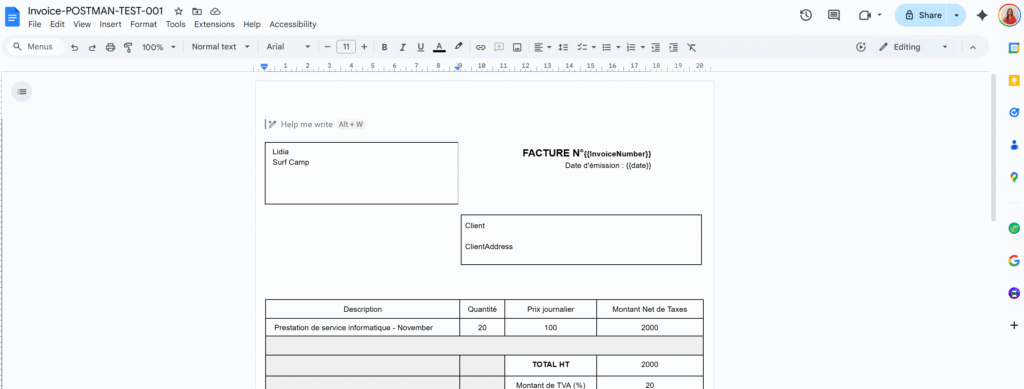
I also setup a very simple invoice template, with the tags I wanted.
Here is the full code.
/**
 * Web app entry point for POST requests.
 * Expects JSON payload with:
 * {
 *   "tempId": "TEMPLATE_DOC_ID" | "templateId",
 *   "folderId": "DRIVE_FOLDER_ID",
 *   "filename": "Invoice 001",
 *   "tags": {
 *     "InvoiceNumber": "Lidia",
 *     "date": "123 €",
 *     "ClientName":"",
 *   }
 * }
 *
 * @param {GoogleAppsScript.Events.DoPost} e - The POST event.
 * @returns {GoogleAppsScript.Content.TextOutput} JSON response.
 */
function doPost(e) {
  let output;

  try {
    if (!e || !e.postData || !e.postData.contents) {
      throw new Error("Missing POST body.");
    }
    const payload = JSON.parse(e.postData.contents);

    const result = createInvoiceFromTemplate_(payload);

    const response = {
      success: true,
      invoiceId: result.id,
      invoiceUrl: result.url,
      filename: result.name,
    };

    output = ContentService
      .createTextOutput(JSON.stringify(response))
      .setMimeType(ContentService.MimeType.JSON);
  } catch (err) {
    const errorResponse = {
      success: false,
      error: String(err && err.message ? err.message : err),
    };

    output = ContentService
      .createTextOutput(JSON.stringify(errorResponse))
      .setMimeType(ContentService.MimeType.JSON);
  }

  return output;
}

/**
 * @typedef {Object} InvoiceRequestPayload
 * @property {string} [tempId] - Template document ID (legacy name).
 * @property {string} [templateId] - Template document ID (preferred name).
 * @property {string} [folderId] - Drive folder ID where the new doc should be stored.
 * @property {string} filename - Name for the new document.
 * @property {Object.<string, string|number|boolean|null>} tags - Map of placeholders to values.
 */

/**
 * @typedef {Object} InvoiceCreationResult
 * @property {string} id - Created document ID.
 * @property {string} url - Created document URL.
 * @property {string} name - Created document name.
 */

/**
 * Creates an invoice document from a template and replaces placeholders.
 *
 * @param {InvoiceRequestPayload} payload - Data describing the invoice to create.
 * @returns {InvoiceCreationResult} Information about the created document.
 */
function createInvoiceFromTemplate_(payload) {
  if (!payload) {
    throw new Error("Payload is required.");
  }

  const templateId = payload.templateId || payload.tempId;
  if (!templateId) {
    throw new Error("templateId (or tempId) is required.");
  }

  if (!payload.filename) {
    throw new Error("filename is required.");
  }


  let templateFile;
  try {
    templateFile = DriveApp.getFileById(templateId)
  } catch (err) {
    throw new Error("Template file not found or inaccessible.");
  }

  /** @type {GoogleAppsScript.Drive.Folder} */
  let targetFolder;

  if (payload.folderId) {
    try {
      targetFolder = DriveApp.getFolderById(payload.folderId);
    } catch (err) {
      throw new Error("Target folder not found or inaccessible.");
    }
  } else {
    // Fallback: use the template's parent folder if possible, or root
    const parents = templateFile.getParents();
    targetFolder = parents.hasNext() ? parents.next() : DriveApp.getRootFolder();
  }

  const copy = templateFile.makeCopy(payload.filename, targetFolder);
  const newDocId = copy.getId();
  const newDocUrl = copy.getUrl();

  const tags = payload.tags || {};
  if (Object.keys(tags).length > 0) {
    replaceTagsInDocument_(newDocId, tags);
  }

  return {
    id: newDocId,
    url: newDocUrl,
    name: copy.getName(),
  };
}

/**
 * Replaces placeholders in a Google Docs document body.
 * Placeholders are expected in the form {{key}}.
 *
 * @param {string} docId - ID of the document to update.
 * @param {Object.<string, string|number|boolean|null>} tags - Map of placeholders to values.
 * @returns {void}
 */
function replaceTagsInDocument_(docId, tags) {
  const doc = DocumentApp.openById(docId);
  const body = doc.getBody();

  const entries = Object.entries(tags);

  for (const [key, rawValue] of entries) {
    const value = rawValue === null || rawValue === undefined ? "" : String(rawValue);
    const placeholder = "{{" + key + "}}";

    body.replaceText(escapeForRegex_(placeholder), value);

  }

  doc.saveAndClose();
}

/**
 * Escapes a string to be used safely inside a regular expression.
 *
 * @param {string} text - Raw text to escape.
 * @returns {string} Escaped text safe to use in a regex.
 */
function escapeForRegex_(text) {
  return text.replace(/[.*+?^${}()|[\]\\]/g, "\\$&");
}
Web App vs Execution API vs Library, in plain terms
There are three “flavours” of Apps Script that often get mixed up:
- Web App: you deploy
doGet/doPost, you get a/execURL.
Perfect for what we’re doing: lightweight HTTP API. - Execution API: URL on
script.googleapis.comlike.../scripts/ID:run.
Needs OAuth tokens, used to run script functions from other backends. Great, but heavier. - Library: reusable code for other Apps Script projects. Not an HTTP endpoint.
In this tutorial, the only one we need is the Web App deployment.
In the upcoming article, we will focus on how to setup OAuth tokens with the execution API.
Deploying as Web App
In the Apps Script editor:
Deploy → Manage deployments → New deployment- Type: Web app
- Execute as: Me
- Who has access: Anyone (or “Anyone with the link” while testing)
- Deploy and copy the Web app URL (ends in
/exec)
Open that URL once in your browser, go through the “unverified app” screen, and accept the scopes.
From now on:
- The script runs as you (so it can access your Docs and Drive)
- Your backend and Postman can call the
/execURL without any extra OAuth dance
Testing the API with Postman
In Postman:
- Method:
POST - URL: your
/execWeb App URL - Headers:
Content-Type: application/json - Body → raw → JSON:
{
  "templateId": "1H1bFyR3VPI8U5CO_EDqCOOx5k_p6CFGw0HcfwyQ0vvw",
  "folderId": "1R0Izx-_pA0HYurhb25pZ2Hqd8RWOlnUG",
  "filename": "Invoice-POSTMAN-TEST-001",
  "tags": {
    "myName": "Lidia",
    "MyAddress": "Surf Camp",
    "ClientName": "Client",
    "ClientAddress": "ClientAddress",
    "Month": "November",
    "amountExcl": "120.00",
    "qty": "20",
    "Price": "100",
    "TotalTaxFree": "2000",
    "TaxRate": "20",
    "TaxTotal": "200",
    "TotalPrice": "2400"
  }
}
Click Send.
If everything is set up correctly, you should get JSON like:
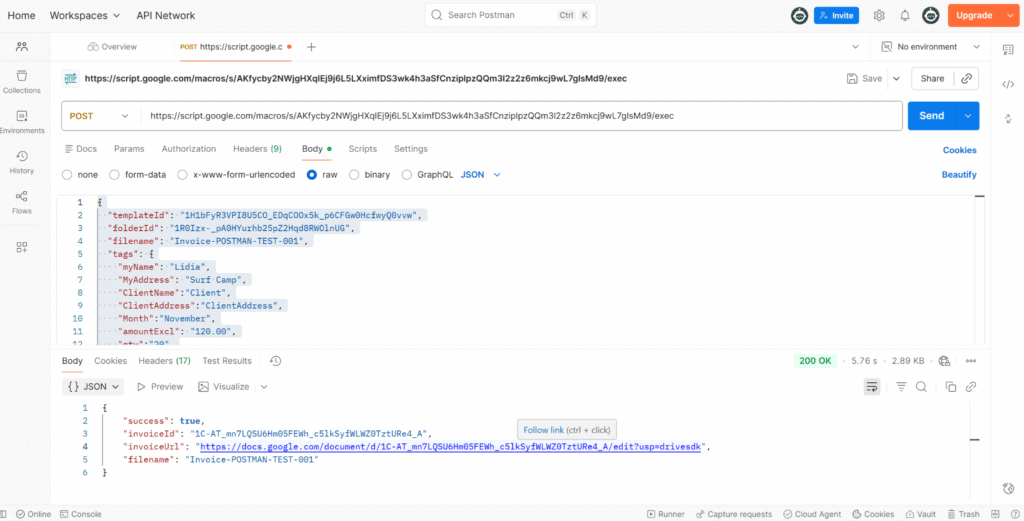
And the tags have been replaced!
The weird Drive “server error” and apps-macros@system.gserviceaccount.com
When I first tried calling DriveApp.getFileById(templateId), I had the following error:

And in the console of Apps Script:

The template existed. It opened fine in Drive.
The script was running as the same user.
But inside the Apps Script project (linked to a Cloud project), Drive access was just… failing.
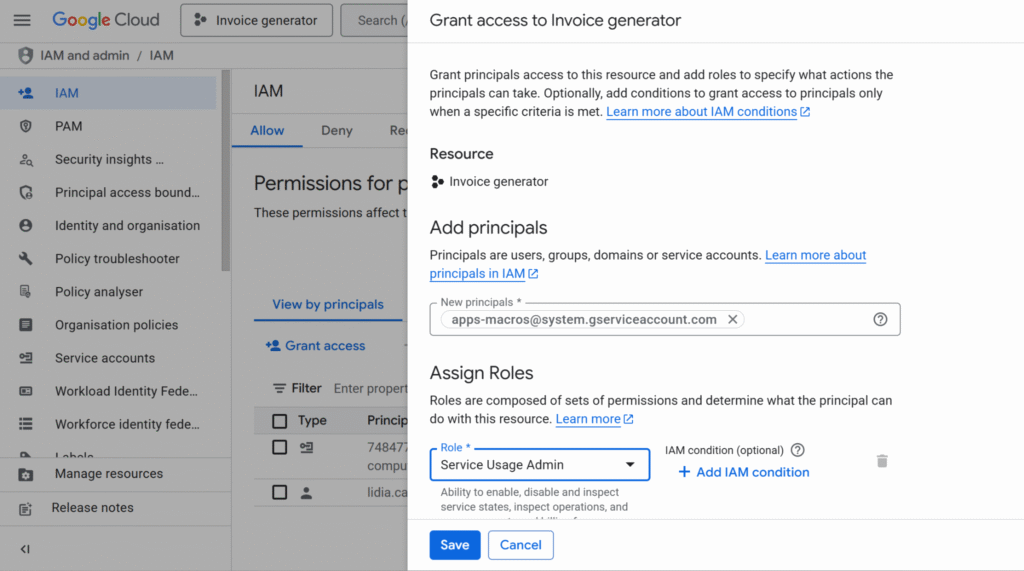
This error happens because Apps Script relies on a Google-managed system account behind the scenes, and that account doesn’t have the permissions it needs to run your script.
To fix it, you have to manually grant the right role to apps-macros@system.gserviceaccount.com.
You won’t see this address in the “Service Accounts” list, but it’s still a real identity in your project that you can add in IAM and assign roles to.
To fix it, I had to:
- Go to IAM & Admin → IAM in the Cloud Console.
- Click Grant access.
- Add a new principal:
apps-macros@system.gserviceaccount.com - Give it the role: Service Usage Admin.
- Save.
After that, API began returning normal JSON responses instead of that generic “server error”.
Wrapping up
Using Apps Script as an API is a nice combo when:
- You already live in Google Workspace
- You want invoices/letters/contracts as Docs, not PDFs generated from scratch
- You’re happy to let Google Drive handle storage and sharing
The flow looks like this:
- Frontend or backend creates invoice data.
- Backend calls the Apps Script Web App with JSON.
- Apps Script copies the template, replaces tags, and responds with the document URL.
- You store the URL in your database and show it in your UI.
And if you ever see that mysterious Drive “server error” in a linked project, check the logs and don’t be afraid to give apps-macros@system.gserviceaccount.com the role it’s asking for.
In the next article, we’ll look at how to connect an app to this API and how to integrate Apps Script into more complex, real-world workflows.